Showing posts with label R5's Dome Eyes. Show all posts

October 17, 2024

The Age of Plastic 3D - website R5-D4 history info etc.

 May 2nd 2023

https://sites.google.com/site/theageofplastic3d/all-about-r5-d4

OpenR2 - original ‘77: R5-D4 Blueprints - 3D drawn up (Part 2)

 May 29th 2023: this was going to be the next stage, not completed.

Sanding, primer and silver paint.

I drew up a location plug that would fit inside the rear of the eye and match the original hole locations in the dome.

Once the rear had been sanded to the curvature of the dome for a snug fit, I refitted the cabochon lens and the retaining ring.

June 25, 2024

May 21, 2023

OpenR2 - original ‘77: R5-D4 Blueprints - 3D drawn up

 Years ago, My father served along side you in the Clone Wars......

..... not quite, but you get the idea 😆


When I first started searching up online for info about R5, one of the finds was a Blueprint for the original dome design. I think I remember it being up for auction??

I had a blurred image, which has always interested me in what R5 could of looked like. The three eyes looked like they were holoprojector’s similar to the ones in R2’s dome.

May
With my recent work on upgrading R5’s eyes to versions that were probably actually used, got me searching for the blueprints again. OpenR2 had a non blurry image of them, so I was able to draw up in CAD a version similar to the sketch. A rough scale in comparison to the dome, so not 100%, but it looked good. First printed version was okay but I wanted to refine the design.

So some tinkering and removal of the inner part that would be the lens, and I got this:

The rear was shaped to better fit the curvature of the dome. This was to the plans I had used, but as my dome was made from wood, it’s not spot on, so the final prints will need to be shaped to fit flush.

This version was good but I wanted to orientate to get better quality prints. So I sectioned it up into two pieces which gave me to these.
This main piece I printed face down, the ring section I printed vertically to retain a better smoother surface for the ‘front’.

I set these up for printing in ABS, sanding is easier. I had already done some searching for cabochon’s for the size I needed. I could go bigger in size later by modifying the design if needed.

May 20th
Cabochons arrived. They only came in pairs so I had to get two sets. Opened up the first packet and tried them for size.


They fitted well, but they will need to be a tighter fit on the recess or a retention ring in front of the lens.

Next up: retention ring, dome fit testing and then painting.

April 03, 2023

Screen accurate R5 eyes - found part by OpenR2

Over on the R2 Discord chat, OpenR2 member raised the question about R5’s eye sensor not being like the ‘club spec standard’ design but actually being conical.
As with lots of items used in the original trilogy, unusual looking things from everyday items were used in different ways. OpenR2 showed a high resolution image of R5’s eye and the shape/shadows showed it to be conical and not the stepped look us club members have been using all these years. As stated above, a lot of the droid greeblies & even Boba Fett's costume and jet pack, in fact came off  vinyl record decks, specifically a Transcriptor Hydraulic Reference Turntable .
He posted up the high res pictures and the turntable, similar to the one below.

Items also (possibly) used that match is the vinyl sweep brush which resembles R5’s antenna.

I have always found the search for these found items to be of great interest, so this was something that I had to follow up on. Online searches revealed the record deck's history and more [see Transcriptor link above].

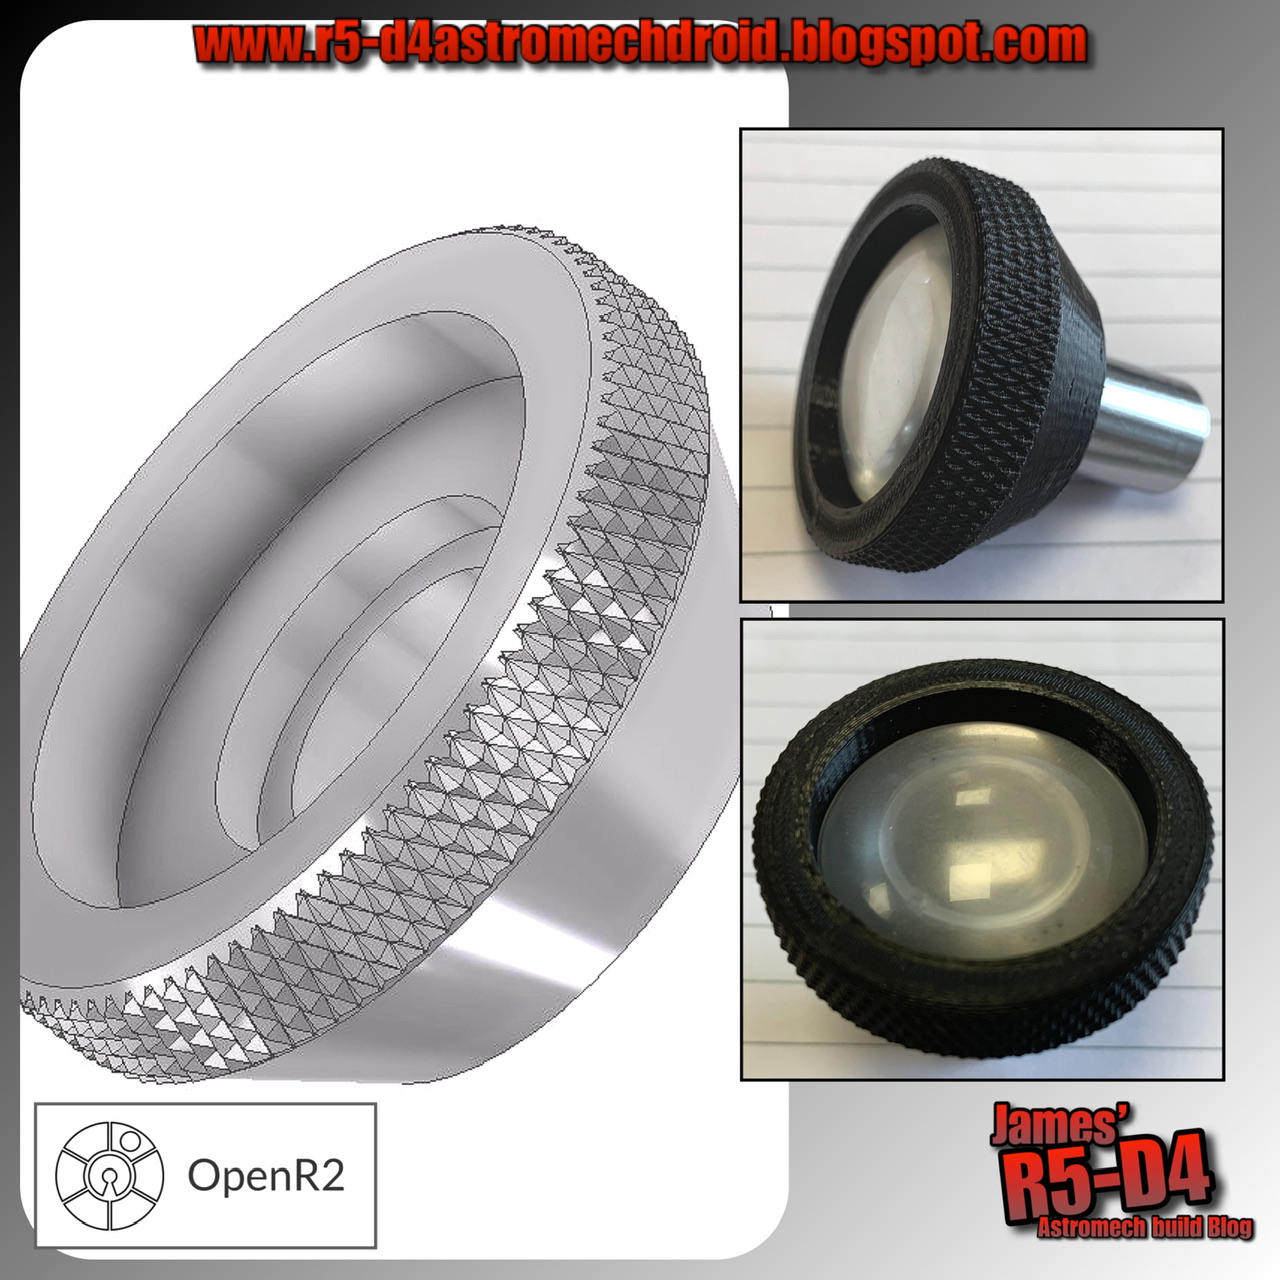
So using the 3D CAD model I had already drawn up years ago, I started on modifying a version to match that of the image supplied by OpenR2.


Creating a 3D Knurl:

I also had to find out how to draw up a knurled effect. Previous jobs have only required the superimposed image of a knurl, but I needed the actual knurl for 3D printing. I found a quick tutorial on YouTube which helped put me in the right direction as to which creative option to use, 'coil'. Once one groove was created, I then copied in 'circular' to multiply around the diameter. Next was to create a new 'work plane', and offset it half the distance of the knurled with. I then mirrored the original 'circular' grouping and this created the opposite grooves to create the knurled effect.

The above image was version (attempt) 'd' or 'e' lol.
Eventually settled on version 'F'


Throwback to 2013:
Wow…..10 years ago I had finished machining up two of the three eye pieces that would have the spy holes lens units fitted.

Here’s the link: R5-D4’s Eyes - update

Back 
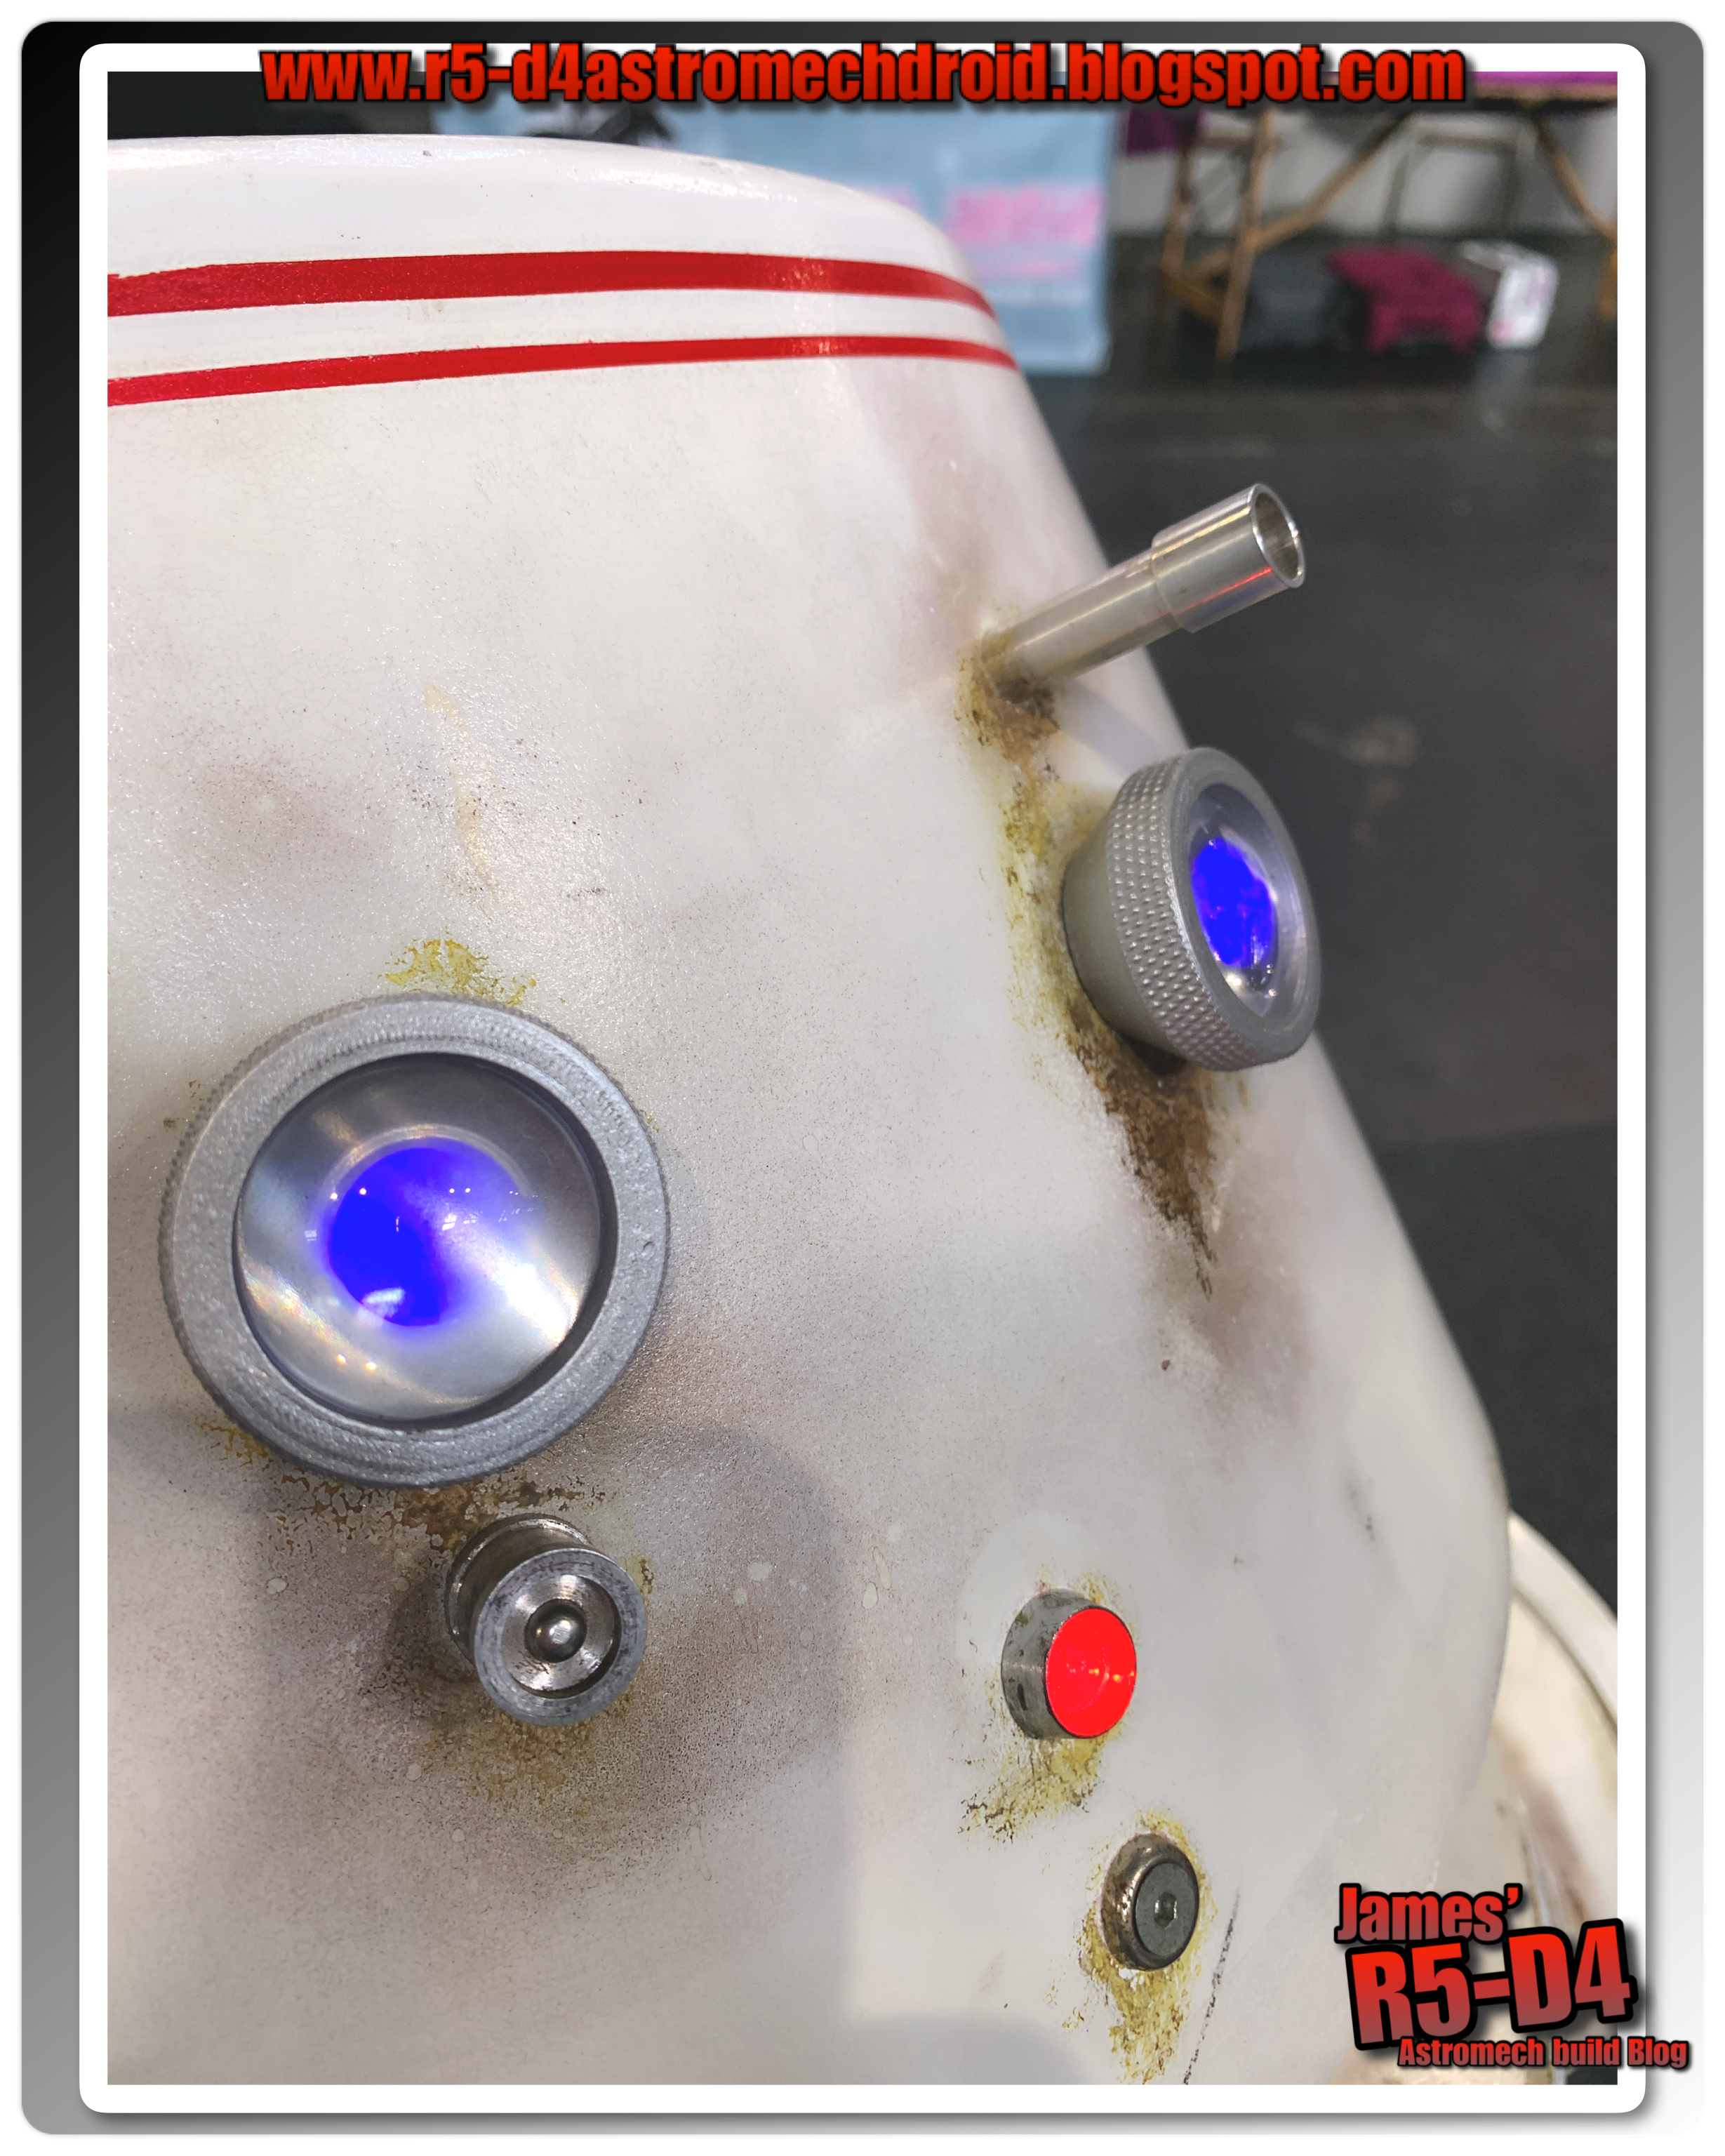
to 2023 and here are the new more realistic eye pieces.


And here they are being painted.


Next up was to cut out some opaque plastic that I had salvaged from a flat screen monitor. This was placed in the recess after the rear part of the original eye piece was fitted through from the front. Then I pushed in a cabochon into each one.

These were then re-fitted back into the dome, and secured in place. I then hot glued the original LED’s back behind them.


Really happy with the new look.
Check these out at #celebrationeurope2023 next week 😎👍🏽

June 03, 2015

Slip-ring system 1.1

Slip-ring work, I paired up the wires and soldered them onto a 9 pin plug. Not used all the pins though. I figured by doubling up the wires it could/would help with current flow [what do I know though lol]. Thankfully my soldering skills held out and all went well. Finished off with heat shrink sleeving. Only took a few hours, of twisting and soldering up lol.
R5-D4 Dome power

R5D4 dome power

Next was soldering some wire to the Dome socket. Electrical cable was used, as I've used on the rest of R5's electrical system. The plugs were chosen as can only be plugged in one way, so can be done 'blind' if needed from inside the Dome. Obviously I'll be adding labels to everything, to help with remembering what wire does what.

The fixing bracket was made from some scrap computer 
insides bracket, this was screwed to the inside frame.

And here's the slip ring installed in R5.
R5D4

February 17, 2015

Dome electrics - Slip Ring ordered

Ordered a slip ring for powering R5's dome components.

This I hope will allow me to power the motivator unit, smoke & pump and also light up R5's eyes, which at the moment are useing a 9.6v rechargeble battery fitted in his dome.

April 18, 2014

Weathering 1.2 - R5-D4's Head

This morning I started on weathering R5's head, by applying Burnt Umber around the neck, side recess, eyes, top pie panel grooves and around the base of the Antenna. This is just the start. One good thing I've noticed is that the woods imperfections help when wiping off the paint as it sinks into them giving a 'pitted' surface finish.
R5-D4R5-D4
These pics were taken right after paint was applied, so its still wet. But looked a lot better once dried. Should look even better once rubbed off a bit and ochre applied.

March 07, 2014

R5-D4's Head 4.7 - clear spray coat

Tuesday night, I stripped R5 of all his eye 'sensors', Dome rods & motivator brackets. This was in preperation for clear coat spraying.

I was planning on doing this Wednesday, but remembered i wasn't going to be in work. Then Thursday I needed to finish off some silver detial work & remove parts from R5's body, ready it also to be clear sprayed up.

So today's the day. I applied masking tape to the inside of the Domes holes and using works spray booth, got to clear coat the Dome.

Photos to follow.......

March 03, 2014

R5-D4's Eyes - LED holders

I machined up three LED 'plugs' for R5's eyes.

Material used was Polypropylene [plastic]. I measured up the hole and made the plugs as snug a fit as possible. I try to look ahead (lol no pun intended), and if I need to take his eyes off his head/dome again in the future, I want it to be a simple, painless process. The last set of LED's I hot glued the leads in place to the inside of his head, which ment trying to uninstall them a bit of a pain. With these plugs, The LED's will be hot glued into them and the 'plugs' push fitted into the rear of the Eyes, actually the rear 'spy-hole' locking ring. See pic for a clearer understanding lol.
R5-D4

R5-D4 Eyes

The brass ring spacer(s) helps to stop the rear of the spy-hole unit from being pulled through the wood dome skin.

More info on my home made (machined) Eyes click this link:
http://r5-d4astromechdroid.blogspot.co.uk/2013/05/r5-d4s-eyes-update.html

More on the brass ring spacers, click link:
http://r5-d4astromechdroid.blogspot.co.uk/2013/06/r5-d4s-eyes-spacers.html

February 12, 2014

Dome electrics......LED upgrade work

I wanted to run all the Dome LED's off the one 9.6v recharge battery to make life so much easier.

I dug out my LED's etc and I found my battery state indicator that I made at collage, 25 years ago. I've fitted it to every car I had, except the Zafira. Thought it might come in handy in R5 :-).
.....Now NOT to be fitted......

I was looking into how to drop the voltage from my 9.6v battery to be able to also run the other dome lights off it. The Eye lights [blue LED's] came out of novalty glasses, I think they run at about 3 volts, adding up the three mini button cell batteries. I had some great advice from fellow builders over on the UK R2 Builders Forum, but decided that I would just buy some suitable Blue LED's, as I know I would of blown them, and then would of needed to buy more lol.


5 x Blue LED Lamp Light Set 25cm Pre Wired 5mm 12V DC
I only need three for R5's Main 'Eyes', though am sure I'll find a use for the others....as long as I don't burn them out!! hahahaha.

Whilst I was looking around I also found this Digital Panel Volt Meter. I've seen tthis type of meter used recently on Prop made Pulse Rifle, similar to the amunition counter ('Aliens').

Anything to give me an idea of how much charge I have must be a good thing right??
DC 3-30V 0.36" 2 Wire LED Digital Panel Volt Meter Voltage Voltmeter Car Motor

10.02.14
Came home to find my Blue LED's and digital volt meter had arrived.
Blue LED's & Digital Volt Metre
11.02.14
So last night I set myself up ready for work. I stripped out R5's original blue light set up. They did a very good job for their one and only event lol, but wanted to utilise the 9.6v power unit.

R5-D4

Using a terminal block and spare cable from work, I then daisy chained (right terminolgy?) positive and negative's to the LED's and the digital volt meter, and placed the switch inline to cut all power.
R5-D4 electricsR5-D4 electrics

R5-D4 electricsR5-D4 electricsR5-D4 electrics


Also R5's red led was connected, not sure what to do bout the motivator LED, it can be disconnected when pie panel is needed and in place.......this is next to do & also to fix LED's and terminal block in place.
So two hours later I was very happy, and the fact the wife let me work on the dining room table ;)

November 22, 2013

R5's Dome lights & 'smouldering' Motivator

Last night I fitted the motivator, bolted it into place and then hot glued into a suitable position, its battery holder and switch. Bolted into place the Antenna. Then a test of all the lights.
I will be looking at re-wireing all these to run off the 9.6 volt battery pack installed. This will require someone to do some thinking for me regarding voltages etc lol. Will be easier and simplier. Fingers crossed for how long they all work for on Saturday! :D

November 21, 2013

R5-D4's Head 4.2 - Cone prep work & RED paint!

Yesterday morning I used a rather large plastic bag (used for rubbish bins] to place R5's Dome into. I then sealed off round the edge with masking tape. Next I applied some watered down PVA glue to all the exposed sanded wood that had paint removed from sanding the joining edge of the cone to the Dome sides.
Lunchtime, I took R5's Dome into the spray booth (work). And primered up the cone and inside the pie hole.
R5D4 pic of masked off dome for pin stripes
Then that evening, I got on with masking off the dome ready for spraying the red pin stripes around the two recessed side boxes, as R5 has in the film, the rear dome rod recessed box, doesnt have pin stripping. And also the lower of the two circumferance pin stripes to. The upper one will be applied after the dome's cone, has been sprayed up white. So, 1hr later, I'd marked off the edges with red pin stripes and then masking tape holding the plastic sheet.

R5D4, Red Astromech, DomeR5D4, Red Astromech, Dome

For all of two minutes in the spray booth in work lol.
R5D4, Red Astromech, Dome


Am quite pleased with how these have turned out. Using the pin stripe tape reduced the amount of paint bleed. I didn't think to use it on the inside edges of the two recessed areas and the masking tape has allowed the paint to bleed a bit. I'll try to clean this up, but once a bit of dirt is applied it will just add to the old/used look of R5 :-)

November 08, 2013

R5 Eye Lights pt2


Last night's work. Half hour wasted, wireing up the wrong (blown) set of LED's :'(

R5D4 Eye lights

R5D4 Eye lights

R5D4 Eye lights

Then un-soldering them, and then re-soldering the good LED's :-). There are three Blue LED's, one for each of the main Eyes. At the moment they are running off little 'button' cell batteries that came with the glasses, see prev post on Eye Lights. These will be upgraded along with the LED's at a later stage.

Couldn't find a switch in junk box :-( so had to make do with terminal block for now :-)
Then hot glued everything into position.

November 01, 2013

R5 Eye Lights

My Son had a novelty pair of blue LED light up glasses.
But the arm broke off so were then no good.
Then I had an idea..........insert mad scientist laugh :D

Tested the brightness of the LED's in R5's eye.
These images shows R5's eye with two LED's shining through from inside the eyepiece

Not to bad. I want them to be bright (for now) so they can actually be seen.

July 05, 2013

R5-D4's Head 3.4 - silver tape applied

I was originally planning on spraying the silver dome band. But thought I'd give the silver tape a second chance lol. My last go at using the tape on the leg spacer discs didn't end well.

I first wrapped the tape around and cut to length. Then applied, peeling the backing tape a bit at a time. I then trimmed the width and stuck the excess under the edge. I then used a cloth to smooth any bumps & creases out.
R5-D4

Then I fitted all the dome components back on.
R5-D4

R5-D4

R5-D4

All ready for tomorrows appearance at my children's school summer fair :)