Droid Builder

February 05, 2021


January 27, 2021
Lee Towersey - YouTube
So if you don’t know who Lee Towersey is, get on over to his YouTube channel and check out what’s involved in attending a Tier 2 event.

I’ve mentioned before that here in the UK our droids have to pass an MOT inspection process to be allowed to attend events representing the club and this then includes PLI in case of accidents. All droids that pass are classed as Tier 1, but, if you’re droid meets the requirements, you can apply for a Tier 2 status. This isn’t for everyone as T2 can be a daunting prospect, as this video shows, but to see your work on TV for example, has got to be worth it.
My R5 was cleared for Tier 2 from his induction into the club. I wasn’t aware of it till Colin informed me lol. So keep your eyes open as you never know, you may spot him ;-)
check out Lee’s YouTube channel (& also his website) for more.
#leetowersey #droidbuildersuk #astromech #youtube
January 25, 2021
Droid Builders UK - total amount raised for CALM [2020]

quote:
'We did it……
Wow, what an amazing achievement thanks to everyone's amazing help and dedication we managed to raise over.........'
Droid Builders UK website link
Check out the website for the total amount raised for the charity CALM.

Thanks to everyone!
January 02, 2021
Mini project: Toolbox Display banner carrying straps
Back to cutting & sewing.
As mentioned in previous post, I wanted something that could hold R5’s display banner to the toolbox for ease at events. I did a few sketches and settled on this simple design. I only have one display, but this can be extended to two, possibly three, depending upon the weight.
Dug out the strap webbing I had bought for the dome bag project. This was used for the handles. Took some measurements and started cutting up & stitching them together.
And here is the start of ...... ‘it’.....

Did some more planning and then added the second strap. Double stitch by hand for this test piece.


And this is the lower strap in place.

Next then was to fit the upper strap and mark the single snaps location. And here it is.

And here’s the finished banner holder fitted on the toolbox.

December 28, 2020
And another mini project begins for 2021
Not actually droid related, ie in building something. But something I’ve had the idea about for some time.
Going to events & having to transport your equipment can be a handful, so this will hopefully help.
There’s going to be two versions of this which I have started working on today.
As always, more updates coming......
December 22, 2020
Wishing you all a Happy Christmas 2020
Had a surprise Christmas card/gift the other day from fellow Bristol builder Mike B.

Always wanted one of these (below image) and over the years, I have attempted to create one.....but the results where something I wasn’t anywhere near happy with lol. Mike and his design, printing skills, came up with this tho.

Whatever your beliefs for the Christmas season, I’d like to wish all who are reading this, a very Happy Christmas from myself & of course R5.
Mental Health message:
2020 has not been a good year for all of us, in many different ways and then there’s COVID to top it all off. I like to think of myself as a ‘glass half full’ person and try to always look on the positive side of life. Perspective is always a good thing to keep in mind when things don’t look good, they can and do, get better! Find a little something that makes you smile and feel good, keep these little happy moments and add to them. I find (apart from family/my children) that being creative, designing, making stuff really helps me.
2021 is on its way so a new year, new start and hopefully we can all get back to what we used to call, normal!
If you need to seek more help, see your Dr, there’s NO shame in asking for help!
If you don’t feel you can’t in person, then try contacting CALM, the Charity Against Living Miserably.

December 21, 2020
R0-D4 Dome update 2020 (Part 2)
Thankfully I still have the original wood neck ring, so that I could match up the painted stripes.

There are four quarters which have thicker vertical bands. These had a stripe of masking tape and the pin strips to prevent paint bleed.

Next came the top and bottom bands, again using the pin stripe tape width, with an additional single thickness vertical line at each centre of the quarters. As can be seen in above picture.
Then the fun bit, spraying with the red metallic’ish paint.

Looking good. I left this for about 20mins before starting the messy bit, removing the pin stripe tape.


I had made sure to corner crease the edges of the over lapping tape, but this isn’t the best way, cutting the tape is. But I didn’t want to damage the paint and it’s not critical. Weathering will cover up and also chipped paint too.
Once all the tape was off, one final picture before being left to fully dry.

December 20, 2020
Droid Builders UK - Christmas Special show

Sam and Lee hosted the marathon show today, with special guests
- Sammy Stormtrooper
- Brian Herring
- Jake Lunt
- video interviews with builders
- tutorial
- ......and also the raffle to raise funds for the charity CALM. Plus loads of other stuff.
To re-watch the show, click the following link:
Droid Builders UK YouTube channel.
The aim was to raise £10,000 by the end of the year 2020. It’s not been a good year and for sum it has been so much harder to have to deal with. That’s where CALM comes in.
We are fundraising for the Campaign Against Living Miserably (CALM)
The Campaign Against Living Miserably (CALM) is leading a movement against suicide, the single biggest killer of men under the age of 45 in the UK.Anyone can hit crisis point. CALM run a free and confidential helpline and webchat 7 hours a day, 7 days a week for anyone who needs to talk about lifes problems.
For full details and also if you would like to donate to the charity, please click on the link, you can leave an anonymous donation if you like and every amount big or small is a step in saving a life.....
December 13, 2020
James’ R5-D4 YouTube channel 2020
Had this congratulations email today from YouTube for all my videos uploaded in 2020 lol......all 12 minutes of them :D . Not exactly ground breaking mind you, and a few million off any YouTube awards lol, but I appreciate everyone who has watched etc and I hope they have been entertaining or educational.
See screenshots below.... then head on over to my channel to contribute to the ‘ups’ & likes and shares, thanks everyone.


My YouTube channel link below:
December 03, 2020
A Life-form scanner for R5-D4 - Part 1


November 30, 2020
Droid Builders UK - ‘Lockdown Christmas Show'
The Droid Builders
Lock-down Christmas Show.....

Original date was for Saturday December 6th.....
but has now been changed to......
Sunday 20th December
12 noon [UK time] till 5pm
November 02, 2020
‘Trading Card Dispenser’ utility arm inside panel 1.0
Since installing the bracket that holds the TCD, ‘Trading Card Dispenser’, the idea of making/replacing the rear metal screen with something more fitting has been something I’ve been working on.
I upgraded the original piece to have a curved front and increased the thickness to act as a stop for the utility arm when it’s closed. I need to recess some details a bit more on one side.

Next up was the sides and top. I drew up these in autocad inventor, longer than needed, and 3D printed one side off. Took this piece home and got to measuring and trimming it to fit around the utility arms pivot point bracket. See above picture.
As my droid is custom built, using the plans is only a guide lol.
After designing up a full screen, to save printing time I only printed the new part, seen in red, as it was a Friday afternoon and wanted to take it home to work on over the weekend.

The above picture shows the two pieces, which will eventually be printed/printable as one. I need to ad more rear fixing points as R5’s frame is wood.
The recesses in the red part are for future greeblies to be fitted. But rather than them being curved, I’ll make them flat so that the inserts can be printed in a flat orientation for better print results.
There is also a need for a hole to allow the servo arm to pass through to activate the utility arm. But one step at a time lol. I will of course upload this to my Thingiverse page.
October 26, 2020
Sounds for Droid 2020 - 1.8 installation
Made up a new bracket for holding one speaker, out of some MDF wood. The prev one was perspex and was attached to the old sound board.

I may mount the second speakers in a rear position.
Continuing on with organising the wires, the slip ring underside wires are always annoyed me as they are stiffer due to less strands. This makes it awkward reaching inside as they get in the way. So I decided to cut them short and connect new, more flexible cable. This will also be yellow to match up with identification of the voltages, yellow being 12v positive.

Next up was to install the sound board. I changed my mind about which side to mount it on. Decided that it would be better over on the right hand side. I needed a spacer block, so cut a small piece of wood, marked the boards fixing hole position on it, then drilled clearance holes and screwed the spacer block to the frame.

Next up was to then mount the sound board to the spacer block.

I de-soldered the red power cable on the sound board and replaced it with a yellow one. I had some yellow heat shrink to cover the red wire for the Trading Card Dispenser electronics box.
Next up then is to connect the speaker, route the servo lead which operates the relay switch and test out the amp/speaker. Also need to look at where best to fit the volume control knob.
October 16, 2020
Logo Update.....
Decided to create a new logo, not just for the Blog, but one that incorporated me....my name lol. :D

October 15, 2020
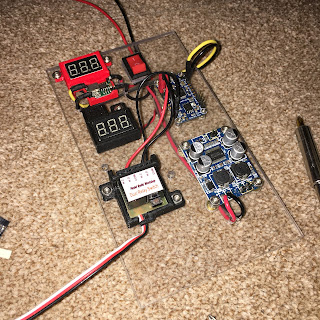
Sounds for droid 2020 - 1.7 Sound board build
Back in August 2020
After lots of design layout ideas, and 3D printing a special holder for the sound components. I decided to just go back to basics and use Perspex.....as I had found some spare. I still utilised the digital voltage meter holders & also the Dual Relay Switch holder, as these don't have there own fixing points.
I dug out all the old nuts and bolts previously used and thought.....naaaa, I don't like the look of them. So I drilled a hole and test fitted a threaded Brass insert. It worked! So positioned the components, marked and drilled holes......all except the sound board (as this requires M2 size thread fittings) and then using my soldering iron tip, melted into place the Brass inserts.

Next up was test fitting all the components on the perspex board.

Just waiting on the M2 thread fittings.....
I started routing and soldering the wiring next. I drilled holes to route the power wires behind the panel and to help identify the voltage, used yellow as positive for the Audio FX sound board as it uses a lower voltage than the amplifier.
The M2 inserts and bolts/screws arrived in a few days via eBay and where inserted into the rear of the board.
October 2020.....update
Got on with refitting the sound system. The extra perspex material has now been removed and a suitable location to mount it has been prioritised. A wood spacer block is needed to raise off the vertical frame support to allow the wires to fit behind. This new location is closer also to the 12v terminal distribution block.
I also fitted some of the new cable clamps I designed and 3D printed.
![new [yellow] cable clamps installed](https://blogger.googleusercontent.com/img/b/R29vZ2xl/AVvXsEj4777JvyLwKXlj10euqQOyYYAteDlCEUfa_eC3GqHQjOZ9lFbRSdNpzq58iypRHeroiVffnv0zJT_j9SeXiYBR0uGezIE4QdvEQiusi4cvja0Sd-rZG-RwrJrx01tupxFm2eJX524Dx1w/w200-h200/IMG_6272.JPG)
![new [yellow] cable clamps installed](https://blogger.googleusercontent.com/img/b/R29vZ2xl/AVvXsEj72TgDacBKBJEjssGu67_YT0BPilt9T12Qqg4lAOLbjIHPqyCMtSy_j39S2kX6LNxSv4ueXUGRCn_8R2E1ovoNctyu-OoSonrSbWaORH3EV3Htc38BkACsHHHdUyfMH_VQPzqI6HIE8bA/w200-h200/IMG_6273.JPG)
October 05, 2020
Teeces LED work for Mike's dome [August 2020]
27th August 2020
A few weeks back I was asked to help wire up a set of Teeces LED light and add some LED's to illuminate the Holo Projectors x3.

I fitted a voltage regulator to drop the volts down to 5v.


I did some updates to the LED holder, now that the 3D printer is better than the previous one lol and also upgraded the bearing holder.

The bearing holder, is designed to be shaped with a file to be a tight fit into the rear opening of the Holo Projectors eye. The whole unit acts as a slip-ring arrangement, allowing the LED's to be connected and lite, but also allowing the Holo Projector to fully 360 degree free movement, without worry of 'Holo wire twist & break'!

Mike's dome only has two moving Holo Projector's, so these received these units. The third Holo is static. Nect up was installing them into his dome.

Next up is to finish installing the power cables, the Teeces units & connecting up the power switches.......


And some pics of LED's illuminated.


Mike was kind enough to make this new tool storage box sticker, nothing wrong with the original lol, but hay....everyone should have their name on their tool box.


