Showing posts with label R5's silver neck tape. Show all posts

June 25, 2024

April 08, 2019

Next project...... Dome Bag 1.1

(5.4.19)
Going to event's with two domes can be a bit tricky, and also my garage seems to attrack dust. So I came up with this idea to protect (from dust) and be able to carry a dome easily.

And the 'Dome Bag' idea was created.

I did have a plan....but this first attempt was basically a test/WIP as I will eventually need another bag for the other R4 dome. Oh and maybe another for my R0 dome, but that's still being upgraded, so no rush to take that to any events.

Step 1: The Base.
I wanted there to be a padded surface as the dome connect with the body and this edge could get damaged. Now, this wouldn't stop damage if the dome where to be dropped, but a slight knock or bump would be ok.

I drew around the base of the dome, with the intention of cutting an extra bit larger for the side foam padding to sit on.......but due to distractions & thinking two steps ahead.....I forgot. So the foam diameter is the same size as the dome's outer edge.....that it's supposed to protect.
Dome bag, R5D4

Next I drew around this foam base & cut out the material to cover it, like a cushion. The material is just a single fitted bed sheet, costing about £6. Remember, this is just to offer some protection from dust, the actual structural strength comes later on in this build.
Dome bag, R5-D4
I pinned and using the sowing machine, stitched the two panels together, inside out, then turned them the right way and squeezed the foam panel inside.

Step 2: The Side. The next step was the side protection. I measured a height that would protect the upper edge of R5's dome, above the holographic, engine turned tape panels.
The material's was cut long enough to wrap around the faom to hold it in place.
Dome bag, R5D4
The second smaller piece was used as a guide for the turned over piece of material. I almost messed up again, by not allowing extra material for the fold.

I did however, mess up on the actual height of the material needed to cover the side height of the dome and also the top section......more about that 'upgrade' later.
Dome bag, R5D4
Using my daughters sowing machine, and re-learning on the go, lol, I managed to stitch a half decent straight line along the edge of the panel. I didn't want it to be loose, allowing the padding to move, so I got this right and it fits nice and tight.

So far this is all going as planned.....hahahaha......

September 04, 2018

R5-D4's metallic 'machine turn' neck tape - UK UPDATE!!

Last week I had the idea of getting some more machine turn vinyl sticker from the previous supplier I had bought from. But when it arrived it was not correct. I contacted them and they're response was that their supplier had changed the size a while back. They were very helpful tho this doesn't help us UK builders.

Problem is that they had not included this in there add on eBay or on their website!

Here is a size comparrison:
LARGE MACHINE TURN

VERY SMALL MACHINE TURN
I've been back on the internet searching for other UK suppliers of the large format required, but no such luck at the mo. Funny thing is that there are loads more suppliers stocking this in the USA than before, as at least it is available still!

April 27, 2017

R5's dome rotation upgrade 1.7 - metal ring

I needed to add some more pads & had Steve add some more tabs to help centralize the metal band. I was considering weight against thickness, but the thicker metal may have been a better choice in helping to reduce flex of the band. The additional pads and tabs should hopefully help with this. Found that these were not actually needed.

Next up was preparing the ring for painting. I'd already lightly sanded the ring and edges to key the surface and deburr the edges. I then used pin stripe tap to line edge & mask off for spraying up.

Using the original skin, I'd measured up about 25mm.

I then wrapped around the pin stripe tape and then masking tape.

~~~

Now Easter break is over, I was able to get back on with sorting out the new neck ring. It's not been easy, lol, with the dome in work sorting neck ring and clearance with the new bearing. Then taking the bearing and un-attached neck home, to check it all works on the body with the motor etc.

Well....... due to my unique skills, lol, the ring needed to be re-worked a bit. Then it was time to screw it all back onto R5's dome.

Glass fiber filler the gap between the metal ring and the wood. This was applied via the inside to also give some extra strength to the wood angled piece.

Wood filler applied:

This was then sanded smooth once dried. This side needed a bit more than the other.

Next up was primer. So I bagged up the dome and masking taped it off at the edge.
Using works spray booth makes life easier and breathable lol.
R5-D4

Due to time, I didn't take any pics of spraying up white, but it was the same as the grey pic lol. This work was done yesterday and left over night, to stink out works workshop.

This mornings little project was applying the neck's silver tape. Now, you can/could use silver spray paint, but this tape matches the other tape used on other parts of R5. Plus it re-matches the original he previously had.
R5D4
Goes on easy'ish, then used a cloth to smooth out all the edges & wrinkles. Next up was to trim off the excess.
Once I'd finished this, it was back into the spray booth to clear coat the new paint and silver tape.
Then once it was dry, it was de-bag time.
R5-D4
The white, is WHITE lol, so will need to be dirtied up a bit before Saturday's Lego Land event! It's amazing to see the colour difference over the time since I'd originally sprayed up R5's dome. Hopefully this should last him a few more years.

February 14, 2017

R5-D4's metallic 'machine turn' neck tape

UK builders have struggled to find this and from reading up, most have had to import it from the USA, at addition cost.
R5-D4's silver 'machine turn' tape

A fellow member asked me for info on my tape and where to get it from.

After explaining my luck a few years ago, I decided to look for the elusive 'machine turn' material!

USA builders can find the supplier....... Tape Planet [click for link]

And this place has it in sheet form over here in the UK.

Update, fellow club member was VERY happy with this!

April 18, 2014

Weathering 1.2 - R5-D4's Head

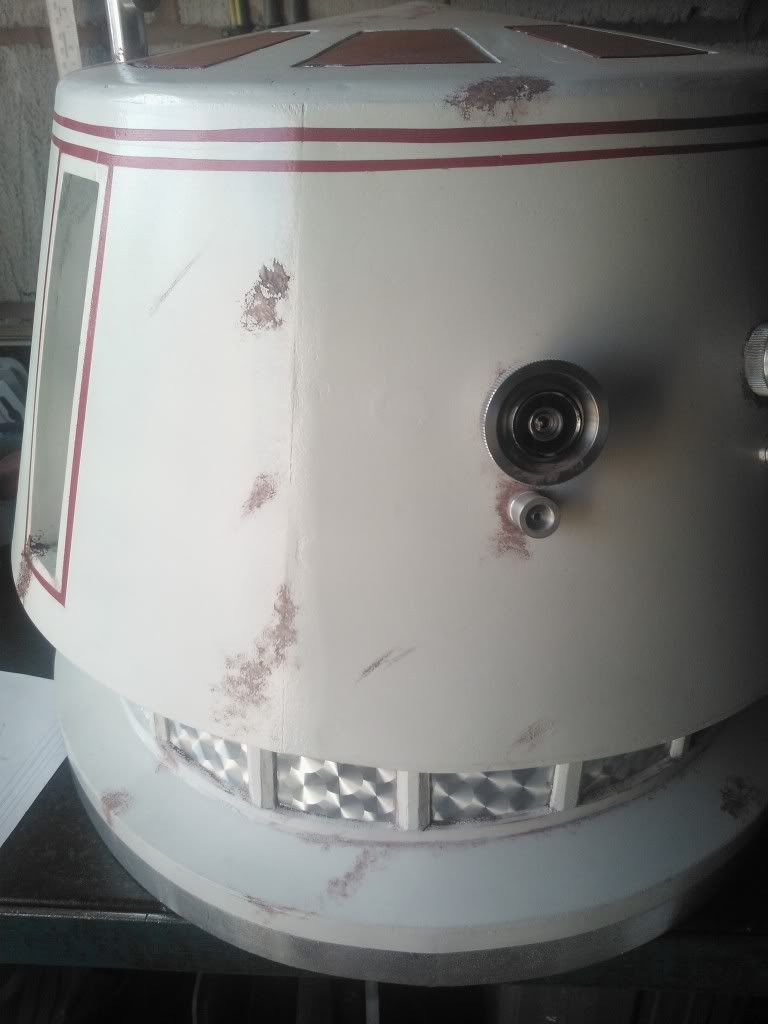
This morning I started on weathering R5's head, by applying Burnt Umber around the neck, side recess, eyes, top pie panel grooves and around the base of the Antenna. This is just the start. One good thing I've noticed is that the woods imperfections help when wiping off the paint as it sinks into them giving a 'pitted' surface finish.
R5-D4R5-D4
These pics were taken right after paint was applied, so its still wet. But looked a lot better once dried. Should look even better once rubbed off a bit and ochre applied.

March 10, 2014

November 11, 2013

R5-D4's Head 4.0 - Neck ring silver tape

I wanted to make sure that the silver tape would actually stick to the painted wood. So I cut some up and tried them in place.
R5-D4 Silver Neck Tape
Without camera flash
R5-D4 Silver Neck Tape
With camera flash lol
I've not added any more, as much as I would like to..... :D. As there is still a log of work to be done, filler, sanding, primer spraying up. And then of course a clear coat to seal everything.

June 22, 2011

R5's Silver Neck Tape

The other day the postman had left a card say i had a parcel ?? So Friday the wife picked up the parcel from the post office...


I wasnt expecting a parcel! A jiffy bag maybe lol, it was my R5 tape, sent to me by a fellow Astromech.net member [Asher40].


perfect!

June 03, 2011

R5's Silver Neck Tape

Scrolling through the Astromech.net forum the other day. A member posted that he would like to give something back to the group. He offered sets of the tape that goes around R5-D4's neck, under the 'ladder' piece.
R5's silver neck, behind 'ladder' frame

After a brief & simple email chat, I was fortunate that he still had some sets left and that one would be in the post :-)