Showing posts with label toolbox. Show all posts

May 22, 2022

Another new sticker for the toolbox


Found this on eBay and yes, I had to buy it.

I repositioned another sticker, as this one looked best next to the CFX crew stickers.

April 20, 2021

More stickers for the tool box

....some more stickers for the toolbox.
The following two were purchased off Etsy & eBay.

First: ‘Kenobi

Supplied by ‘Beyond the Fairytale

<~~~>
Next up is this ‘Tatooine’ sticker:

Supplied by ‘Black Dragon Vinyl’ on eBay.

#stickers #kenobi #tatooine #ebay #etsy

January 02, 2021

Mini project: Toolbox Display banner carrying straps

 Back to cutting & sewing.

As mentioned in previous post, I wanted something that could hold R5’s display banner to the toolbox for ease at events. I did a few sketches and settled on this simple design. I only have one display, but this can be extended to two, possibly three, depending upon the weight.

Dug out the strap webbing I had bought for the dome bag project. This was used for the handles. Took some measurements and started cutting up & stitching them together.

And here is the start of ...... ‘it’.....

Toolbox banner straps

Did some more planning and then added the second strap. Double stitch by hand for this test piece.
Toolbox banner straps
Ordered some pieces as I couldn’t put my hands on items I know I have....stored somewhere lol. I did find them eventually, but they were just leftovers lol only one side of the snaps.
Snaps for Toolbox banner straps
New ones coming soon. Next was making the second strap parts of this project......
I measured up a length and then cut up two  small ‘loops’. These will be for the main strap. They are stitched together and fixed in place on the main strap.
Toolbox banner straps
The banner bag wouldn’t be in place when wanting to open the toolbox. And the straps move and don’t restrict the lid opening.

The snaps came today, so got on with fitting them.
Snaps fitted to lower strap

And this is the lower strap in place.
Snaps fitted and lower strap installed

Next then was to fit the upper strap and mark the single snaps location. And here it is.
Upper strap snap fitted and installed

And here’s the finished banner holder fitted on the toolbox.
Straps fitted with banner in place


Really happy with how this has turned out. Next is to modify the design to accommodate multiple banners.

October 05, 2020

Teeces LED work for Mike's dome [August 2020]

27th August 2020


     A few weeks back I was asked to help wire up a set of Teeces LED light and add some LED's to illuminate the Holo Projectors x3.

R2 type dome getting some lights fitted

I fitted a voltage regulator to drop the volts down to 5v.

Teeces lights lite up
These are the main lights for the dome illumination.

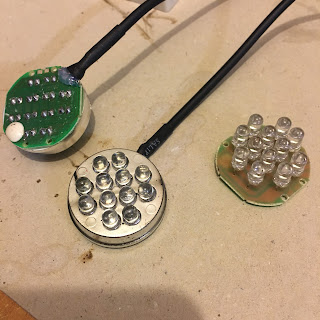
Mike also supplied some torch LED panels, which I managed to solder up wire connections to after figuring out why they all didn't light up with just one ground wire connected.
Torch LED units

After soldering these up, I had a thought about how to fit these into the Holo Projectors, without the dreaded 'Holo wire twist & break'. So I dug out my Holo Light units I made years back for my R4-D4 dome.

I did some updates to the LED holder, now that the 3D printer is better than the previous one lol and also upgraded the bearing holder.

Holo Projector LED holder

The bearing holder, is designed to be shaped with a file to be a tight fit into the rear opening of the Holo Projectors eye. The whole unit acts as a slip-ring arrangement, allowing the LED's to be connected and lite, but also allowing the Holo Projector to fully 360 degree free movement, without worry of 'Holo wire twist & break'!

Short video demo of new holo slip-ring

No more 'Holo wire twist & break'

Mike's dome only has two moving Holo Projector's, so these received these units. The third Holo is static. Nect up was installing them into his dome.

Panoramic view of inside the dome - LED's

Next up is to finish installing the power cables, the Teeces units & connecting up the power switches.......

wiring up the switcheswiring up the switches

And some pics of LED's illuminated.

illuminated LED'silluminated LED's

illuminated LED's from the inside of the domeilluminated LED's

Mike was kind enough to make this new tool storage box sticker, nothing wrong with the original lol, but hay....everyone should have their name on their tool box.

tool box stickertool box sticker


Interested in sign's etc, check out his website...

Click this link to his website ->>> Vinyl Designs

July 23, 2020

Workbench Lockdown 2020 - storage unit

More organising & making.

Was going to start on fitting a sliding shelf for storage under the draw. I can put all my electronics/electrical components in/on it for easy access.

But before I made a start, I instead started on making a wheeled storage unit for under the bottom shelf. I wanted it to hold my drill and drill bit boxes and anything else could be stored in it.
wheels, storage box

I cut the base and fitted casters I already had. The above picture shows the short side opening for the drill and bits boxes.
storage box

The above picture shows the unit almost complete. The wood is not very good, (hence the clamp and PVA gluing layers together), but it was free a few years back and now it’s being put to good use.
I have a ratchet set but wanted it vertical for easy access. So cut up some of the scrap material and made a bracket that the box slides down into.
storage box
Ratchet tool box with handle, had a wood fitted strip to help retain it in place. Can be just seen in above picture.

Next up I added some fold-able shelving. I wanted to be able to utilise the depth of the box, without restricting access to the lower, not used to much, area. Some left over wood, just the right size, some supports and a pair of hinges I've had for ages lol. The two pictures below, show before & after with shelf in use
shelf shelf

And a quick video showing it in action lol.
shelf
I had bought some LED lights to help see under the bench and illuminate the shelves as the ceiling lights cast shadows.
Under bench lighting
These are really bright and will come in handy.

Lastly, for now, I wanted somewhere to have my soldering irons in reach. So made up a holder that slides over the edge, the cables just go into the box.
.......pic
soldering iron holder

I've still got plans for more upgrades...

July 14, 2020

Workbench Lockdown 2020 - Bench drawer & shelf

One thing I really needed was a large drawer for my tools and also to have easy access to the ones used regularly.
workbench drawer
completed workbench drawer....wood filler waiting to be sanded
I wanted a way to store them but not create a problem, either getting to them or just finding them. Watched loads of YouTube videos, and got a few ideas. Next up....making it.

LOL, now I usually draw up plans.....but not this time. I already had some not really usable (probably grade 'D') plywood sheets, that I knew I wouldn't use, but didn't want to get rid off, just in case. And this was their time to shine lol.

Measured up the area, and marked all the pieces for the drawer onto one sheet.
Not having a circular saw, only a jigsaw, I used a straight piece of metal clamped in place as a guide and got cutting.

The sides, front, rear where screwed into the base and probably should of looked at sorting the poor quality wood out with wood filler and glue.....but more on that later.

The drawer runners I wanted and for once, where bought at local ScrewFix store [pay online, click and collect, due to COVID-19]. These were ball bearing runners, 450mm for £6!! They can take a load up to 45kg!

Next, I found some large pieces of 2"x4", thought would do for support. These were screwed to the underside of the bench's worktops and the drawer runners added. After watching one video in particular, I learned that the 'tabs' on the sides of the runners allow for the whole unit to 'align' itself if the gap at the sides is to large. Never knew this!

I was going to get all creative and fancy with making up a drawer handle out of dowel, but found this old handle what came from my parents old 'under the stairs' cupboard and thought, YES, that's a nice touch and a reminder to my past. It's also has a low profile and is not ever going to get something caught on it!

Inside the main drawer I wanted some way of having smaller tools that I use readily to hand without rummaging. So I remembered that I had a pair of small draw runners that I had bought years ago as part of R5's bad motivator pop up idea. These were perfect and after measuring and cutting out some more wood, I created this small shelf/tray for inside the main drawer. I was going to place it centrally, but then decided that the rear for it to be pulled forward would be better. This then allows full access to the main lower area, but also when the tray is pulled forward, you can see the rear area for all those things that usually get pushed to the back of a draw and forgotten lol.

I cleared out more junk again, re-organised stuff and added a shelf so things weren't just piled up on top of other boxes etc.
shelf, shelf idea
Looks fancy, and it is a bit, but I know how annoying having 'support legs' in the way can be lol.

Went looking in the back of garage for paint tins colour choices....but nothing really suitable, so will have to get something I actually like.

And here's the bench progress so far.
workbench
......before I cleared everything away lol.

I added a thin scrap piece of wood centrally on the lower shelf to stop things getting pushed under the draw itself and possible getting wedged. I'm planning on possible adding a second slide tray/drawer mounted there.....for what, I don't know yet. The three containers stacked on the floor (purple) fit just right under the new shelf.

As per usual, I've already started drawing up and sourcing mini LED lights to mount under the shelves etc. These will come next or before painting of the drawer/new shelf wood.

This was my weekend....which was delayed starting due to having to sort out the dishwasher that kept tripping the electrics.

More workbench build work updates coming soon.....

April 04, 2019

New Tool Box......stickers 1.0

Posted up a few pics of the stickers already added to the new tool box.

Saturday's event brought two more:
Menigitis NOW, UK R2D2 Builders Club, R5-D4UK R2D2 Builders Club, R5-D4, R2-XL

I then remembered I had another R5 sticker from left coast graphics. A vintage R5-D4 via their Etsy shop. Same sticker, but trying to not get a reflection on it.
Vintage R5-D4 sticker from left coast graphicsVintage R5-D4 sticker from left coast graphics
This version was a chrome one, not a white version. These I have stuck on my transport sledge.
Vintage R5-D4 sticker from left coast graphics

Two more stickers arrived with a patch I got from 'Half the Droid'. Checkout his Facebook page here. One was an artistic version of his R2-D2, and the other was the 'walk of shame'. A recent addition to the club after recent events lol, mechanical or electrical, where you've had to push your droid back to base. This stickers is just for laughs.
UK R2D2 Builders ClubUK R2D2 Builders Club

I also placed three very special stickers on the case.....
CFX Pinewood, stickers, Star Wars

March 29, 2019

New Tool Box....

.....I've been meaning to get myself a proper storage/tool box for events for a while now, as my first two attempts were either not big enough (my first tool box - red) or as in the case of my wheely crate, not strong enough.

This was my first repurposed tool box, which just carried tools in. But as R5 has never needed on site maintanance, except when he had a drive belt snap (C.B), I was carrying everything but the kitchen sink in it. So I now only carry essentials.
R5-D4, tool box

The wheely crate's front stands caught on the edge of a curb and cracked the side along to the joint. This meant it wouldn't support the insert base properly, which bent under the weight of R5's batteries. The batteries & the battery boxes plus other little bits would be carried in this, before it broke.
R5-D4
This weekend the club attended MCM Comic Con in Birmingham. Now, there's not much I can do about having to carry two domes (R4-D4's was going on the display stand), but I also then had three other bags with stuff in to carry from the car to the stand. So decided that 'now was the time' to upgrade my storage/tool box.

A lot of the builders took Lee's lead and bout this type. But at the time I couldn't afford (or justify) the cost. Then the other week I saw one in a local'ish B&Q store (UK). Reduced down to £55.

So yesterday I popped in and was lucky enough to pickup the last one in the store.
This has three main compartments & was just big enough to carry everything I need.

I'll still need to carry the rear hatch, though I have a few ideas to make this a thing of the past as well lol.
After I had arranged everything inside, it was time to add stickers..... first being my own R5-D4 one.
R5-D4 sticker

.....I'll add other sticker pics later..... ;-)