Showing posts with label Exmitter EX7. Show all posts

April 05, 2023

New Transmitter - FlySky FS-ST8

Birmingham’s event was eventful, but also had a sad part, my second Volantex Exmiter EX7 transmitter died...???? 😢 Great.... right before Celebration in a two weeks.
I spoke with Chris as he had a flysky which I had looked at before but didn’t know anyone who had one to check it out.

I came across this FS-ST8 and liked the look, checked out a few YouTube reviews and all seemed good.

Got home and started searching for suitable ones and also non Royal Mail delivery (as they have unfortunately become less reliable) found one and decided to buy. It arrived within days.

Had a quick flick through the settings, so easy to operate. Has LED’s that can be changed, sounds for power on/off. It’s also quite lightweight and comfortable to hold.

Eximiter diagnostic
Checked the batteries, stripped it down the following day, tested it for continuity, but nothing after the switch, even swapped the switch as had a spare one.

September 23, 2022

Transmitter modification - remote for the ‘Trading Card Dispenser’


As much as I luved my wrist strapped remote control unit <Blog link, for activating R5's trading card dispenser, it is not so easy to operate, whilst holding the transmitter.


It's even harder to remember which on activates the TCD and which one fires the Bad Motivator system lol.
I originally went with a simple clip attachment <-Blog link, to the transmitter for the remote to clip into.

These both worked fine and the files can be found on my Prusa account page.
(The watch remote's are not presently up, but will be soon.)

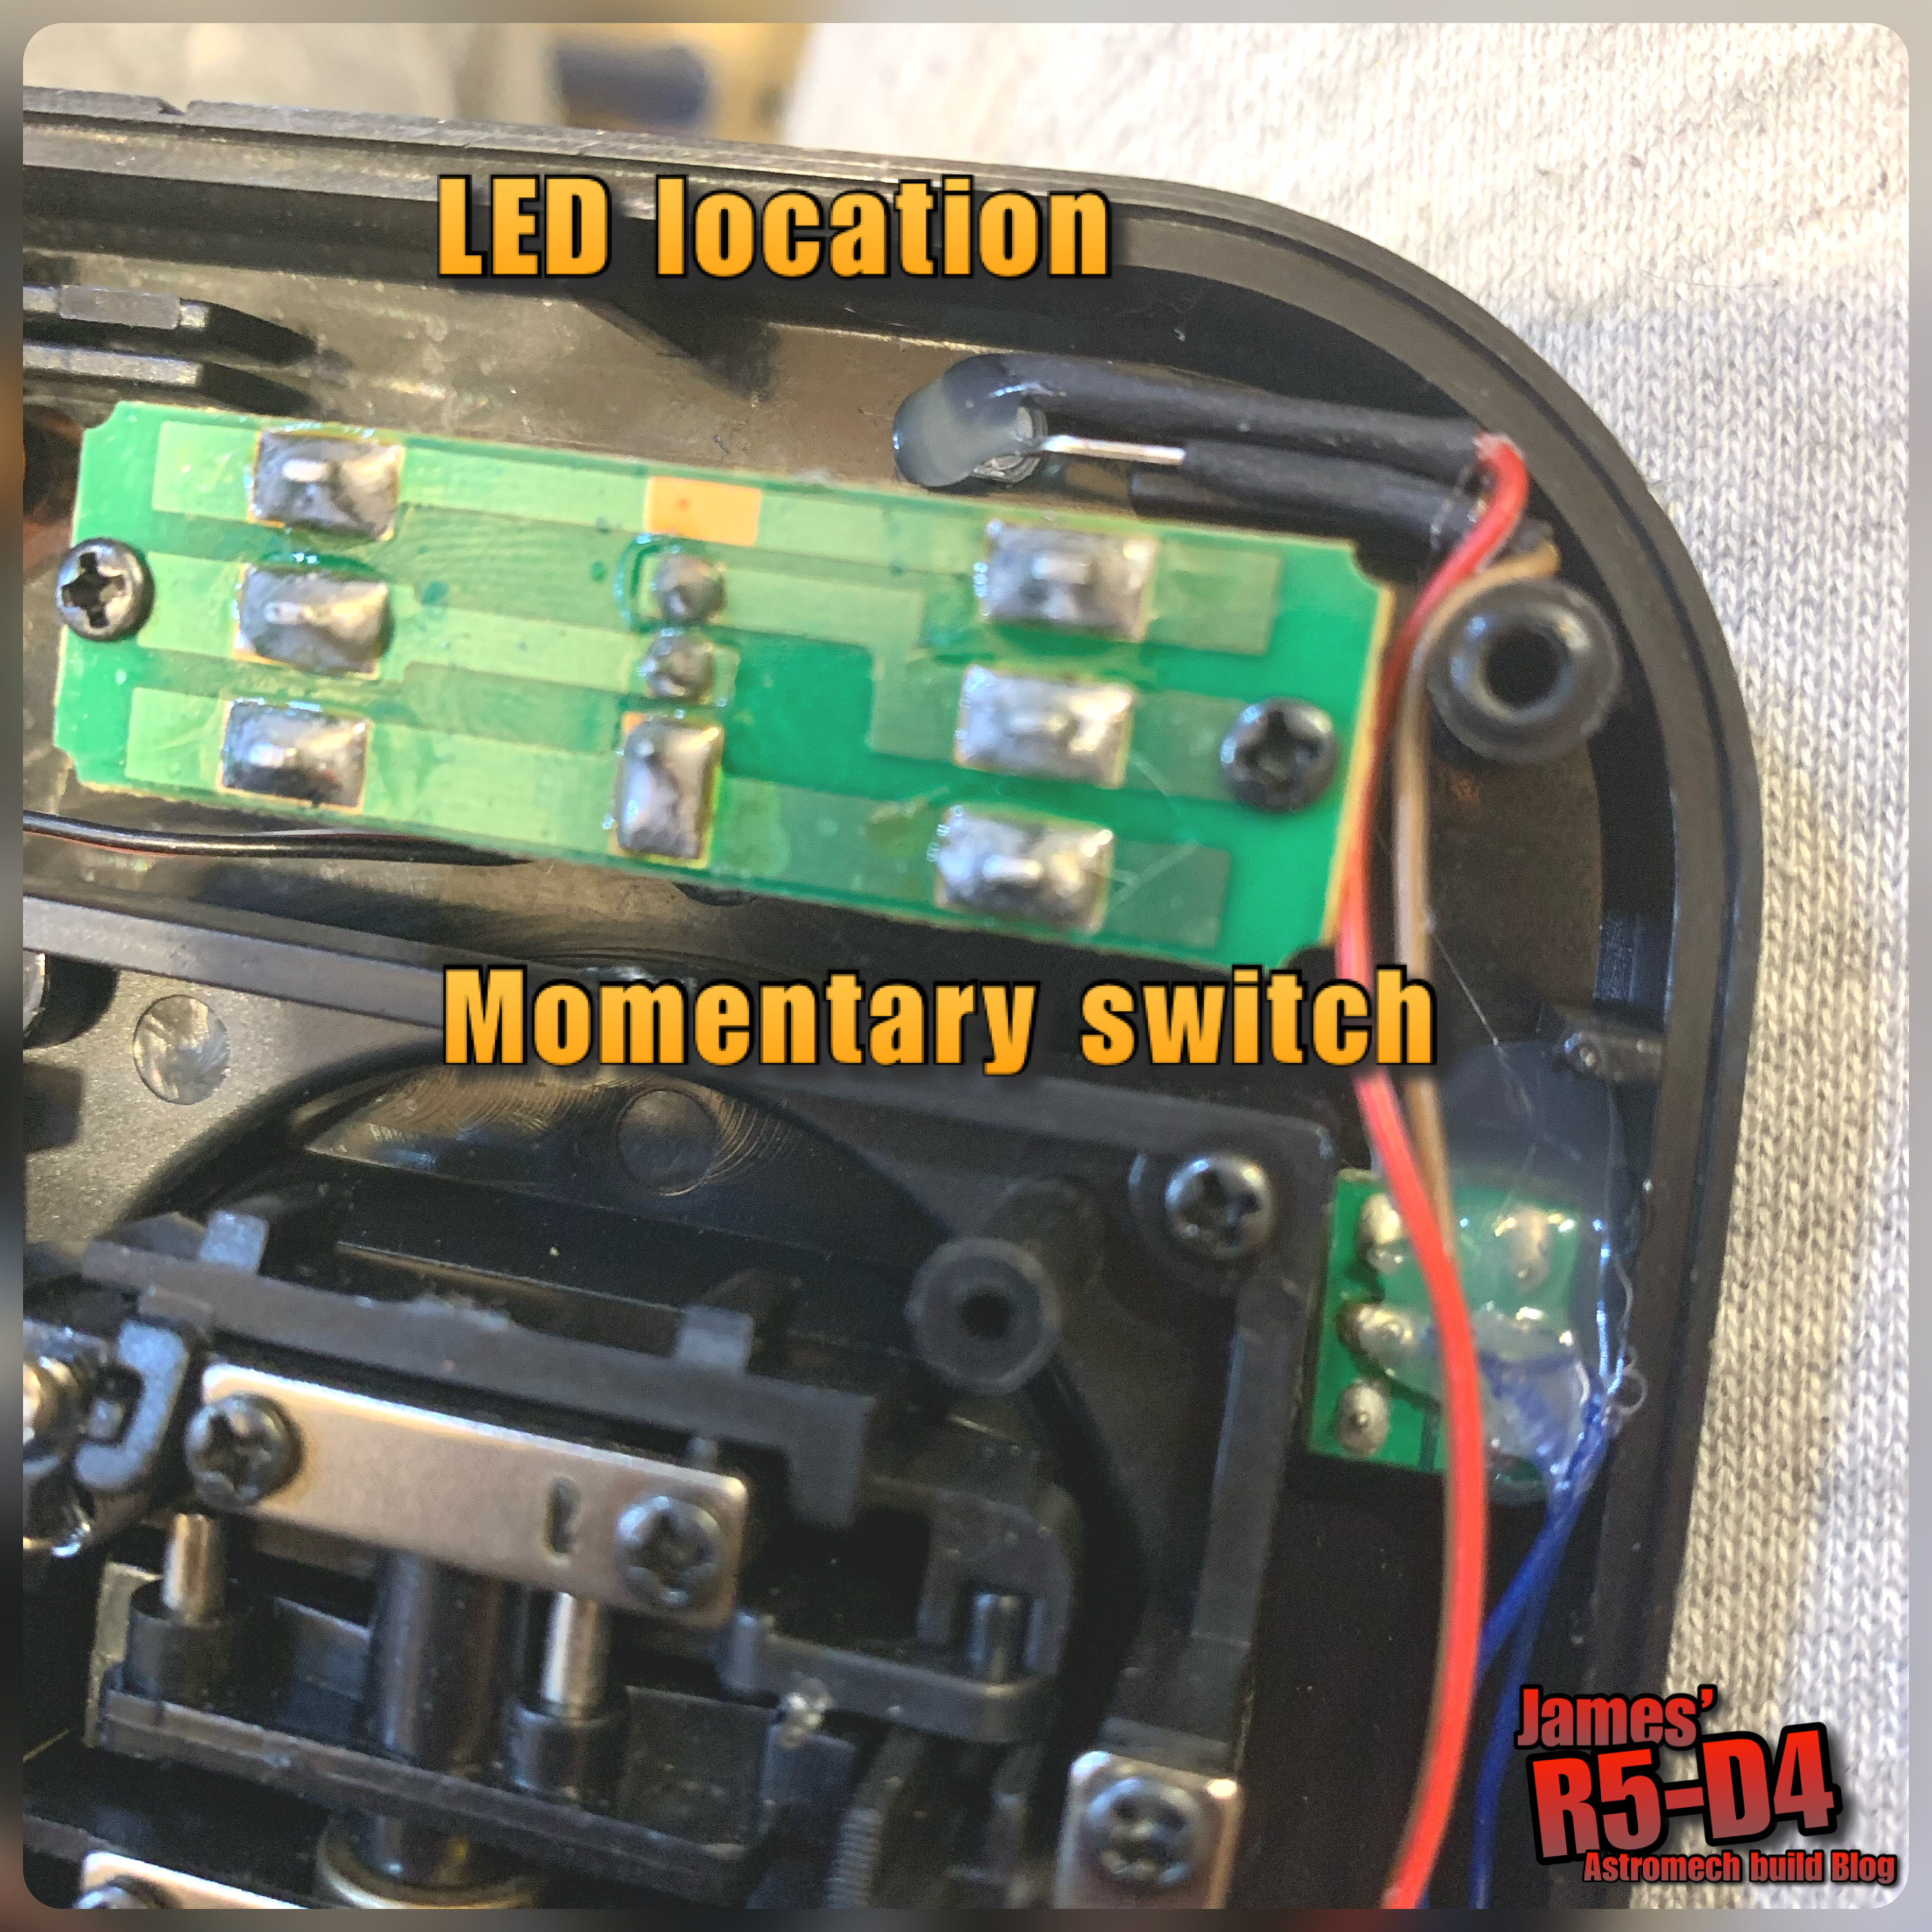
So after some thought and tinkering, I found a momentary switch and tested it on the remotes contacts to check that a remote switch WOULD still work lol. Two dabs of solder onto the contacts and the remotes remote switch was on. Next up was the LED, again, having it show that I HAD actually pressed the button, I wanted an indicator. A quick test with the contacts of an LED onto the contacts of the board mounted on, showed that it lit up. Two more dabs of solder and we were in business.

I positioned the LED next to the Utility arm's switch. Both these were secured in place with hot glue.

Above picture: the switch is just below it. The momentary switch was positioned a bit further down due to space, but it's still in a good place to press, without loosening your grip on the transmitter.

Front view of LED and new momentary switch.

Then came the really tricky part lol, finding a position to locate the actual remote's board. I covered exposed contacts with electrical tape, before placing the remote's board inside. I then applied more tape over it to secure it. I did think of securing with hot glue but decided not to.

Just need to test it next....

Yep, it lights up lol.

September 03, 2020

3D printed RC receiver holder

 Started this little project a while back, as with the new electrical layout, I wanted a holder for my Volantex Exmitter RC Transmitter’s receiver unit that’s installed in R5.

The original idea had a bottom/base.... which it didn’t actually need, so was removed & an open slot added for a securing screw. I designed in matching angels and edge lips so the receiver can't 'pop' out the top.

Test fitting the holder.

After a few attempts, I was finally happy with the design.

Progress of fine tuning the fit of the holder

This holder can now be found on my Thingiverse page.

August 10, 2020

Sounds for droid 2020 - 1.6 transmitter switch test

 Forgot to post this.....

A few weeks ago I was asked to do a tutorial video for the Droid Builders UK Live 2020 event, check out the website here & the You Tube channel here. It didn't get aired due to time, but whilst I was working on all the electrical's, I swapped over the transmitter switch I had originally fitted, with a momentary version.

The original 'switch' was a dial which wasn't needed so after watching some YouTube videos on how too, I swapped it for a switch.

Here are my Blog links to prev. work done.

I wanted to have a momentary switch, rather than a normal 3 position one.

Sound trigger testing

As I had already done the hard work in Parts 1 & 2, this was just a simple un-solder and re-solder the new switch.....except that what I didn't realise at the time was that the thread is an M6.....not an M5. So I'll have to make a new switch nut.

March 06, 2020

Transmitter Ex7 switch upgrade - rotary to switch, part 2

Finished putting a groove in the new switch locking ‘cap’.
I used a grooving tip tool to scrape/shape the slot.

Got home and the posty had delivered the pack of resisters. So test soldered up the resistors & wires to the two switches and tested them with batteries in the transmitter. And the switch works, via the transmitters screen, still need to actually test via the reciever.
Exmitter EX7, switch, upgrade
The above picture shows the resistors and wires soldered up to test it worked. Exposed wires will be insulated once completed.


Exmitter EX7, switch, upgrade
My 'cap' fitted to the switch CH7 in picture above.

March 04, 2020

Transmitter Ex7 switch upgrade - rotary to switch, part 1

Most RC controllers have that one (or more) rotary dial ‘switch’ which for droid controlling, isn’t needed as such, so is just a waste of a switch. Yellow circled in next picture.


Searching up online and YouTube came up with ‘how to’ swap a dial switch for an actual on-off-on switch. Had already bought a switch ages ago, so next was to order a pair of resisters which replicate the potentiometer in the dial switch.

Whilst waiting for the resisters, I decided that rather than buy a pack of switch ‘caps’ or lock nuts, that holds the switch in place, I’d machine one up myself.
So lunchtime in work I found & machined up a piece of aluminium bar to almost the exact dimensions lol.

Just needs a slot added. Original is on the right.

November 27, 2018

New RC Transmitter - Exmitter EX7 + mini review

25.10.18
So, at Optimus Bristol, I had a slight accident with my Optics 6 Sport transmitter. Basically I managed to cross the battery contacts whilst swapping old/new ones over. It turned on but no signal to R5. So the rest of the event, he was shut down for display only.

Really gutted about this as the controller had been really good and it was a gift from a fellow builder friend Colin. Not to mention the additional extra's I'd addded to make it more user friendly.

Never mind.
My next headache then was getting a NEW transmitter, installing and testing/setting it up all before my next event at MCM London. This might not seam like a big deal, but shop  availability isn't good and transmitter choice is limited for me unfortunatly. Due to more financial restrictions, this expense was the last thing I needed.

I did find on tho and picked it up from the shop on the Monday lunchtime.
(Would just like to say thanks to Rob for the loan offer of his spare transmitter until I was mobile again). Got the transmitter home Monday night and got to testing and setting up the transmitter/reciever.

It's a Volantex Exmitter EX7. Link (this is an example, product link)

Volantex Exmitter EX7

It has a 7 channel reviever.
Volantex Exmitter EX7

I wanted to first check it would work ok, so Monday night was just a plug everything in and power up. Then (due to limited free time), Wednesday evening I was able to continue setting up and adjusting the settings.

This post was written before MCM London, so once the transmitter has had it's first outting, I'll write up a report and add it below afterwards.


Swapped over the left stick mask and the stick 'pads'.
James R5-D4 Exmitter EX7James R5-D4 Exmitter EX7


***********************

REVIEW:
Setting up was quite straight forward, once I had the control sticks sussed. Reversing was also really simple to do and the instructions are really easy to follow. The transmitter itself is very light, and after it's first outting at MCM London, there was no wrist ach, which was the reason for the hand strap I fitted to the Optic 6 unit. The sub-trim was easy to set up, again, thanks to the instructions and the fact that once you get the button order, it becomes second nature.
I've not added anything to the other controls yet.

I did have one moment when setting up where the reciever seemed to loose connection with the transmitter??? I was sat right next to R5 and the reciever was in an odd position.....

Nothing bad happened, as I had already set the fail safe positions to zero. This ensure that R5 doesn't carry on in whatever he was doing if the signal is lost.
This is one of the safety features all droids should have in their settings!

The transmitter now has a few event's to it's name and even though it uses four AA batteries, these have lasted well and from the on screen monitor, are still going strong!
I can say this unit gets the thumbs up from me.