Showing posts with label Star Wars A New Hope. Show all posts

March 16, 2024

Futaba: vintage M - series transmitter

With building WED-15, I often refer back to photos and even videos from the original behind the scenes. One thing that is always in my mind is the transmitter, a Futaba M-series transmitter, which were not only used for WED-15 but also for R5-D4.
John Stears - on the Star Wars set,
controlling the WED droid

I was fortunate enough to get a dual purchase of a 4 channel and a 6 channel, transmitters, a few years back (2016). Neither came with an antenna, but I was again lucky enough to find one, on eBay, for my display setup.
Futaba M-4 transmitter

Link to Blog post(s):
Post - ribbon indicator part 2

I keep a search update on eBay, for similar transmitters as well as antennas, which always seem to be missing. Over the last few years the price of these transmitters has increased significantly!

I’ll be updating my display information to include the WED-15 image of John Stears.

September 03, 2020

R5’s centre leg - ankle detail update

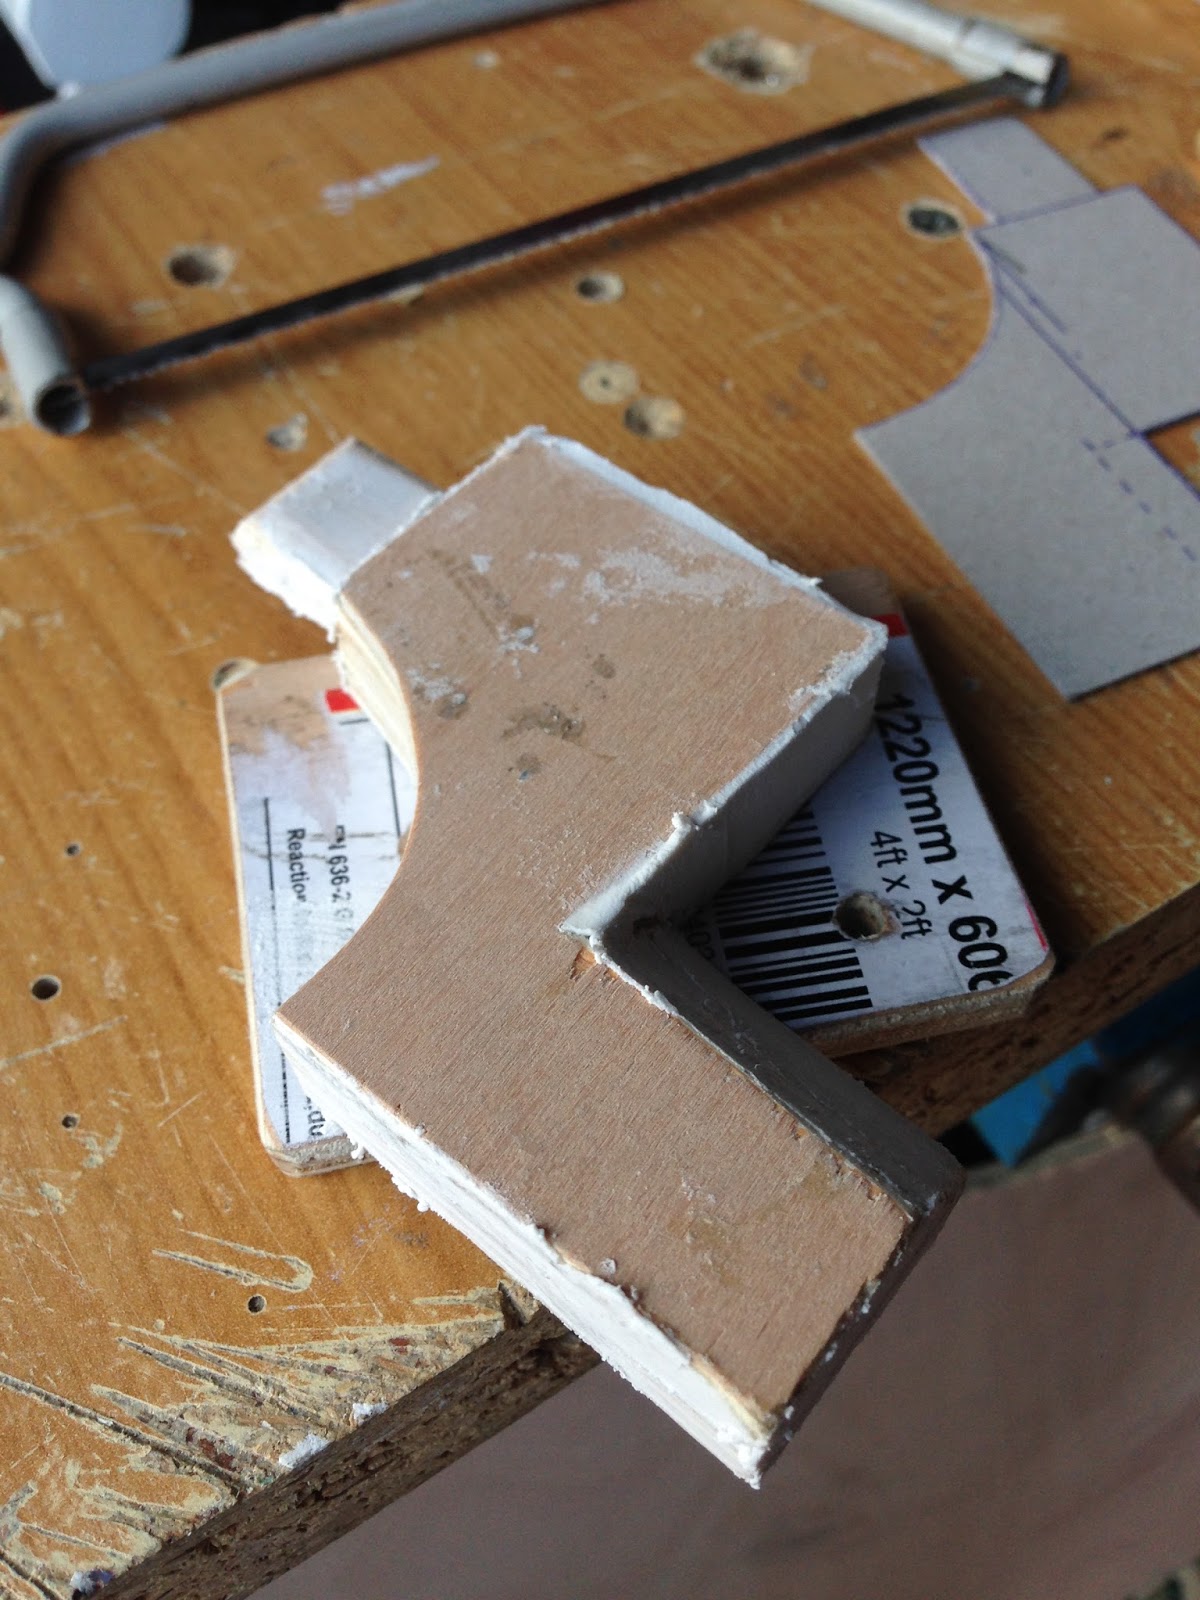
 When I originally fitted the ankle detail, I hadn’t permanently fix it to the leg. I just used hot glue. It lasted surprisingly well. But as the retaining strap is used in this area for transportation of R5, it eventually got knocked off.

So it was time to fix in place properly. I made a cardboard template to mark suitable hole locations with.

Cardboard template

I had to redo the hole position as I forgot the drill wouldn’t be able to reach the upper hole location, so moved it down a bit.

Of course this was after I’d already drilled the ankle detail lol.

Ankle detail with location dowels

So the upper hole was plugged. It didn’t have to but it did for me.

I didn’t need to glue in as the holes/dowels were a tight fit.

Ankle detail in place

Ankle detail

Next up: finishing installation of the electricals.

August 06, 2020

R5 Button Badges


Button badges.....with an old skool type safety pin
Dia 25mm

Had a few made, well.....just because.... may add them
as an option on my Etsy page.

July 07, 2020

Funko Pop Astromech: 3D

So in my last post I said I’d uploaded the feet, battery box and leg version of R5’s Funko Pop Astromech to my Thingiverse page. I had made a start on creating the feet hoses ages ago......what a nightmare to try to recreate them!

But after several hours and then a version 2, I finished up as close as possible, a pair of feet hoses that  resemble the ones on the Pop droid.
Funko Pop Astromech droid R5D4

I think they still need some adjustments, but I have to also remember that these are very small so I shouldn’t beat myself up over going to fine on the details.

Once I’m happy with these i’ll upload to my Thingiverse page.

I wasn't planning on doing this but thought I'd make a start on the body. It is hollow, not solid like the other pieces.
Funko Pop Astromech droid R5D4

The colours are just to help see the build. Am please so far.......

July 02, 2020

Throw Back Thursday - Vintage Futaba transmitter

This weeks throw back Thursday
is to my purchase of two vintage Futaba radio transmitters.

Futaba, transmitter

Futaba, transmitter

These were a little part of R5's behind the scenes history.
And was the start of a few mini projects linked to them.


Vintage Futaba - Crystal hatch 3D printed 1.0 [2019]
Vintage Futaba - Crystal hatch 3D printed 1.1 [2019]

I also designed up and printed a display stand.....but I don't think I actually blogged it....? I'll have to dig it out and post pictures....

March 12, 2020

September 24, 2019

Vintage Futaba Antenna - Ribbon indicator 1.1

Way back in January of this year I posted up my search and 3D printed design for the antenna ribbon indicator clip. There are two types, but this was the first one I found and so drew it up. See link below for previous post on this topic.
Vintage Futaba transmitter - R5D4

Click these link's to Vintage Futaba Antenna - Ribbon indicator 1.0 and also this link to my Thingiverse account & the ribbon clip.

I've been searching online over these months looking for an authentic blue ribbon, as seen in the above picture. I found one but the price was a bit much! So I picked up some blue ribbon off eBay, that matched as close as possible, to tide me over till I actual find a vintage one at a reasonable price.
reproduction vintage Futaba transmitter ribbon
I just need to cut it to a suitable length for the display unit.

March 21, 2019

New display boards - Futaba & R4-D4 dome

Just one of the many little things I've been meaning to do
is create some display boards.


A brief discription about the Futaba transmitter,
the type used to control R5-D4 in the original scene,
seen below in this picture.


Next display board is for my R4 dome I made.
This has a brief discription about how I made it.
Documented with photo's from the build and a
QR scanable code for a link to the begining of the build.
R4-D4, astromech, droid

Here's the QR code if not viewable on the above picture.
QR code, R4-D4, dome, wood built, astromech, droid

Hopefully this will help visitors to our table explain
how we build these domes in a bit more detail.
I'll be taking both of these along
to the Birmingham NEC this weekend,

January 17, 2019

Vintage Futaba Antenna - Ribbon indicator 1.0

One thing that I have wanted to get but couldn't find was a ribbon antenna (clip) ....later to be found to be called a 'frequency penant or pennant'......to match the controller seen below in the picture.


vintage futaba transmitter, star wars, r5d4,

I searched online for images & also ones to buy, but the pictures were never really clear for the top of the antenna and also I didn't find any that, for what I wanted, cheaply enough. I then found an instruction manual for an ACOMS ATB-227 (Mk2) transmitter. It had a nice drawn sectioned view of the clip. So I thought I'd give it a go at drawing & 3D printing one.


transmitter ribbon clip, vintage futaba transmitter, R5D4

I first drew the clip part for the antenna. After a few test prints I was happy with the grip. Next up was to draw the rest of it up. I assumed that the ribbon itself would be no more than 1" in width, so this plus the dimensions I'd collected off my actual Futaba's aerial, I was able to produce something to a scale.

I then found a picture (I think) eventually of the ribbon clip used by Futaba. It's looks basically like a coat hanger design lol......after all the designing for the above version lol.


This following picture link takes you to a great site which has vintage 'adverts' from magazines etc. These are for the Futaba's, and shows the range and changes over the years. I found this years ago when I first started looking to try to identy the controller in the first picture. The controllers used were from 1974 to 1977. The newer modles were seen and used in the later films.
vintage Futaba transmitters, R5D4
click pictutre for link to this site for info on vintage Futaba's etc

I have now found a similar clip, so will purchase this instead.


....I'll post the ACOMS's version up on my Thingiverse account, [free].

June 08, 2017

R5-D4 Trading cards 2017

Since my first post on my mini collection of R5-D4 trading cards,
I've found a few more.


This was my collection back on my first post back in 2014.

I wanted to find and collect (finances permitting) all the available trading cards which feature (and there aren't many) R5-D4, just as a fun thing to do.

I made up a stand, at the time as my collection was small.

But with the addition of a few more cards,
I'll need to think of a way to display them better.

Here are the new cards added to the collection:
NEW CARD 1
Interesting to note that both views of R5 show him with a round skirt.
Some of the body's did actually have round skirts,
but the 'standardised' flat sided skirts is usually the one
seen and even drawn up.
This can also be seen in the card red boarder card below.
(on my 'to get' list)

NEW CARD 2
This sparkly version is a newer of the plain standard 'grey background' card.
The back is also updated compared to the 'grey' pic version below

~~~~~~~~~~~ This one below, is still on my 'to get' list.

~~~~~~~~~~~

As mentioned in the previous post, another style of trading cards that have become more prominent, is the 'sketch card'. These are artist drawn ones that relate to the films characters. They're rare and hard to find tho, especially here in the UK!

Whilst searching this artist caught my attention, Marsha Parkins.
She created these cards for Topps for Rogue One.
These pics were from an eBay sale (not her's) that I was watching.....$125.00 US Dollars!!
Plus postage to the UK..... 

It's not R5-D4, but R5-SK1 who is red & white
and there aren't to many with this colour scheme,
so it's a nice connection
I'd like to add this one at some point......if possible.

June 05, 2017

Centre Leg - Film version **UPDATE 1.4**

So i got home from work Friday 26th and gave the components a lite sanding over the primer paint.

I then set up my hi tech spray booth........My cardboard box......and set up the components for spraying. After a few coats, I left them to dry. It has been very hot here in the UK the last few days, so it wouldn't take long to dry.
r5d4
new all white components
Saturday again the weather was fair, after a massive thunder storm early hours of the morning.
Out came my spray booth and i got on with clear coating the components. Again, these didn't take long to dry. A few hours later, I started to fit the components onto R5's centre leg and foot shell. They all fitted.
r5d4 centre leg

I dug out a tube of silicone sealant, but it had gone off at the ends. I cut it open to find the inside middle was still okay, so I scooped the good stuff out and used some to fix the front and rear ankle details onto the centre leg. Applied some masking tape to secure in place till it had set.
r5d4 centre leg
silicon applied to fix ankle details in place
r5d4 centre leg
ankle details taped into place till silicone set


r5d4 centre leg

r5d4 centre leg
The new centre leg & foot shell, pre-weathering

r5d4 centre leg
Rear ankle detail taped into place
Just back from a weeks mini-break..... Next up was to weather the new components to better blend in.

May 26, 2017

Centre Leg - Film version **UPDATE - 1.2 - centre foot shell**

With all the other work going on, the part that would need some real thought was the new side foot shell panels.

The original ones I made, were screwed onto the main shell, so these new ones will be too.
Centre foot shell with side panel removed.
Semi-circle at top of opening
is there to help remove the centre leg securing bolt.

First panel cut out, next was to apply watered down PVA glue.
This helps seal the wood for spraying, strengthens it as well.
Once done and dried, a light sanding of the edges & faces was carried out.

I marked out the second panel,

And then primer sprayed up the lot.

Next will be to spray up the lot in white.

May 25, 2017

Centre Leg - Film version **UPDATE - 1.1 - ankle details**

I already had the plans for the ankle details, which are available via www.astromech.net forum, so it was just a case of marking up some wood and cutting them out and shaping them.

detail pics:
Drew up a template and marked out on the wood the 'detail'.
Notice that only one of them has the upper 'tab' marked on it.

Next up was gluing the two pieces together.........then cutting out the details...

And here's the first on.

I sanded the edges and faces, before applying wood filler to the cut sides & faces.
Had to stop for food, then I was back out in the garage, marking up the second 'ankle detail'.

And here they both are, cut out and wood filler applied.
Left to dry over night, before sanding and extra wood filler where needed.

.....these versions as with the ankle cylinders, don't have any blue (that can be seen in the photos), so will be just white. Which is fine as they are going to be weathered to blend in with the centre leg.

The top 'tab' would normally be blue (or dependent on your choice of droid colour) and also there's a small rectangle recess, which would also be coloured accordingly. 

** I uses normal everyday tools, the hand saw as can be seen in the pic .
The most 'hi-tech' tool I have is a borrowed jigsaw,
meaning these projects are not beyond anyone's abilities to try **

Centre Leg - Film version **UPDATE - 1.0 - ankle cylinder**

A long time  ago.......... ;-) I realised that my nagging conscious wasn't going to let me sleep anymore lol.

This (zoomed in) image of R5 rolling away from the droid lineup, shows R5's alternate centre leg/foot shell.

The obvious things you can see is that there are:

  • no side crescents on the foot shells.
  • the ankle cylinder & wedge, are white (no silver or blue, like the outer leg)
But when you look even closer, you can just make out that the 'centre leg' is actually fitted with 'ankle details'. Well it would do wouldn't it, as it was an outer ankle unit.

For more on this, check back on my first blog via this link below:


So, as I already had a spare ankle cylinder.....as my original centre leg was built to the club plans (based on R2 and all Astromech's having a 'standard' build) & before I fully knew about R5's centre leg incident during filming (see the link above for more). I thought I'd do a little bit of upgrade work.

So I dug out the spare cylinder/wedge and checked it would fit the centre leg fixings I already had installed. Yep, me and the plans in perfect synic lol.

Next I sanded the cylinder and then primer sprayed it ready for the next stage.
R5D4

Next I'll spray it up with Satin white from Plasti-Kote, once I've finished the other parts.
This and the primer I bought from The Range (shop in the UK).