Showing posts with label Transport platform. Show all posts

December 18, 2021

2-3-2 manual legs


This has been something that has bugged me for a while now. Transporting R5 in his 3 leg mode is not easy.

First was the new leg transport board.
This worked and R5 etc could be loaded up into my small car. But the legs then took up a lot of space (height wise) so making packing the dome(s) etc in, a tight squeeze.

I have been envious of droids that could be pivoted from 3 leg mode into 2 leg since i first made R5. If i had known then what i know now lol.

So after last weekend’s Builders meet, I decided it was time to upgrade……again.


I wasn’t able to use opposite bolt locations (4 off) due to my top plate bracket. So had to go with the four consecutive bolt holes.
This is fine as i can use the remaining hole as a locking one. The washers and wing nuts are temporary whilst the other side was worked on.
I’ve got some larger washers and nylock nuts coming.

Next will be designing a new transport sledge.

July 03, 2021

Corsa transport upgrades - 1.1

June 21st
After thinking about how best to support the legs. I decided that the solid shoulder hubs would be best, with a slot designed to hold in place.

I may still think about a central support, but the legs are solid hence not having them.

Next up was to support the ankle. The piece I had already made which would slot in the ankle and support on the bent steel ankle lock, needed to be modified to fit on the ankle support part.


~~~~~

July 3rd
With everything else going on, today was finishing up the leg platform.
So measured up, and got on with cutting out wood. All pieces were then glued and screwed together.
I added padding to areas needed to protect the paint etc. and these were covered in leftover red material.
And the finished platform…..

Tomorrow’s the big event day, for MOT’ing droids. Some have traveled far and are already in Bristol. I’ll be loading up R5 etc in the morning.

June 15, 2021

Corsa transport upgrades - 1.0

May of mentioned before, but my small Corsa, will probably be my main transport for events etc. for future events. The boot load area isn’t large enough to hold R5 in one piece, thankfully with recent upgrades the legs can easily be removed. Allowing a lot less weight to be lifted up and over the boot lip into the rear boot area.

So R5’s body and transport sledge location are sorted. Next up are the legs/feet. This required a new platform to sit over the rear seat area, when it’s laid down. Designed the platform to be level and to be able to be slid forward and use the supports in the boot area that support the raised false floor position.

Measured and cut up some wood and added some strengthening beams underneath.

Next:
  • securing points.
  • Strap/handles
  • Location mounts for legs.
I didn’t want the handles to be an obstruction so decided that as I have plenty of web strapping, I’d make two handles out of a piece of 10mm dia dowel, with the webbing fixed to them.

The second handle is fitted to the rear of the board, to be able to 'lift' the platform up over the side support end stops. The platform then easily slides up onto the rear of the lowered seat......as can be seen in the first picture above.

Still working out how best to mount the legs to the platform....

This picture shows the platform in its 'unloading' position, after being pulled forward, allowing easy access to the legs to be loaded/unloaded.

Am leaning towards the leg bolts as a fixing point and the ankles have a metal strengthening strip, so this could be the support point.

More updates soon......


..............Don't forget, the South West MOT day,
Sunday 4th July [UK only]

If your a UK Builder who needs a Droid MOT
[required for club approved events]
check out the Droid Builders UK portal link,
for the Northern & Southern events.

October 05, 2020

Transport sledge modification 2020

1st September 2020 

Yep, upgrading the sledge....again lol.

Well, due to circumstances, transportation of R5 may now have to be done in my small car. This does means him being disassembled, legs off, which was also part of his electrical upgrade. So now it’s just figuring out how to get it all IN the car.

Transport sledge upgrade

Looks drastic but it’s all part of the plan. The material being cut off will reduce the height when the sled is led down in the car. This also makes it lighter still. Also looking at the handle bar and the bracket that holds R5 at the top, again for when sled is led down. The bracket serves a purpose but also restricts having the dome fitted on the body if you needed to move him as one unit.

November 27, 2018

Transport upgrade - New Handle

R5's transport sledge finally got the handle I needed to fit on it. I managed to get this all done last week before MCM Birmingham.

Due to the weight/balance point it was uncomfortable to more it around. You had to bend at an awkward angle to balance the weight.

So I removed one of the top 'supports'. These were just to give the upper section some stability when R5's loaded up and is in transit in the back of tha car. It wasn't actually needed, hence why I used it. I literally cut it in half as to get the maximum height. I then positioned the uprights in position. Then using the holes already drilled, I fixed them in place. Next was to drill a large hole through to fix a t-nut for the M6 bolt.
R5's new sledge handleR5's new sledge handle

I then drilled two 1" dia holes for the two new aluminium sockets I had to machine up in work. Then it was a case of screwing and bolting both uprights onto the frame.
I had already checked that these wouldn't be a problem once the sledge was led down in the rear of the car.

I just need to paint up the sawn pieces.
R5's new sledge handle
The MCM  Comic Con event was it's first 'test' and it was a great help. Still not perfect, but WAY better than it was before lol.

July 14, 2017

R5's transport sledge 'upgrade work' pt6

This was something I had had planned since building the sledge to get its weight down. It was a strain to lift it by itself when I first made it, thinking it had to be to support R5's weight.


So I marked out areas that could have material removed, not near corners or stress points, used a large wood bit for radius and drilled and jigsaw'd out some material.


I've not done anything to the top area......yet.....as it was getting late. But am looking at the 'double' layed section that extends to support the top of R5.

It is now a lot less effort to lift it, just by itself. More to come......

July 11, 2017

R5's transport sledge 'upgrade work' pt5

The small caster wheels on the skid where not up to the job and became a pain whilst loading into rear of car. But they needed to be small to keep the sledge at a height to fit in the rear of the car, so I'm not mad at them :D.

I looked at collapsible sack truck's but reports I've read recon that unless your droid is light, then they can't handle the weight. And I'm not up for spending loads of money on a solid fixed one. Plus the fact of then having to load for transport to events with already limited space, were also negative points.

I read on www.astromech.net that one builder had done a similar thing to my way of thinking. But instead of lifting brackets, he's used large threaded hand wheels. But how R5 is, foot heavy, I didn't want to be struggling holding the overhang of the sledge up with one hand, whilst trying to unscrew the locking hand wheels.

So my idea was to build a removable set of wheels, but sack truck style.
I cut up a piece of 18mm thick Plywood, attached two old, large, rubber'ish wheels and made up two brackets that hook underneath the transport sledge. The brackets were something I had keep from something that would of needed fixing brackets lol. Always good to keep stuff. One of the brackets I bent and is a little bit snug fitting on the bent edge, but it goes on and stays put, so not the end of the world.

The wheel brackets have T-nuts on the rear face, countersunk. I only had hex bolts the right length, two of which needed to be cut to a more suitable length.

Tried it out last night and it didn't break :D
 Wheels fitted, next was to mark out the bracket position.


 Countersunk T-nuts, as this is the face that will be up against the sledge.

And here it is test fitted, before I then gave it a mini test run, lol.

The metal brackets are very strong, and should last.
But if they don't I can fabricate some new ones.

Next up is to fit some sliding strips to the rear of the sledge.
Less resistance, point contact etc.

April 04, 2017

R5's transport sledge 'upgrade work' pt4

With the new dome lazy susan bearing soon to be permanently fitted in place, the sledge will also need an upgrade.
In order for the lower part of the sledge to be able to lift up R5, the top struts (seen in the above picture) need to be trimmed to accommodate the extra 10mm or so of the new bearing. So I marked up and then jigsawed off the extra material. These have insulation foam on as can be seen in the lower right part of the picture, to protect him in transport.

Due to the position of the dome location bolts, the length of the struts needed to be shortened as well.
Bottom strut has a pencil line for where to cut to length. The upper strut in the above pic had already been cut to new shorter length. The foam was then re-attached to the struts as well as the cross beam strengthening piece.

February 17, 2017

R5's transport sledge 'upgrade work' pt3

The two 'fixed, in-line' wheels, where good, but made pushing in directions a bit difficult at times.

So wanted to replace with two more swivel casters. I also wanted to reduce some of its weight and clean up the lines a bit. So the two protruding sections (holed wheel slots) where marked and sawn off.
Transport sledge

I then marked and drilled two holes for the threaded swivel casters. I used t-nuts this time rather than trying to fit normal nuts, like on the two the other end.
Transport sledge

Not much lighter, but is a bit and is easier to move when R5's not loaded up on him. Defo easier to move around.

August 05, 2016

R5-D4's - Sledge 1 - UPDATE pt2

On returning from #SWCE I knew that the sledge needed some work doing to it.
  1. It needed a paint job - check.
  2. It needed to have a dome mount stand so only requiring one trip once unloaded from car - to do.
  3. Locations for batteries (the real ones) - to do.
  4. Location holders for R5's feet battery boxes - to do.
So I dug out the paint can's & found a tin of gloss white. I removed the foam protection & starting with the underside wheel base, applied the paint. This stuff stinks worse than spray cans!! Within five mins my head was telling me, "OK, that's enough for today!" It also doesn't dry very quickly (which is why I didn't use it in the house) & this was with the sledge out in the Sun.

After a few days of painting, second coats etc, I've got to this stage. The last bit I had to leave so I had something to hold onto to move it lol (it has to stand up in my garage).

Then I reapplied the foam protection.
Also added these to rubber pads.

Next is to look at some location brackets to hold the actual batteries in place. R5's battery boxes will hopefully fit inside the sledge (remember that R5 will already be loaded on it, so its a case of where/how to fit things in/on once he's on.

Possible locations (either side) for the batteries.
Need to make up or buy some corner brackets.

More in "R5-D4's - Sledge 1 - UPDATE Part 3".....

July 04, 2016

New platform/support/frame for R5 in car - Sledge 1 - UPDATE

It's been a long time coming, but over the weekend, I eventually got round to transferring the wheels off the first transport platform onto the Sledge.

This does away with the need to (if I ever did) carry two. Makes life a lot easier to more him around too.


 Location for batteries, brace added.

 Front wheel drive, lol

And with the two large wheels at the bottom, a tip up and he's movable in the upright position.

October 06, 2015

New platform/support/frame for R5 in car - Sledge 1

After quite a few events, what I really want is for R5 to be ready to roll, straight out the back of the car, so to speak. Travelling to local events, he can fit in rear of my car, standing up on his motorised feet, but in the car other (used for NOT so local) events, they have to be removed, due to the rear hatch being lower. This adds more to the time needed to disassemble/reassemble him, and in which order.....

So I needed to build a new support frame so he can be led down, instead of stood up.

There are loads of different ideas, so which one is best for me......?? lol
So plans are being drawn up to accommodate his specific needs....

Sunday 27th, I got to start work on building, the idea I setteled on is one I've seen used a few times by other builders. Had been measuring up and marked wood, so today was cutting it all out.

Well I managed to get it 95% completed....enough to support in car anyway lol.

The underside of the frame sits on the lower protruding parts, then it helps to tip R5. The upper 'arms' stop him sliding once in the car. Then he'll be strapped in place on sledge and to points in car boot.

July 27, 2015

R5-D4's transport platform 1.5 - UPGRADE

Saturday, I got to finishing off some things that needed doing to the platform to make it actually fully useable lol. As it was, there was no where to mount his centre leg and also he wasn't securely stable if platform was moved.

Original location bolt holes for the stand were no good once the car ankle stabiliser stands were used on the platform. So I made and fitted two location pins for the stand. These are just to help stop things moving around.

Platform now fitted with location pins for stand

The batteries can be stored under the stand.
R5D4R5D4
The foot/ankle stands also fit on the platform. These may also get location pins, but as the whole lot gets strapped down, they may not be needed. 

R5D4
In the previous pictures, you can see the new 'slot' to the rear of the platform, between his legs. This is where his centre leg 'slots' into place.
R5D4
R5 fully installed on his transport platform. Just need to add some location points for the battery boxes to secure them and also some storage for transit bolts and tools.
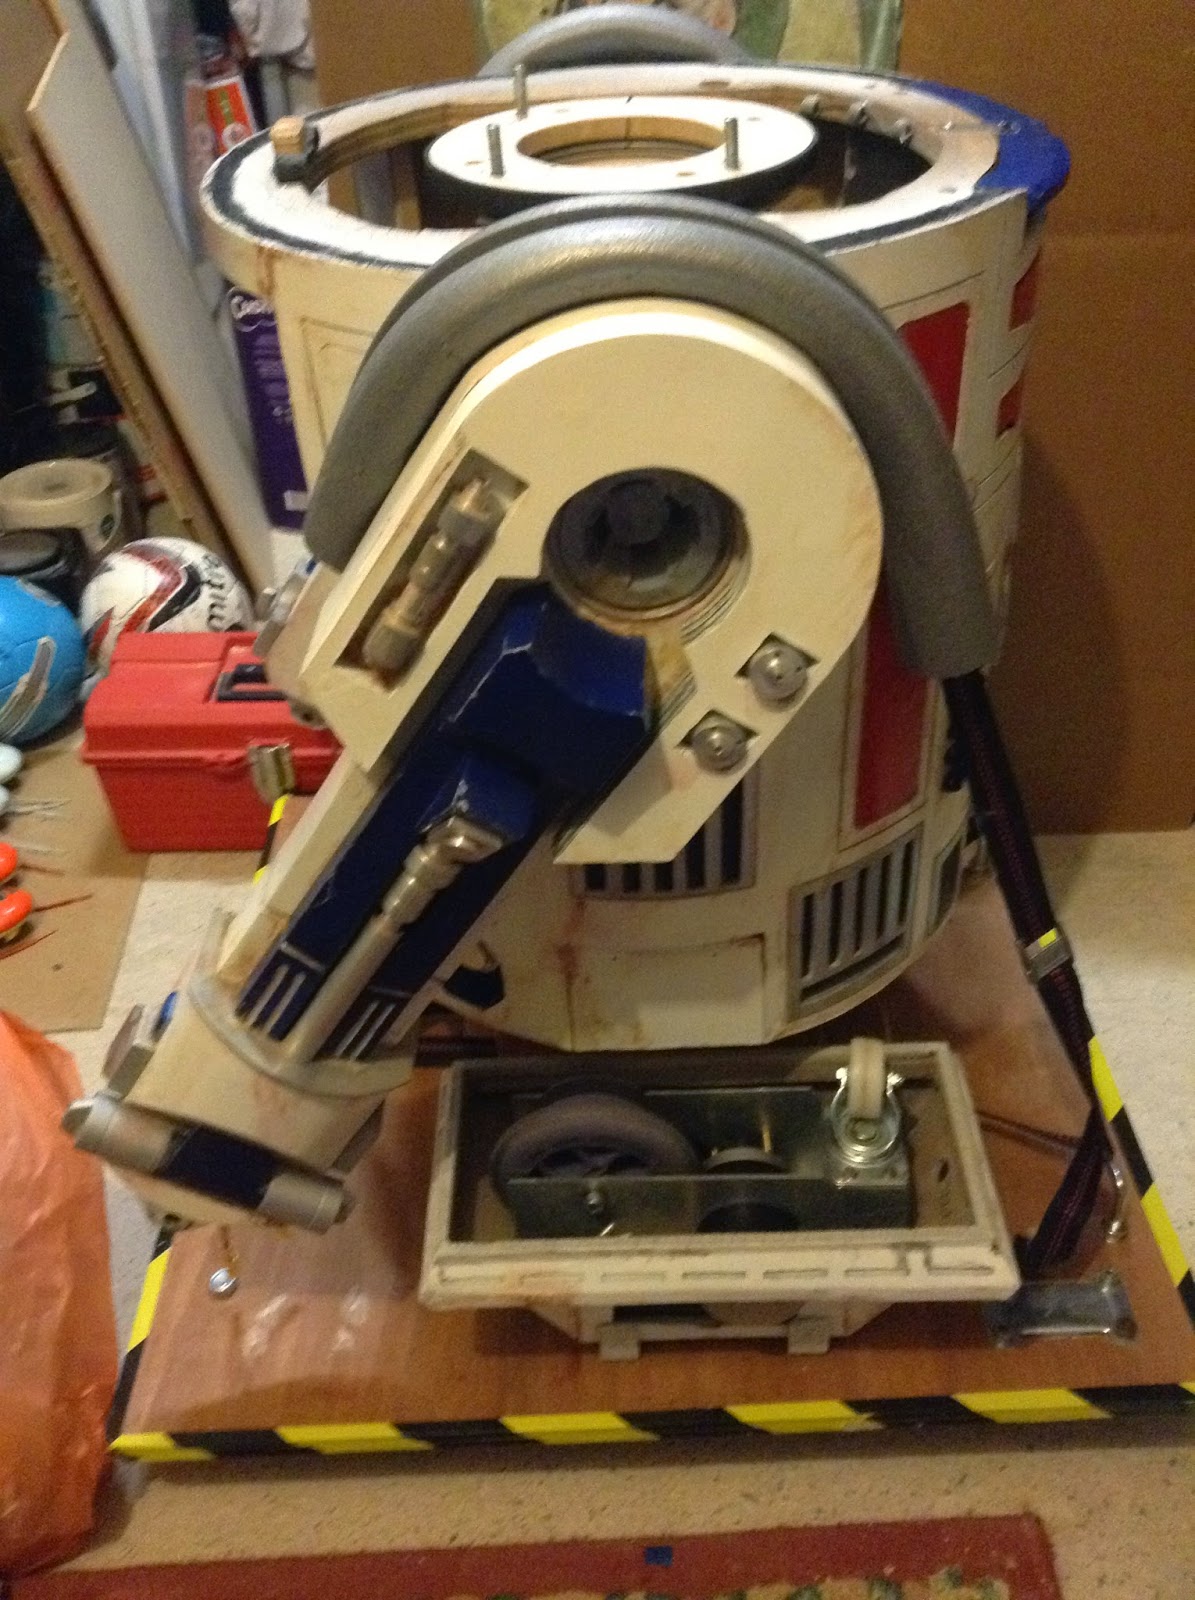
I'm considering installing some sort of push bar to be fitted to the base, rather than have hand's on his shoulders.....

His head will be fitted onto his body, it is now for storage purposes.

July 23, 2015

Car transportation unit - Leg supports

After taking R5 to a few events now, I realise that he need's better restraints for the transporting in the rear of the car. Either new ankle leg locking stands or something.

R5 is too tall to go in through the rear hatch when in three leg mode, requiring outer feet and centre leg/foot assembly to be removed. I had made a 'stand' which fit's up inside his skirt [centre leg removed] and this is what he sit's on whilst in transport.

But even with him strapped down, he is still unstable going round corners. So new leg/ankle supports are a must. These can be bolted to the legs for support, using the original T-nuts.

So I dug out his original wood internal frames and started cutting these up to fit the new angle they need to be to sit level with the floor.
R5D4

R5D4

Now working on the second leg support.....

November 05, 2014

R5-D4's transport platform 1.4 - UPGRADE

Almost finished the upgrade work to the transport platform.
I added some bolts and t-nuts to locate and secure the 'stand' to the base platform for once it's being pushed. Re-positioned the front two U-bolts. Then refitted the rear strap bracket.
(this will be removed so that the 'stand' can be moved towards the edge)
R5D4

R5D4

R5D4

Still need to figure out placing of the centre foot and battery boxes??

October 30, 2014

R5-D4's transport platform 1.3 - UPGRADE

R5-D4 when built fitted into the boot/load area of MY Zafira just fine. But the wife's newer one, the hatch is smaller in height.
Meaning the feet have to come off. This was something I would of preferred not to have to do, because then I'd have to figure out a way to support R5 in no leg mode!

This is not complete, but is on it's way to being. The centre leg would have to come off due to the limited height.


So I built this mini platform, which will also double as an assembly stand once attached to the mobile platform. The mini platform fits onto the mobile platform, giving the right amount of clearance and stability to re-assemble his feet, then he can be reversed, giving access to the stand, which once moved, allow's me to re-fit his central leg/foot assembly. Phew.

The left pic shows how the stand will be once R5's in place, the right picture shows the stand aligned with the edge of the platform, this allows the outer feet to be re-attached with plenty of ground/platform clearance.

I thought about if I needed to transport from A-B without having the space (or dry weather) and needed to move everything quickly. So thought and made up these to channel runners to bolt the outer feet too. The ankle bolts hold them in place whilst in transport, also means I can't misplace them lol.

I still need secure the centre leg and re-do the strap U-bolts (at the front of platform). Of course the proof will be when it comes to using it if this works or not lol. But, I know that with his feet off, I'm able to lift him up and into the boot again.

October 24, 2014

Prep work for R5-D4's next event @ Chippenham 25.10.14

These last few day's I've been checking and re-checking, last minute fixing, charging batteries etc ready for Saturdays event in Chippenham.


Finaly got round to fitting this last strap bracket to fully hold R5 down.
Astromech transport platformAstromech transport platform


I don't know about R5, but this is his first event that he'll be rolling around at and so am a little apprehensive about him behaving himself lol.