Showing posts with label Cylinder Wedge. Show all posts

May 25, 2017

Centre Leg - Film version **UPDATE - 1.1 - ankle details**

I already had the plans for the ankle details, which are available via www.astromech.net forum, so it was just a case of marking up some wood and cutting them out and shaping them.

detail pics:
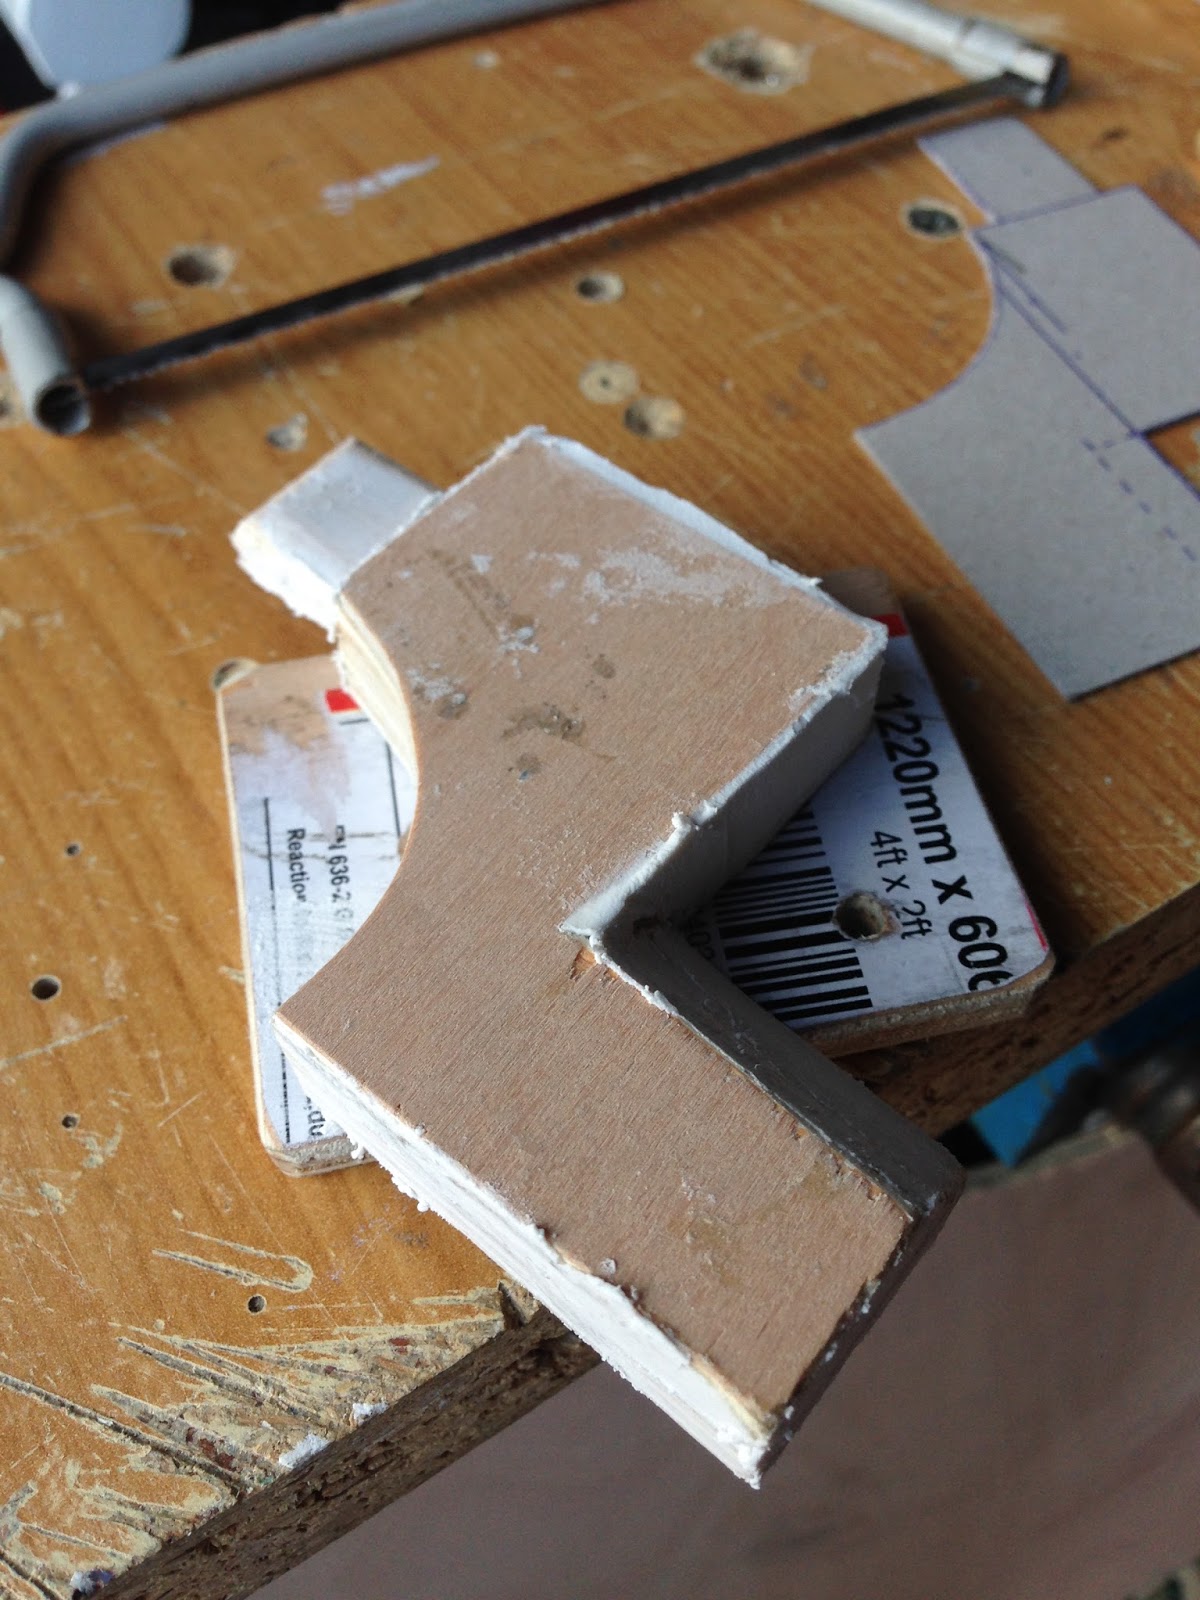
Drew up a template and marked out on the wood the 'detail'.
Notice that only one of them has the upper 'tab' marked on it.

Next up was gluing the two pieces together.........then cutting out the details...

And here's the first on.

I sanded the edges and faces, before applying wood filler to the cut sides & faces.
Had to stop for food, then I was back out in the garage, marking up the second 'ankle detail'.

And here they both are, cut out and wood filler applied.
Left to dry over night, before sanding and extra wood filler where needed.

.....these versions as with the ankle cylinders, don't have any blue (that can be seen in the photos), so will be just white. Which is fine as they are going to be weathered to blend in with the centre leg.

The top 'tab' would normally be blue (or dependent on your choice of droid colour) and also there's a small rectangle recess, which would also be coloured accordingly. 

** I uses normal everyday tools, the hand saw as can be seen in the pic .
The most 'hi-tech' tool I have is a borrowed jigsaw,
meaning these projects are not beyond anyone's abilities to try **

Centre Leg - Film version **UPDATE - 1.0 - ankle cylinder**

A long time  ago.......... ;-) I realised that my nagging conscious wasn't going to let me sleep anymore lol.

This (zoomed in) image of R5 rolling away from the droid lineup, shows R5's alternate centre leg/foot shell.

The obvious things you can see is that there are:

  • no side crescents on the foot shells.
  • the ankle cylinder & wedge, are white (no silver or blue, like the outer leg)
But when you look even closer, you can just make out that the 'centre leg' is actually fitted with 'ankle details'. Well it would do wouldn't it, as it was an outer ankle unit.

For more on this, check back on my first blog via this link below:


So, as I already had a spare ankle cylinder.....as my original centre leg was built to the club plans (based on R2 and all Astromech's having a 'standard' build) & before I fully knew about R5's centre leg incident during filming (see the link above for more). I thought I'd do a little bit of upgrade work.

So I dug out the spare cylinder/wedge and checked it would fit the centre leg fixings I already had installed. Yep, me and the plans in perfect synic lol.

Next I sanded the cylinder and then primer sprayed it ready for the next stage.
R5D4

Next I'll spray it up with Satin white from Plasti-Kote, once I've finished the other parts.
This and the primer I bought from The Range (shop in the UK).

March 13, 2014

Leg Assembly......again

Last night I got to re-assembly Leg No1 again.


The way most of these components were designed to be connected together was not my 'new' idea. I have followed several other R2 Builders builds. And this, along with building the actual components, are mostly not original to me.

Adam Strawson's R2 was one of the first R2 Build's I followed.
The other being Emy by Podpadstudio's.

So here's all the parts....
R5-D4's Leg
Left pic shows the front, the right pic shows the rear fixing points etc.

For my build, I secure the Ankle Braclet to the Ankle 'curved' section with a small screw. This holds it in place and will locate the Booster Strut in place.
Next I secure the Booster Strut by inserting the bottom of it into the Ankle Bracelet, then a screw into a bracket on the rear of the top square part, picture below.
Booster Cover over the Strut, and press it down into the dowel location holes.
The other components, the Ankle Cylinder, cylinder wedge and support are already assembled as one piece. These are push fitted into the leg with dowels.
The last three items are the 'Ankle Details' these fit on the lower ankle sides, fron and back.
And the Shoulder Horseshoe assembly, which is pre-assembled.
The centre hub is also a snug push fit.

March 12, 2014

Horseshoe No2 - Hydraulic & Buttons fitted

To make space in the bedroom [keeping the wife happy] I took the Horseshoe back out to the garage and fitted [bolted] the Hydraulic & the two Buttons back on. Then fitted the spacer and finally, pushed the location pegs into the holes on the Leg.

Leg No2, is now complete :)
R5-D4

January 07, 2013

Ankle Cylinder for Main Leg No.2 - 2.2

I've eventually got round to taking some photos, don't really like to post without them, as it's a bit boring and a picture makes things easier to understand :)
Well I drilled, out the two wood pieces and then PVA glued in the two 'dowels'.
Next I lightly sanded over the wood filler around the end caps and all over the plastic tube to help key it for primer.

Followed by silver, masked off areas, and once dried and re-masked off, blue :)
Here it is in bits, again.
R2D2 Ankle Cylinder, Wedge & holder

December 15, 2012

Main Leg 2 - 2.4 - Ankle work [bracelet & wedge]

Ankle
I marked out the curve section needed on the two blocks I'll be using to make up the ankle. I also marked where I need to drill counter sunk holes to fix them to the leg.
Image is from first Leg build

Did this then screwed them on. Next I used my trusty saw to cut chunks off to shape. Then I used a file to smooth over. I then used dowel cut to length to plug the screw holes. The next step was to apply wood filler all over and sand all over....again.
Image is from first Leg build

Had a 'lost item' moment last night. I couldn't find my Ankle Cylinder Holder ????? I'd taken it out of the storage tin to remind myself what needed to be done, if anything, to it. Then........it was gone!?!?! I'd had a bit of a tidy up to make some space and yes, you guessed it, it had fallen into my box of off-cuts! Phew....... :D

Ankle Braclet:
Marked out the Ankle Bracelet for the 2nd leg & cut it out. Then measured my leg and cut the inside of the Ankle Bracelet to fit it. I then marked up and drilled a location hole for the Leg Strut to fit into. Next up I applied watered down PVA glue all over and allowed this to soak in and dry. This hardens the wood and seals the cut edges, which stops the spray paint from being absorbed into the wood and gives a better finish.
Image is from first Leg build. Wood filler to underside of bracelet

I then applied wood filler to the underside of the Ankle Bracelet, that may be visable to anyone on all fours looking up underneath R5, lol. This will smooth over the textured underside of the hardboard :). I then fitted the Booster Strut in place and secured the support angle with a screw. The bottom of the strut fitted into the hole in the Ankle Bracelet. Some wood filler was applied to the gap between the bracelet and the lower ankle area.

Ankle Wedge:
Cut out a piece of 3mm hardboard to make the ankle wedge front panel. I angled the back faces to fit flush up against the angle face of the ankle and the curved part of the cylinder. Next I applied masking tape all over the cylinder & angled face of the ankle and applied p40 resin to fill the gap & build the sides. Once dried, this new piece came away easily and was then ready for trimming of the excess P40 resin and then filling any gaps with wood filler. Once all this was dried, I drilled and screwed the new Ankle Wedge and also the Cylinder holder onto the Ankle Cylinder. Once painted, these become a one piece item which is then held on the leg via the fixing method mentioned in prev post.
Image is from previous wedge build. This image shows sides and P40 resin.
For the last wedge, I didn't use sides.
The weather has been very cold, so build time has been limited, hence lack of photos. I will take some up-to-date ones soon.

September 09, 2012

Leg 1 update

Clear sprayed Leg No1 up, don't know or remember why I'd not done it before now, apart from the Horse shoe, it's completed ??? lol
 
Then I fitted the Ankle Cylinder/wedge/cylinder holder combo in place, this just clips over the holders [click here for how I made these]. Then glued on the Ankle Details. Used silicone sealant to hold the ends of the Ankle bracelet on, then screwed it down. The screw will be covered by the Booster cover. I then fitted and screwed the Booster Strut in place and finally used sealant on the dowels again, to fit the Booster Cover in place.

Astromech Droid Leg R5D4 R2D2

Drilled and threaded some holes in the shoulder stabilisers and clearance holes in the metal back plate. Then screwed in two cut down 6BA screws to hold in place. Thought this would be easier to hold them in the leg when the back plate is silicone'd into the shoulder socket.
R5D4 Shoulder Stabiliser
 

November 29, 2011

Main Leg 1.4, Ankle Wedge 1.4 Centre Leg build update

Spent 2.5hrs working on leg. Sanding then more wood filler. Made the counter sunk holes bigger on five of the screw holes. Then filled with wood filler.
counter sink holes made deeper
Once dried, more sanding. Also applied wood filler to fill in the wood grain surface.
Mixed up some more P40 body filler and fi0lled in the back of the seconed ankle wedge. I then got to work on re-shaping the resin in the back of the first wedge. Once happy with the fit, I marked its position on the ankle cylinder and removed the cylinder from the centre leg. I then drilled through from the inside of the cylinder up into the resin in the back of the wedge & secured it in place with a screw. I repeated this with the second cylinder & wedge, once the resin had dried.
There is a screw (that you can't) see securing the taped up wedge onto the cylinder
I then masked of the wedges and sprayed them with grey primer.
Wedge masked off and primed
wedge time taken, about 1hr.

Next Day = Once they were dry, I sprayed them blue

And then once dry, I sprayed them clear and also the centre leg.

Centre Leg complate, with cylinders and wedges

 Am pleased with work so far.

November 21, 2011

Ankle Wedge build 1.2


The template i had made was the right size, but the trimmed wood ones came out a bit small. The filler needed filing down and the gap left will be filled with more P40 resin.


I made up another template for the wedge sides and this time they should come out a better fit.


Not the best pic, but these side pieces are larger than the first ones.

October 05, 2011

Spraying up stuff

Well, it wouldn't last long before I HAD to do some work on R5 :-D

Bought some white and clear spray paint the other weekend, well I was getting some matt black spray for the Proton Pack build, so thought two birds with one stone.

Finished off wood filler and sanding and grey primering and silver spraying of the Cylinders...... and then got on with the clear spray finish.

Sprayed up both Ankle cylinders made so far, the front Wedge plates made so far and the four Ankle Details.
And am happy to say, I am well pleased with the results :-)

Look at the shine on them Cylinders lol

The rear of my Ankle Cylinders, dowel's to fit into Centre Leg
More work has been done, just need to post up, cylinders to centre leg next.....

September 12, 2011

Cylinder wedges

I also measured up & cut out a piece of thin hardboard to be the face of the cylinder wedge. Not sure how to secure bracket yet but do have a few ideas.

Cylinder and plate for wedge, in place, test fit
The sides will possibly be filled in with body filler.