Had to put this on hold, but not for much longer lol, daughters nagging me :D
Have got some elasticated material for the flight suit cuffs. It's just a case of fitting everything in, time wise.
Then once more free time is available, I'll make my first attempt at molding.....her X-wing helmet. Still work to be done before I get to this stage tho.
Droid Builder

Showing posts with label x-wing flight-suit. Show all posts
Showing posts with label x-wing flight-suit. Show all posts
March 20, 2017
January 31, 2017
Jessika 'Testor' Pava - Flight suit 2.1
2017 and after Xmas/New Year am feeling positive about things.
With a free afternoon on Sunday, I got out my daughters flight suit and accessories and got to working on it again. I started by remeasuring her in the suit, yep, still fits lol. I then measured marked and cut off the excess sleeve & leg material. These bits I can reuse as pockets etc on the suit.
 I left enough for hemming the edges and also the arms will need elasticated cuff material. There's also plenty of space and length to last her a few years growth lol.
I then led it all out for a mock-up picture.

There were a few bit's I'd misplaced for the straps, but for now, this is work so far.
With a free afternoon on Sunday, I got out my daughters flight suit and accessories and got to working on it again. I started by remeasuring her in the suit, yep, still fits lol. I then measured marked and cut off the excess sleeve & leg material. These bits I can reuse as pockets etc on the suit.

I then led it all out for a mock-up picture.

There were a few bit's I'd misplaced for the straps, but for now, this is work so far.
November 11, 2016
Jessika 'Testor' Pava - Flight suit & Chest Box 1.4
I found some spare ABS sheet that came with my FX armour, years ago. And marked up the ejector brackets for the harnesses.
 These are scaled down to suit my daughters outfit.
The green LED arrived yesterday & so of course I had to fit it in to check.


Next was to apply wood filler to the joins. Because the cardboard is layered up it's really stiff and so the filler actually works. Below pic is the morning after, once it had dried and was sanded.

I had to fit the hose on to show my daughter, who was very excited. These were taken before wood filler was applied.


The green LED arrived yesterday & so of course I had to fit it in to check.

Inside of box showing LED (this will be hot glued in place)
& view from the front.

Next was to apply wood filler to the joins. Because the cardboard is layered up it's really stiff and so the filler actually works. Below pic is the morning after, once it had dried and was sanded.

I had to fit the hose on to show my daughter, who was very excited. These were taken before wood filler was applied.

X-wing chest box & hose (which will be cut to length)

November 10, 2016
Jessika 'Testor' Pava - Flight suit & Chest Box 1.3
Top section of box.
I measured and then cut to the length I needed, but then remembered that the angled end sections don't reach to the edge. So I had to cut it in half and trim down to correct length.

Then I started on the front angular, cutout section.

 This was my first time at cutting angles etc and just like the rest of this build, enjoyed the thinking behind how I was going to do it.
Here is a test fitting before the next stage.

The next stage being the cut out on the front angle.

Next was to add support to the internal flat, I just layered up more cardboard.

And then glued it into place.

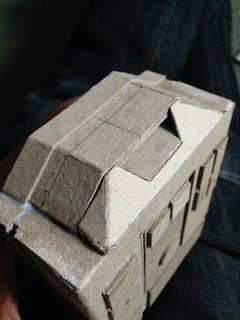

I need to add the top pieces, to cover the visible join lines etc.
I measured and then cut to the length I needed, but then remembered that the angled end sections don't reach to the edge. So I had to cut it in half and trim down to correct length.

Then I started on the front angular, cutout section.


Here is a test fitting before the next stage.

The next stage being the cut out on the front angle.

Next was to add support to the internal flat, I just layered up more cardboard.

And then glued it into place.


I need to add the top pieces, to cover the visible join lines etc.
Jessika 'Testor' Pava - Flight suit & Chest Box 1.2
Had two mins, in between kids TV programs, over the weekend, to get daughter to stand up and try on her flight suit. This was so I could measure & cut to length the belt and straps.

Thinking again tho that he buckles are a bit heavy, so may need to look at alternate ones, smaller, lighter or to make some myself.


 Outside view, before last piece of cardboard was glued into place.


Thinking again tho that he buckles are a bit heavy, so may need to look at alternate ones, smaller, lighter or to make some myself.
~~~~~~
I have been looking at how to attach the hose to the chest control box, securely. Searching through my 'plastics' box, I found an end cap off a photo copier toner cartridge from work. The course thread it uses to fit into the machine, is just the right size to thread onto the hose. How lucky is that!!

pictures of toner cartridge cap

picture of toner cartridge cap fitted onto hose
~~~~~~
Here's the hole I made in the bottom of the box. This it to locate the cap.

Next I started to glue the flat pieces of cardboard that I had cut out to accept & hold the trimmed down cap. The cap & block are then glued into place, all with PVA glue.


View, inside of box. To help stop possible twisting of the cap, I trimmed some of it off and glued some layered up cardboard across the half cut down cap.
November 03, 2016
Jessika 'Testor' Pava - Flight suit & Chest Box 1.1
 |
| Jessika Pava - flight suit |
I've made the box out of several built up layers to create the grooved detail. This also add's strength to the box. The cut out in the rear was done to be able to access the internal area, as I plan to include a green LED, as per available data known. I've also not fully sealed up the box as the hose needs to be able to be secured first.
 |
| x-wing flight-suit chest box |


Still the upper & bottom sections to complete. Then the plan is to fill in areas with filler before painting.
The hose arrived and looks good. Also the webbing came to, so I'll be able to get measuring and cutting this to length this week sometime.
Jess Testor Pava - Flight suit 1.0
Ordered a jumpsuit/overall off eBay for about £12. As the flight suit is baggy, this comes in handy for choosing a suitable size for my daughter :)

I also found some roll pin belt buckles x3 off, and also some suitable webbing which I'll use to make ALL the belts. (Note: this is not 100% screen accurate, but suitable for mini pilot lol). I also bought some flexible pond pipe, also of eBay.


And finally, I ordered some hose. Again tho, this is NOT screen accurate, but close enough.

I have also started on making her the flight suit 'chest box'. This is being made, at the moment, out of cardboard.
More to follow.....

I also found some roll pin belt buckles x3 off, and also some suitable webbing which I'll use to make ALL the belts. (Note: this is not 100% screen accurate, but suitable for mini pilot lol). I also bought some flexible pond pipe, also of eBay.


I have also started on making her the flight suit 'chest box'. This is being made, at the moment, out of cardboard.
More to follow.....
Subscribe to:
Posts (Atom)