Showing posts with label Battery Box Straps. Show all posts

April 22, 2014

Weathering 1.3 - Body, Leg, Outer Foot and Battery Box

My attempt at weathing R5's body. Started next to the fitted rear hatch and worked my way round. The Leg got in the way so moved onto this lol. This then led down to the Battery Box. I then turned him round and carried on with the Body, working down to his skirt (no pics yet).
R5D4


I got round as far as the Centre Vent's but didn't take pictures, will do for next post.
This is by no means perfect, not that it's supposed to be, just my interpretation.

March 12, 2014

Battery Straps - set no2

Started 22.01.14

Drilled out and pinned, along with Araldite, the top and bottom pieces of the Battery Straps.
R2D2 Battery Box

Next was primer, then some wood filler and sanding. Then silver. These haven't come out as well as the first set, but once 'dirtied up' they should be OK.

Lastly, the blue pads were HOT glued in place. Once dried, wood filler was applied to fill in the gaps. Lightly sanded and then touched up with Metalic Blue paint. They were then hot glued onto the Battery Box.

January 20, 2014

Assembly - Battery Box No2 with Braided Hose & Outer Foot Shell

Thought I'd share a mock up of the battery box, hose fitted, battery straps & Outer foot shell no2.

Still working on the battery straps, as can be seen, the blue panels are not fixed on yet. And of course it all needs spraying up.

January 17, 2014

Battery Box No2 - 1.2 & Braided Hose

So grey primer is on. This helps hi-lights all the work still needed to be done :D
More filler where needed along with sanding.
R5D4 Battery Box.

I also got on with finishing off the set of battery straps I started making, last year, when I made the first set for box no.1. The idea being to keep the 'flow' going.......yeah, that worked didn't it!?! lol.
R5D4 R2D2 battery strapsBattery Straps for R5D4

These are simply made up of small pieces of hardboard over lengths of wood strip. Filed pieces and then wood filler inbetween the gaps. The top pieces are seperate, that are pinned & glued to the main strap.

Braided Hose
Cut ends off hose, taped up and fitted wall plugs & screws (test fitting) as still need to be sprayed.
R2D2 Braided Battery Box Hose

April 20, 2013

I give you........R5-D4

So, this morning, the kids were out doing 'activities' and the wife was out too, and to top it all the SUN was out shining and the wind was still.

Didn't take two seconds to realise, now was my chance to 'do' some work on R5.

So I assembled R5, legs, feet, 'aluminium' strip to feet channels, battery box on to check for clearance etc.

Whilst assembling, a gentlman walking his dog, by himself, said [to himself or his dog], 'Look, it's R2-D2!' So I was chuffed it was recognisable, then a bit miffed he got it wrong! hahaha :D.

Outer foot R5D4
Test fitting of outer foot internal to leg

Then on with the rest of the legs and feet.
R5-D4


And the pictures you and I have been waiting for............

R5-D4 standing on his own three feet.
This shot show's Foot No.2 is still a W.I.P.
I didn't fit the booster cover etc or the horseshoe.
This shot shows R5-D4's rear, rear hatch, opening into his outer foot
And back round to the side.
Close up of the Battery box fitted.


I also fitted the fake aluminium strips to the channels of the feet. They are screwed in place and these will need a spot of paint on them.
R5-D4

And here is the 'trimming' I had to do so the legs would fit into the channel of the internal foot channel.

This leg still needed trimming, but this time along the thick part of it. As it was touching the shell. Found this out when the leg and foot were assembled and the wheels weren't sitting flat on the floor.

April 18, 2013

Work update 2 - Outer Foot No.2 & Battery Harness Straps & Leg No.2


Leg No.2
Cut out ankle slot.
Finished sanding all over. But work still needed doing on the curve to get it smoother.
Then applied primer spray all over.
Then applied satin white, in stages, front/side faces then once dried, rear face.


Re-test fitted the 2nd outer foot internal assembly, and found that the leg end was to long for the channel. Basically, either the leg's hole was to high or the foot internal assembly hole was drilled to low or both lol. So I had to mark and cut off some material from the leg end and file smooth. This will need to be primed and sprayed again, not the end of the world as the slot & curved ankle area also need re-doing. Wasn't happy with how either looked so did some more work on them. Next re-sanding, primer, white.

Outer Foot shell No.2
What with R5 going to be on display, and whilst spraying up the leg. I decided to apply a few light coats of primer.
R2D2 R5D4 feet foot
Outer Shell No.2 WIP still
I also sprayed up the centre channel of the internal foot, visable when assembled.


Outer feet internals:
Applied primer to channel areas of the internal wheeled feet.
R2D2 wheels feet
Not the best shot, but this shows the internal side supports to stop the shell tipping
Then applied satin white. These are not perfect, but will do for now. When these are converted to the motorised version, they will be redone to a higher standard!
Started working on a 'strip' to cover the channel that will be sprayed 'aluminium'.


Battery Harness straps.
Hot glued on the blue details onto the two straps.
Then applied wood filler to the visable gaps.
Once dried, they were wiped clean of excess filler and will be touched up with blue.
Then I hot glued the straps into place on the battery box :)
R2D2 Feet
A before and after picture
R2D2 Feet
The Outer Foot Assembly No1....almost complete

April 15, 2013

Work update - Outer Foot No.2 & Battery Harness Straps & Leg No.2

Outer Foot No.2 work:
Internal Work:
Cut, screwed, drilled & fitted centre piece to clamp sides together. Made some spacers as the internal frame was a bit slack. Made up some side supports, to keep the shell level and square.

External Work:
Cut out the front and rear 'channels'.
Glued on the front plate where the knurled hose fittings go.
And also the rear plate.
Bonded on the last top piece of the shell.
Drilled and screwed side panel detail on, for hole ref at the moment. Still need to create the curve and top strip detail.
Started adding internal supports to stop the shell from 'wobbeling' on the frame. [two added so far].

Outer Foot No.1 work:
Silver sprayed up the front and rear strip details.
Started applying black paint and smudging it to look oily and dirty - W.I.P.


Battery Box Harness Straps:
Silver sprayed these two up.
Metalic Blue sprayed up all four details, these's will be glued on and additional filler added under 'blue' parts [and painted blue] once all dried.
R2D2 R5D4


Leg No.2
Applied wood filler over the back face of leg no.2 to cover the grain.
Started Sanding curved area, then applied some primer. This showed up where more filler was needed and which was then applied.


Finished of the second recess for the under shoulder stabiliers the other day, needs cleaning up round the edges with some wood filler.

Marked the ankle slot position, but this showed that the curve of the ankle was flatter on one side. This i wasn't happy with, so mixed up some car body resin & applied to area that needs building up more.

Transferred fixing points onto leg, ready to be drilled, these can just be seen in above picture.

April 04, 2013

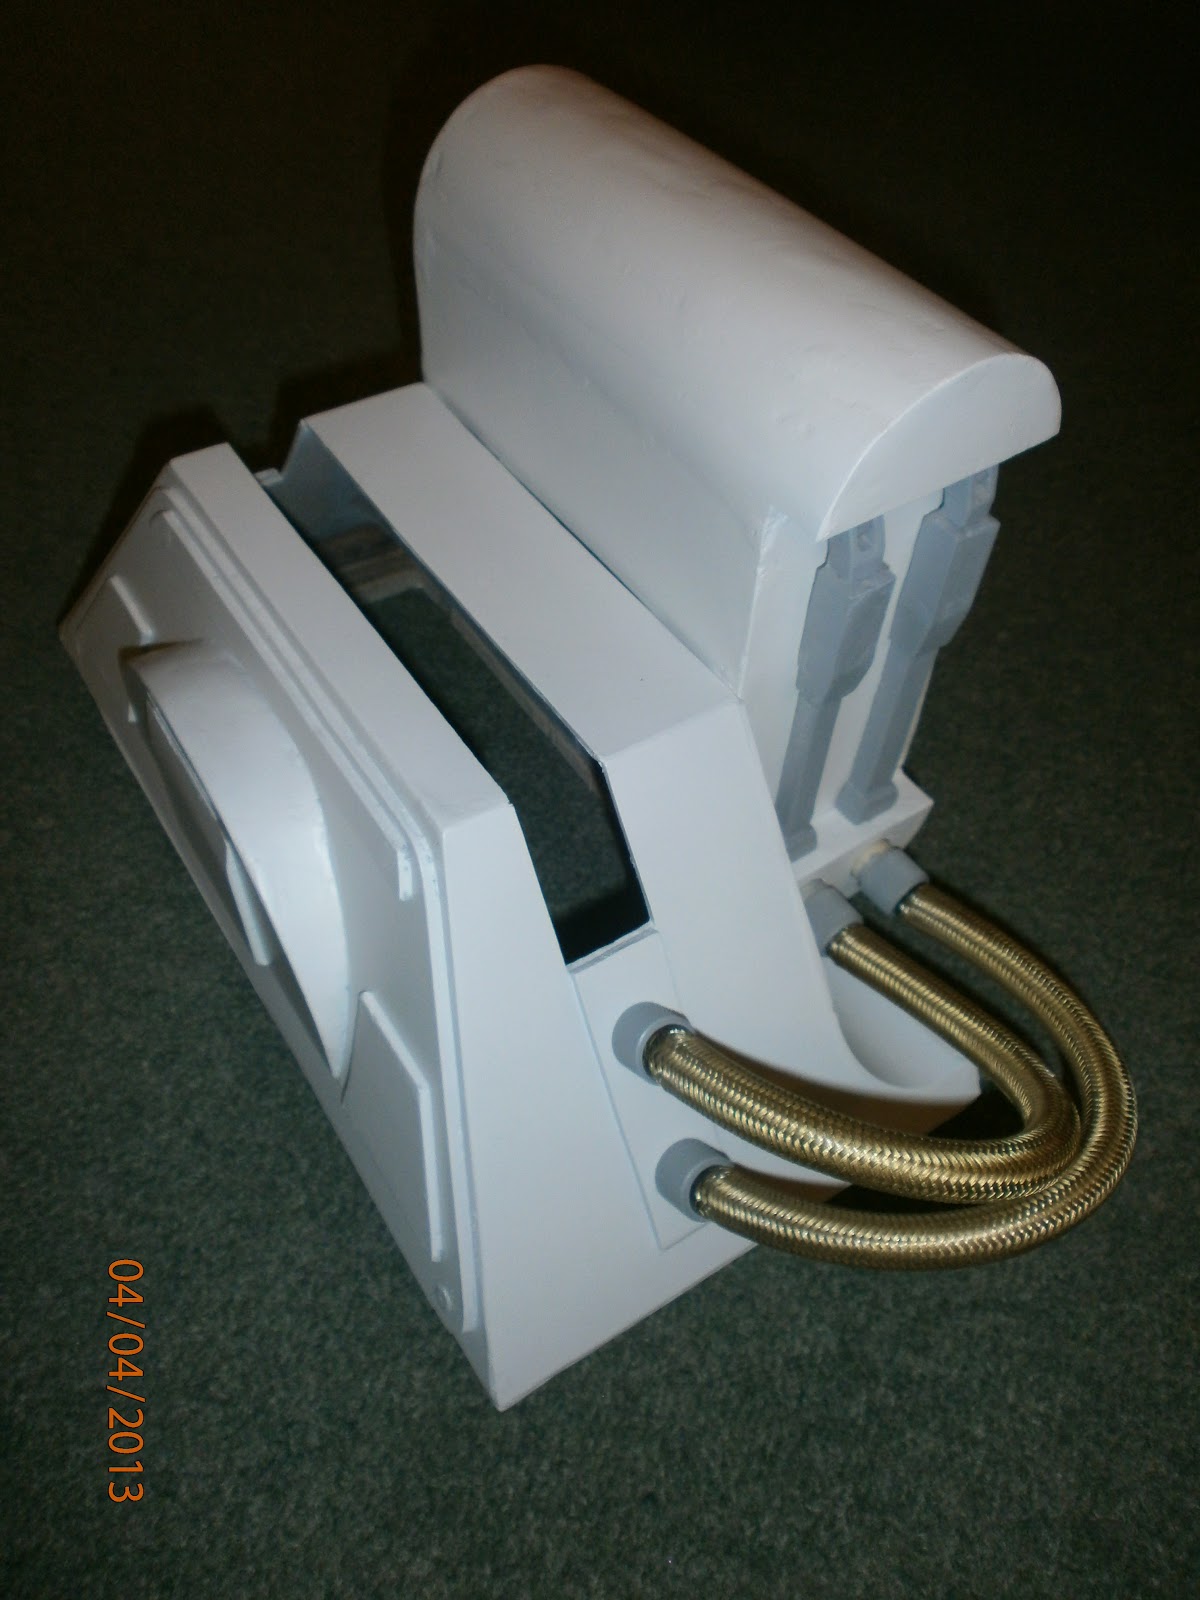
Outer Foot No1 & Battery Box No1 - now in white

Finished Sanding the battery box.
 
Then on test fitting the braided hose & Knurled fittings, I found that the flex in hose (the rubber hose inside the braid) was causing the box to tip away from the outer foot shell at the bottom. The pivot point was the two catches at the top!
 
So drilled a pilot hole, then through into the battery box, then hammered a spiral pin through into place in the Outer Foot. The hole in the battery box was made slightly bigger for clearance. The battery box now slides over the two catches and locates onto the pin.
R2D2 outer foot, location pin for battery box
The spiral pin can just be seen sticking out of the curved section.
This is not a new idea, has been used in similar forms before.

Then this morning, out came the white spray can and got to spraying up the outer foot shell & battery box.
R2D2 Outer Foot & Battery Box, Braided hoseR2D2 Outer Foot & Battery Box, Braided hose

Also sprayed up the knurled hose fittings and battery harness straps with primer.

March 12, 2013

Knurled fittings for Battery Box Hose's - 1:1

I've bought a set of Knurled hose fittings off e-bay from Don Jarr. This will save me some time rather than make a set. Available access to a free lathe in work has been limited, due to them being used for work :-( lol :-D

So here they are after I did a bit of filling of holes etc.

Drilled and pinned & using Araldite to complete the bond, the two parts of the Battery Harness straps, together. Test fitted here in the pic.

March 07, 2013

Battery Box No.1 - 1.6 - Battery Straps

Cut & glued on 3 angles & front strip in-fill. Then cut out front raised 'blue' pieces 4 off, filed angles.Applied watered down PVA glue to seal. This piece will be glued on once painted [this is the flat piece that's just resting on the battery strap in the picture below]. Cut & glued in place 2nd lower piece. Then started on top pivot pieces, 1 done.
A bit of Sanding & applying of wood filler.

This picture shows one 'mock-up' of battery harness strap :)

March 03, 2013

Battery Box No.1 - 1.5 - Battery Straps

Started making the battery straps on Saturday. Started on just the two then thought I might as well make all four up at the same time. So after working out HOW I was going to make them, I started by cutting up four lengths. I then cut some 3mm thick hardboard to size for the top 'box' section. These were glued in place with PVA glue to the sides [pic below, two on the far right]. Next came the side angled pieces.
These were angle cut then the backs were filed to an angled point.

The front was then filled in with another 3mm piece of hardboard, before wood filler was applied all over to make level [the two on the left of pic].

I only had time to make a start on one of the bottom pieces [far left of pic].
So far, it's not looking to bad :)
R2D2 Battery Box Straps