Showing posts with label Bad Motivator. Show all posts

August 11, 2026

R5’s Bad Motivator 2025 (Part 2)...... unfinished in 2026

13th  September 2025

The other fix I need to do is R5’s bad motivator system. I found a servo switch that I had bought for this , but thought that the RC transmitter route would work...... it didn't. Well, not using two transmitters at the same time.


For part 1: click here.


......August 2026......
Didn't get round to sorting this, maybe one day.

July 07, 2025

R5’s Bad Motivator 2025

 February 2025.....

Back on it again these last few months, waiting for delivery of different components to get R5’s bad motivator setup all working from one switch off the RC transmitter.

A new receiver paired to use a different channel not used on main body, worked when bench testing, but didn't work when both receivers were powered up. So it's back to the drawing board on this.....

An Adafruit sound board, mini amplifier, voltage regulator and utilising a speaker out of my parts bin lol.

Then 3D printing of brackets to mount these parts.

Then one new momentary servo controlled switch to control the adafruit sound board, and one on/off switch for the ‘Bad Motivator smoke setup’.

February 13, 2025

3D print's Prusa latest additions

Linktree will take you to my Prusa account where you can find most of my files I've created, free to download.

Credit is appreciated, which also helps overs find these too.

These and more can be found on my Prusa page. These are all FREE to use.

August 06, 2024

R5’s bad motivator smoke system PAGE


It has links yo my YouTube channel for the videos on there, including the latest test design.

This was the current setup, before I redesigned the electronics/electrical and motivator activation system.

October 19, 2022

R5’s Bad Motivator : reincarnation (Part 3)

As mentioned in my previous post, Monday saw me start on drawing/creating the ‘Bad Motivator’ as i saw it in the movie, screen grab. See below.

There are some features that I can now see that I didn’t before, and these have already been captured by other already created designs. So these I’ve incorporated into my design as I believe them to be correct in my opinion, and scaled the other parts to better match (again, how I saw/see them) into my design.

The first design I wasn’t 100% happy with so altered it for version 2. I was going to print each component separately, but couldn’t be bothered lol, plus the combined part’s secured the motivator better as one. This would be great as a resin printed piece, but for now I’ll have to make do with my printer lol.

3D coloured rendering of new motivator.

I uploaded the file to Astroprint so that I could print out at home on my Tevo Tarantula. The printer is running already, hopefully this will be done by the morning.

(Astroprint is a free online program to convert stl files into gcodes for your chosen 3D printer)

13hrs later…… the print came out great 👍🏽
Wasn’t happy about the size/scale though so going to edit and reprint.


October 15, 2022

R5’s Bad Motivator : reincarnation (Part 2)


March 2022
Planning out the electronics/electrical connections etc.

This has been the most concentrated effort of work to get things ready for Birmingham's event @MegaCONlive [26th March 2022].

….well…..I got it working on the bench, but there was a problem once installed in R5’s dome.

The smoke system worked ✅
But the magnetic actuator didn’t have enough to move the motivator assembly ❌

So back to the drawing board & a new lighter motivator assembly .........


October 2022
I eventually returned to this project as have time. I thought I’d try out an idea that Brad 'BHD' had a few years ago to activate HIS bad motivator’s on his droids.

It utilised a servo, pivot arm and a track system. His droids are gone, but his webpage Blog is still lives on 😎👍🏽


For lightness I dug out a rail and bearing carriage I'd salvaged from a 3D printer.
Next up was to measure the carriage’s holes position, so that I could draw up in Inventor CAD, an adapter to a-fix to it for the Bad Motivator. I then needed a bracket to secure the servo to and also the rail. So again I CAD’ed up a design and 3D printed it off. It was a Friday, so I knew that this would have to be ‘modified’ lol. Sure enough, with the help of my soldering iron, (melting plastic to reshape areas, the servo fitted into place.

I’m using a metal gear servo for strength, the new motivator isn’t overly heavy, but just to be safe as it will see a lot of action.


As this setup is in R5’s dome, my standard arrangement to activate the bad motivator, is via a remote control fob.
I have been toying with and have tested out using, one of the other transmitter’s receiver’s (I have a few spare and connected it up using the last free channel on my transmitter). This is still a work in progress idea.

After printing the components, I test fitted the assembly unit into R5’s dome, only to find that the rail was further over than existing setup. The new assembly is fitted inside the dome, the old one, resting on the top of it. the 'white' component is the original 'Bad Motivator' location piece, the inside 'black' component is the new 'BMs' location piece. So I had to do some CAD alterations.

The next set of prints worked much better, fit wise. On test fitting, I had trouble with the actual motivator fitting up through the pie hole, without it catching on the new rail. This was due to orientation.

I’ve always accepted this motivator design as (at the time) was the only version available. But I think its now time I stopped wrestling with that nagging feeling and CAD up the motivator ‘that I envisioned years ago when I first sketched it up from what/how I saw it from screen caps’. (Said in Moff Tarkin’s tone of voice 😂).

…….So that’s Mondays project!

Next was to install the brass inserts, drill a few holes to secure parts and wait for a dual relay switch to arrive.....

March 20, 2022

R5’s Bad Motivator : reincarnation

After months (years) of saying I must get R5’s mojo back, I’ve made a start on getting his motivator system back up and running. Well done James, given myself a week to get it ready for next Saturday’s event at NEC Birmingham 😂😂😂 MegaCON Live.

See previous posts about the issues with the car door actuator failing and then upgrading to the magnetic version.

I dug out the parts bags and laid them out on the bench. There’s half still in the dome, the actual pump to be used….and also the vape tank….

In the above picture, there’s two air pumps, one has a broken terminal, so is salvage at the moment. The magnetic solenoid (left, wrapped in blue) is attached to the pivot arm, the clear plastic bag has some mini voltage regulators, the white board is the original one I used, the orange block below it is the time unit, below that is the new remote control unit, and finally the activation remote control wrist strap (bagged up on the right).

R5-D4's Bad Motivator system 2021 - Part 1.3

June 2021
Decided (last month May) that I was going to be the start of getting R5's
'Bad Motivator'
…….back installed again.

It all started waaaaay back in 2019 (part 1.0)........


....the door actuator needed replacing...... again!

The following past Blog links:
The design's were all from my early days of 3D designing components, so they needed some slight modifications and alterations for printing on my Tevo printer.

This new idea is to combine all the components onto the one assembly bracket, which is secured to the inside of the dome.

The solenoid holder needed a few changes, but the knowledge I have gained meant that the design itself was sound.

The bracket which supports the motivator and rail, had a notch in it from an earlier design. This I could use as a location point for the solenoid support bracket.

One thing I did have to change was the pivot position on the bracket arm. The solenoid activates in the pull position when powered on.
*****************************

The electricals needed re-doing as I will also be replacing the original 4 channel remote control with a two channel one.
This will operate the original Bad Motivator pop actuation, smoke/vape system....... and new for 2021.... (if all goes well)..... an amplifier/speaker/sound card to play the sound effects!

…..March 2022, thought I had posted this up last year 😂

January 27, 2022

The Book of Boba Fett: R5-D4

*** SPOILER ALERT!!! ***

The Book of Boba Fett

*** DO NOT SCROLL DOWN ANY FURTHER *** 


*****


****


***


**


*


Sat down to watch Episode 5 of The Book of Boba Fett and was excited (as always) to see R5 in action 😍😍😍😍😍

Flicking between watching the scene and paying close attention to R5.... I was disappointed to notice continuity errors in his appearance 😞😞😞😞😞.

When R5 was re-introduced in The Mandalorian, session 2, there were the usual hype and details noted which could be explained away as 'over time this and that were fixed'. OK, so THIS version is the NEW version, that's cool.

Then in his latest appearance, I noticed a few details and ALL in the one scene!

The above images were captured, in time order in the scene he appears in.

  1. shot, no motivator panel, no rear box red strips.
  2. shot, motivator panel in place, red box strips.
  3. shot, repeat 1st shot.
  4. shot, repeat 2nd shot.
Now, either one of two things:
  • The version with the motivator panel in place [which was seen in the behind the scenes documentary on Disney+] is the REAL remote controlled version.
  • The version with no panel in place is either a repainted version [filmed at a different time] or is CGI.

May 04, 2021

Remote/wristband 'communication devices'

A while back I posted up that I had designed a clip mount remote control fob holder for R5’s ‘Bad Motivator’.
The idea being that it could be glued/Velcro’d to the transmitters rear, allowing hand’s free’ish control of the remote.

Well with all the new 3D models I’ve been drawing up, one of them was a version of a communication wristband from Solo.

The purpose of this was purely as a costume prop, but I soon realised that it could actually be of use as a remote control wristband holder.

So I started changing design dimensions to suit the stripped down remotes internals and the first 3D printed version came out great!
(I just need to design a front cover/panel for the buttons)
This version, above, has had a few more alterations, like a retaining lip and also a location for a Brass insert to be fitted to secure the front panel.

Next was to modify this second design version to suit the other remotes. This version I also drew up the cover/panel at the same time as the wristband.

And here it is......version 1....
The two holes on raised pads are for screws to secure the front panel on, via brass inserts.

I did some more alterations to accommodate the four button remote control I have. This version required the cover/panel to be more raised as this remote has raised, tactile switches, compared to the low profile, metal contacts of the above version circuit board. To combine the fitting of the cover/panel, the main wrist holder, now has a 'lip' for the panel to slid under. This helps secure the front better and requires only 1 screw.

The above picture shows them pre retaining lip and retaining screws.

The four button remote has been the hardest to get right. I've gone through more test prints on this version than any of the others.

I've also increased the 'shell' thickness to hopefully increase the strength of the wrist strap slots.
The 3D printing with increased shell thickness and a new curved strap slot, have made them stronger.
I’ve posted up a short video on my YouTube channel. Click the picture below to view link:

I’ve ordered some Velcro (as I couldn’t find my stash), this will be for the straps.

March 12, 2020

Littlebits - Star Wars Droid Inventor Kit - pt 10 (2020)

littlebits, R5D4

I've now uploaded the stl files to my Thingiverse page. As well as the standard 'open' pie hole lid, I've also uploaded the 'bad motivator' lid version.


littlebits, r5d4

Littlebits - Star Wars Droid Inventor Kit - pt 9 (2019)

22.10.19
Lid update.....R5 now has a 'Bad Motivator':

Printed off the updated R5 lid, which now has the correct orientation 'antenna' and also the 'bad motivator'.
The antenna's front circle needed to be facing the front in relation to the pie panel opening and the bad motivator positions.

I've uploaded a short video onto my You Tube account, it can also be found on my Instagram page.

UPDATE: 12,3,2020
The files have now been uploaded to Thingiverse

May 21, 2019

3D printed Vape Collar now on my Thingiverse


Vape tank collar - bad motivator

Uploaded my 3D collar for the Vape Tank to my Thingiverse account.
It was designed to fit this vape tank pictured below.
Vape tank - bad motivator

October 2026: 3D file(s) can now also be found on my PRUSA profile

May 20, 2019

Bad Motivator - Vape / smoke video 2019

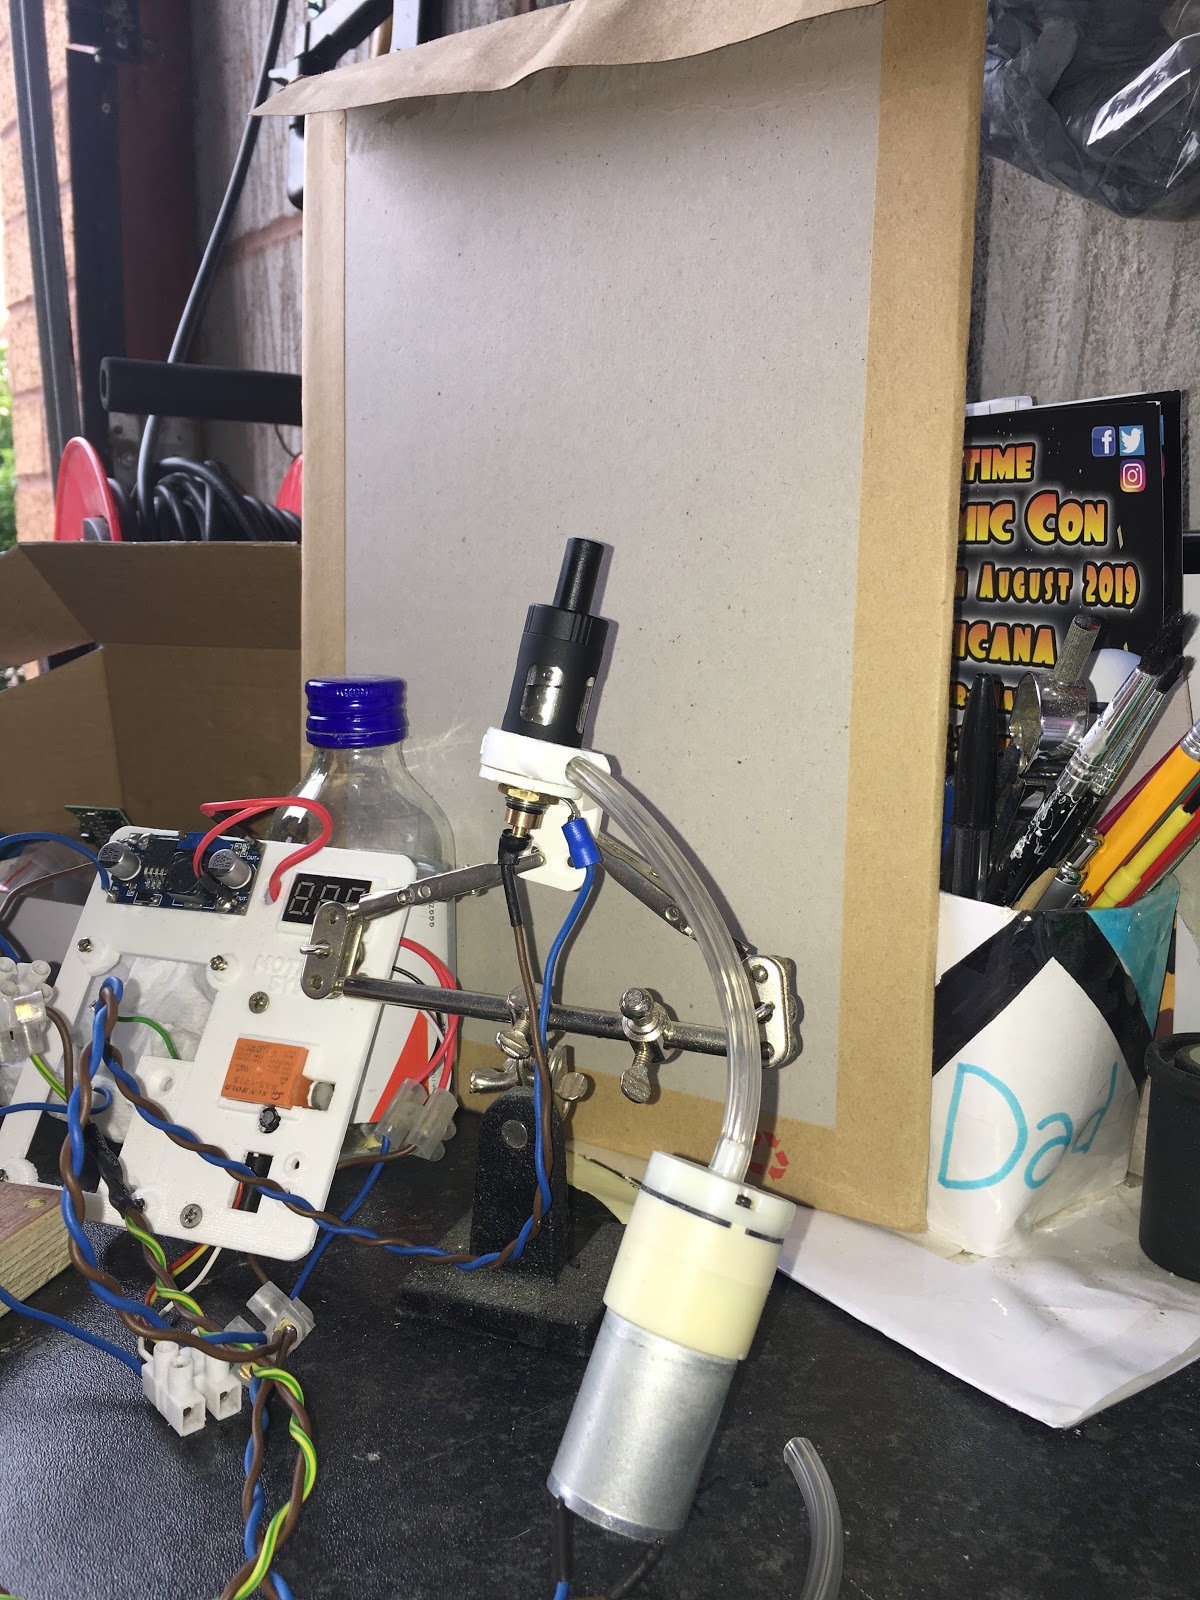
So, Sunday morning, I was able to set up and video the vape tank that I had to replace the e-cig unit. This can take more power lol and produce a LOT more ‘smoke’.
R5D4, Bad Motivator, vape
This was it set up. The timer, orange square, was not in use as I believe it has actually failed like the other one, shame as they are good. So the setup is voltage regulator, air pump & vape tank (controlled via a switch for testing).

The unit would normally only run for a few seconds when activated with the pop up ‘bad motivator’, but it’s ability to have a longer lifetime is a plus. And the fact it produces more vape is another plus.


Next up is to re-do the electronics etc and also the bad motivator pop-up system and R5 will be back in business again.

As mentioned on the video info, I'll be posting up the collar to my Thingiverse page soon.

October 2026: 3D file(s) also now on my Prusa Printables page

May 13, 2019

Bad motivator actuation upgrade 1.2 (2019)

I did some design changes and re-printed off a new holder.

This one fitted much better all round. I had made slots in the inside top face , but I hadn't made them wide enough to allow the crimped edges to fit. Also the clearance hole in the top, didn't clear the shaft enough. It didn't need to be so close a fit.


Next I needed to add a new joining pivot piece similar to the previous one which came fitted on the door actuator itself.
Hopefully I’ll get time to test fit this. I’ve included a hole to fit a locking pin through.

April 28, 2019

Bad motivator actuation upgrade 1.1 (2019)

Drew up a holder in AutoCAD Inventor and printed off a sample.
This was slightly tighter than it should of been, on the inside faces,
so increased some of the dimensions to allow for a better fit.

Here's the CAD model images.
bad motivator, r5d4, 3D
 New magnetic actuator holder
bad motivator, r5d4, 3D

This new holder, is designed to fit onto the exsisting bracket.

If this works, then I may look at 3D printing this all as one piece.
But for testing and speed, it's just an add on for now.

April 25, 2019

Bad motivator actuation upgrade 1.0 (2019)

With the electronics being worked on, another thing that needed replacing due to issues, was the door actuator that makes the ‘Bad Motivator’ pop up.

I bought ages ago a magnetic activated piston, as something to try. In testing it works great, but I still need to actually connect it up to the motivator movement arm.
So am back in CAD drawing up things in 3D, to then be printed.
Am looking at the idea of an attachement to this original arm.

January 31, 2019

Smoke system tutorial - Part 3 Assembly

Last year I was working on an upgrade to the bad motivator system, in that I replaced the e-cig atomiser with a small vape tank. The reason for it was that the atomiser wasn't really up to the task, current going through it and was only good for short burst's of smoke.

Using a vape tank is not my invention, so can't take credit, it just seemed the next step in how to best get more smoke. Also this is STILL on a budget!


Since posting up and sharing of my original set up & 3D collar (on my Thingiverse page) other's have asked about this set up. And I've seen similar collars appear on other  builds. Am happy to share what info I have & have also been asked if it would be ok of them to offer as a kit form to members over in the USA.
(credit given, thanks).

So here's was my latest upgrade:

vape collar, R5D4 smoke, bad motivator
This is the vape tank I bought.....it was actually the wrong one I was actually looking for, but it was late at night and think I clicked and bought by mistake. The one I wanted had the vent hole in the outside of the body....nevermind lol.

In the above picture:
'A' is where the inlet hole is, just above the thread.
'B' there are four grooves that cross, allowing air flow.

So in order for the collar to to fit and allow air flow, I had to modify my original idea into this version. This I've not posted up yet on my Thingiverse page.The new collar fits directly over the 'flat top 510 spring loaded connector. Which has slots in it. The collar's cut outs, lines up with the 510's slots to allow the air flow through to the vape inlet hole.


vape collar, R5D4 smoke, bad motivator

I had been working on the electronics etc on this set up, so it's still not put back together lol.
But here's a picture of the collar fitted onto the vape tank.

vape collar, R5D4 smoke, bad motivator


And how it would all be assembled.
This assembly diagram is missing the bracket, which can be seen in the previous picture. This would fit between the 510 flat top and the terminal connectors underneath.

For 3D files check out the link on this post.

January 09, 2019

3D Printed dual smoke bracket

Just posted up on Thingiverse my dual smoke bracket
that I drew up and printed off for testing, before Christmas.


Link also to the You Tube video I posted up of the e-cig unit's in action.