Showing posts with label Trading Card Dispenser Version 2. Show all posts

February 13, 2025

Trading Card Dispenser (version 3) - TCD [2025]

3D printable, trading card cartridge,
New cartridge - version 3

Re visited the design of this unit and had a thought about simplifying/updating it.

A reoccurring issue I hear is with the metal springs. Either they are not the ones stated on the PDF document I created, or just simply the stiffness isn't correct.

This upgraded design does away with metal springs and instead, I have created [am impressed with myself on this one 😄😄😄] a 3D printable spring!!
3d printing, 3d spring
3D printable spring [not print orientation shown]

I did try a coil design, lol, as I use AutoCAD for work and we use 3D versions in our valves for visual representational use, but this wasn't going to work. So I created a flat 'Z' spring. The first one I printed from the design actually worked, first time.

This then required me to modify the cartridge housing and card plate, but everything else uses the original main motor bracket etc.

This cartridge is a direct size replacement for the original one, the only downside is that it now holds fewer cards due to the 'Z' spring not compressing as much as the metal springs did.

......but I then went and designed a TALL version. This is a new TALLer cartridge housing, and a new TALLer main motor bracket unit. The below image shows the new TALLer version being printed.
3D printing, 3D spring
Version 3b, new TALLer version being printed

The NEW version 3 Cartridge, is now uploaded to my Prusa account, click on the Prusa to be directed there.


Feedback: April 2025, .....'I printed the new cartridge and it solved my issue with the cards not ejecting repetitively!'

January 20, 2025

Trading Card Dispenser - Facebook group 2025

End of 2024, I created a
Trading Card Dispenser page,
but this was not what I wanted
so I created a proper group account,
for people to chat, post builds, and ask questions etc.

Link to the group page:

There is a chat also on FB's messenger service.

YouTube link of dispenser in action

December 13, 2024

‘Trading Card Dispenser’ control box - servo switch controlled [Part 2]

Back in 2022, I posted up about the electronics
for the TCD Control Box.

This was supposed to be THE new RC switch controlled unit, see picture.

Wrong RC switch [not a momentary one]

.....rather than the previous (and very successful it was too) remote controlled version picture here below.
original remote controlled fob version

The new RC switch that I thought was the correct one, wasn't a momentary version, but an on/off one.

Momentary RC switch
So I had to get a new RC switch, from Model Radio Workshop.


The above switch then links to a (original design) micro voltage regulator (seen in next image) and an adjustable automotive timer (orange)

  • The single relay controller (from model radio workshop) has been designed to allow modellers to switch one item on and off (max current 1 amp).
  • The unit also allows the user to select latching or non latching mode, so in latching once switched on it stays on until you trigger it to un-latch.

These have gone up in price so had to find another (cost effective) type of adjustable timer(The timer unit is the orange relay in below picture).

Components List for a RC Transmitter switch version:

Components List for a Remote control relay switch version:
  • Remote control relay: example here.
  • Adjustable relay timer: example here.
  • Voltage regulator, 12v stepdown version: example here.


The above two versions have different 3D housings (If you'd like this), these can be found on my Prusa account page, FREE to download and print.

I have now created a Facebook page,
dedicated for the
Trading Card Dispenser.
To help and for others to share their builds and modifications etc.

May 16, 2024

TCD Bracket for 3D Mr Baddeley’s droid by Dave Steinke


Dave Steinke shared a modified version suitable to fit my TCD cartridge version into his new bracket design that will fit behind the utility arms.

picture link to Prusa 3D model

This was designed to be incorporated into a Mr Baddeley 3D printed R2 body.

It replaces the main body I made seen in version 2, for the cartridge loader.
picture link to Prusa 3D model

Both models can me found on Prusa account website.

Clicking on the photos above will take you to the respective models.

October 30, 2022

‘Trading Card Dispenser’ control box - original remote controlled version

October 1st
With working on the new servo box, see previous post, I decided that the original version could benefit from the same upgrades.

So I opened up AutoCAD inventor (works) and saved a copy, before then working on editing the new version. I removed the side clips [which took me ages originally to get just right when printed lol) and replaced them with a screw and a knurled brass insert like the other version.

Redesigned the top cut-outs whilst positioning the screw hole location.
And then printed off some label stickers, for identification.

October 19, 2022

‘Trading Card Dispenser’ control box - servo switch controlled


October 1st
Back at the beginning of the month, before I fitted the remote control, inside my transmitter, I had thought about utilising the servo activated switch module, that I’d bought for the GOUD-4 droid.

So I combined the bracket I’d designed up for it with a new saved version of the control box base.
wrong RC servo switch.....

Some other modifications were needed to accommodate the alternative model timer circuit board I’d bought, as well as doing away with the lid's side clips and replacing them with a brass knurled threaded insert. The lid section needed alterations to and the design of the slots was simplified. I did away with the LED ‘on’ indicator as it wasn’t necessary.

Have been test printing both in work and at home. It was good to use my printer that’s not been used in over a year. Dusted off the Tevo Tarantula Pro (Orange), fired it up, first print, perfectly just like always.

Probably should mention using online program, Astroprints for creating the gcode for printing on the Tevo.

UPDATE October 2024:
The RC servo switch seen in the above images was the wrong one!
I've updated with the correct RC switch, so for more I'll be posting up a new correct set of parts & 3D printable components. 

October 04, 2022

Throwback two years - A Cup of Tea with Sam & Lee [2020]

This notification pinged up on my phone this morning, reminding me that it's two years since I was visited by ..... no, not the ghost's of Christmas past 😆😆😆 lol....... but by Sam & Lee.


We got to talk about droid building of R5, projects, future builds, events etc and also the South West accent 😄 lol

Check out the interview link here >>>


For the actual interview,
fast forward to the 08.00 minute mark 😄

Once you've watched, then have a look at the other YouTube videos on the channel as there are past events & tutorials, featuring not only Sam & Lee, but Oliver, Giles and others!

Interested in joining and building your own droid, then checkout


September 23, 2022

Transmitter modification - remote for the ‘Trading Card Dispenser’


As much as I luved my wrist strapped remote control unit <Blog link, for activating R5's trading card dispenser, it is not so easy to operate, whilst holding the transmitter.


It's even harder to remember which on activates the TCD and which one fires the Bad Motivator system lol.
I originally went with a simple clip attachment <-Blog link, to the transmitter for the remote to clip into.

These both worked fine and the files can be found on my Prusa account page.
(The watch remote's are not presently up, but will be soon.)

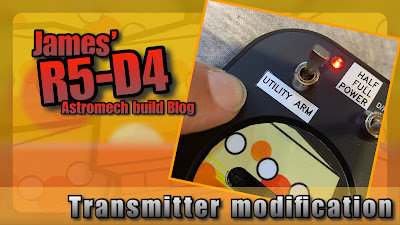
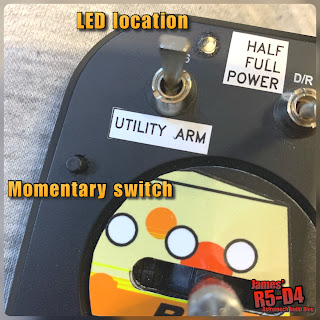
So after some thought and tinkering, I found a momentary switch and tested it on the remotes contacts to check that a remote switch WOULD still work lol. Two dabs of solder onto the contacts and the remotes remote switch was on. Next up was the LED, again, having it show that I HAD actually pressed the button, I wanted an indicator. A quick test with the contacts of an LED onto the contacts of the board mounted on, showed that it lit up. Two more dabs of solder and we were in business.

I positioned the LED next to the Utility arm's switch. Both these were secured in place with hot glue.

Above picture: the switch is just below it. The momentary switch was positioned a bit further down due to space, but it's still in a good place to press, without loosening your grip on the transmitter.

Front view of LED and new momentary switch.

Then came the really tricky part lol, finding a position to locate the actual remote's board. I covered exposed contacts with electrical tape, before placing the remote's board inside. I then applied more tape over it to secure it. I did think of securing with hot glue but decided not to.

Just need to test it next....

Yep, it lights up lol.

July 02, 2022

3D printed ‘Trading Card Dispenser’ parts request

Was asked if I could 3D print off and send over a set of the TCD, Trading Card Dispenser.

Didn’t have much free printer time, but managed to get a set done over the weekend.


Only another 15hrs to go……


Postage is always a nightmare cost wise, but managed to get a good price, with tracking and signed for delivery. Didn’t want to go to all this trouble and then it not arrive.

Packed up using recycled paper, thanks Amazon 😂👍🏽.


Weight…..

Just waiting for the okay to post.

After a mare with the postal service, eventually it got posted…..

April 26, 2022

Trading Card Dispenser : Version 2…. part 3 news update

 Version 2: news update……


…….Due to illness, the last three weeks, I’ve not been able to finalise uploading the new stl files or finish revising the new instruction/assembly sheet PDF.


A side note:
Bought components required, springs, motor, wheel and pin, remain the same as version 1, so you maybe able to salvage these components to use on this version 2 if you have already built version 1.

I will be uploading the files to my Prusa account and I’ll post up on here/astromech forums/Facebook/Twitter once this has been completed, which should be in the next few days.

Am really excited to be able to share this version 2 as a lot of people have been messaging me about it lol.

**UPDATE: now uploaded**

March 31, 2022

Trading Card Dispenser : Version 2…. part 2

First test printing of the parts at 0.15 layer height.
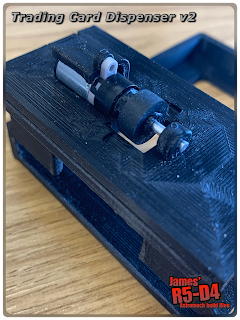
Then trimming and filing off layer lines so that everything that 'touches' runs smoothly. The card plate and the top plate are printed so they have smooth surfaces from the glass print bed.

Before gluing on the top plate, the card plate and springs have to be installed first. I had to check the cards would fit ok....

Next up was to install the mini motor, wheel adaptor and rubber wheel. Then measure and cut the aluminium rod to length, and push it into place for the wheel support axel. The motor needs to be wired up still, in this next picture.

A few test to be carried out and also a modification to the original bracket to support the new unit, possibly……or the main unit could be redesigned to accommodate a bracket.

......UPDATE

So I drew up a new bracket case version (to fit into R5), and I also made it curved at the front, this is so that it would sit flush with the NEW Utility arm socket screen, that I also 3D printed off. It wasn't painted, so will have to do this before R5's next event.

They were all installed last Friday, ready for action at MegaCON Live in Birmingham, see other post about that day in Event Report.

March 19, 2022

Trading Card Dispenser : Version 2…. coming soon!?!?

I luv using my TCD, I pop open R5’s utility arm and dispense his trading card with press of a button.

It doesn’t hold many though and if you get carried away 😂, before you know it, the dispenser is empty.

After the recent event at ‘Stars of Time’, down in Weston, reloading the dispenser through the slot was a bit time consuming 😣😣😣

So I got to thinking of how to improve the design. I came up with a few ideas and will be test printing soon.