Showing posts with label Trade Card Dispenser. Show all posts

January 20, 2025

Trading Card Dispenser - Facebook group 2025

End of 2024, I created a
Trading Card Dispenser page,
but this was not what I wanted
so I created a proper group account,
for people to chat, post builds, and ask questions etc.

Link to the group page:

There is a chat also on FB's messenger service.

YouTube link of dispenser in action

December 13, 2024

‘Trading Card Dispenser’ control box - servo switch controlled [Part 2]

Back in 2022, I posted up about the electronics
for the TCD Control Box.

This was supposed to be THE new RC switch controlled unit, see picture.

Wrong RC switch [not a momentary one]

.....rather than the previous (and very successful it was too) remote controlled version picture here below.
original remote controlled fob version

The new RC switch that I thought was the correct one, wasn't a momentary version, but an on/off one.

Momentary RC switch
So I had to get a new RC switch, from Model Radio Workshop.


The above switch then links to a (original design) micro voltage regulator (seen in next image) and an adjustable automotive timer (orange)

  • The single relay controller (from model radio workshop) has been designed to allow modellers to switch one item on and off (max current 1 amp).
  • The unit also allows the user to select latching or non latching mode, so in latching once switched on it stays on until you trigger it to un-latch.

These have gone up in price so had to find another (cost effective) type of adjustable timer(The timer unit is the orange relay in below picture).

Components List for a RC Transmitter switch version:

Components List for a Remote control relay switch version:
  • Remote control relay: example here.
  • Adjustable relay timer: example here.
  • Voltage regulator, 12v stepdown version: example here.


The above two versions have different 3D housings (If you'd like this), these can be found on my Prusa account page, FREE to download and print.

I have now created a Facebook page,
dedicated for the
Trading Card Dispenser.
To help and for others to share their builds and modifications etc.

October 17, 2024

Trading Card Dispenser: WIDE version

December 2023:
Mike’s card maker, unfortunately, don’t always cut them to the same tight tolerance, so in the past I’ve had to trim them down to fit in the TCD unit.

This isn’t really practical lol so I decided to make a second WIDE version of the TCD to allow for this. I couldn’t just increase the size in Cura, as this would mess with all the other dimensions.
So the cartridge inside width was increased and the main body’s slot opening was also increased slightly.

I 3D printed off a full set from the files & assembled them, cannibalising motor parts & spring plate from an older model.

January 2024:
Testing the new version and it worked.


-----


October 2024, I'll be uploading this version to my Prusa account in the near future.

September 05, 2024

The Mandalorian: R5-D4 trading Card '88': version No1

Managed to bag this bargin on eBay, from a UK seller.


Still on the lookout for the other versions, at a reasonable price, but unfortunately the others are in the USA so postage is an extortionate amount, in relation to the card itself, so will just have to settle for this one for now.

May 16, 2024

TCD Bracket for 3D Mr Baddeley’s droid by Dave Steinke


Dave Steinke shared a modified version suitable to fit my TCD cartridge version into his new bracket design that will fit behind the utility arms.

picture link to Prusa 3D model

This was designed to be incorporated into a Mr Baddeley 3D printed R2 body.

It replaces the main body I made seen in version 2, for the cartridge loader.
picture link to Prusa 3D model

Both models can me found on Prusa account website.

Clicking on the photos above will take you to the respective models.

December 29, 2023

Trading Card Dispenser: original idea

Got asked a question on my YouTube channel about swapping the mini motor for a servo.

This was actually one of my first attempts ,back in 2019, to achieve the cards being dispensed.
TCD, servo


As you’ll see in the short video below, it worked but wasn’t very reliable for repeating the operation.

Then there was the issue of the servo AND its wheel, of being too bulky and its protrusion above the box, for fitting into a confined space.

I may revisit this though, using learned knowledge from the build ideas that followed.

September 27, 2023

R5-D4: Update May/June 2023

Update from May 29th 2023


June:
TCD Control box update:
The new relay arrived, last month (May), but didn’t get a chance to do any work on the new 3D housing as work (that pays me lol) was really busy with deadlines before I was then away for a week.

I modified the base and lid to accommodate the relay & printed them out. See previous post here.

Here’s a picture and link for the new relay from Model Radio Workshop:

(Im not affiliated with this or any other sites that I link too)

May 29, 2023

R5-D4: Update April/May 2023

I’ve been giving R5 as he hadn’t been actually moved since Birmingham at the NEC.


New Dome motor wheel:
3D printed him a new wheel, as on the previous one the retainer nut wasn’t being held well and the PLA had been stretched. So I slightly modified some of the sizes and then printed it in ABS. Fitted the nut and 'o’ring and then fitted it onto the motor shaft.

Test was on Saturday at…..
 ...April

Next up was to connect up the new receiver. This didn’t take me to long, compared to the nightmare I had trying to sort it out when at Celebration 🙄.

I didn’t need to connect power (previous TX require power), this one utilities the power from being connected by the servo leads. Jacking up the wheels meant I was able to setup the drive and steering channels, plus the extra switch ones, for the utility arm, sounds and (once I have the long enough servo lead) I’ll be able to trigger the trading card dispenser.

Trading card dispenser:
A while back, I made a new trigger control box that utilised a servo controlled relay, instead of the previous remote control. Once the servo lead arrived, I crimped on new plugs to connect up the TCD control box.

View Blog post here.

But on testing it….. I realised that it needed to have a momentary activation rather than an actual ‘switch’. So I’ve been on Radio Model Workshops website and will be ordering a single RC switch relay, which has the option of it being a momentary one. So this control box will get another upgrade when it arrives.

In the meantime, I swapped the control box back over to the remote control version and 3D printed a new box for the remote, so that it could be attached to the new rear panel I’d printed off for the new Flysky transmitter.

I drew up a button bracket, that fits into one of the rear screw hole sockets, this will be upgraded again to look better and also hold the LED in place.

May 9th

Outer foot ankle lock:
The outer foot shell needed some repair to it, so with the legs off the body, I stripped the outer foot down. The ankle locks unbolted and the ankle bolt nut (previously held in place with super glue), fell out lol. I knew I needed a better way to hold them in place. I had thought about a lock washer, but then a lightbulb 💡 moment came. I measured up and drew up a nut holder to 3D print. It would be held in place by a bolt.
Nut holder loose.

Nut holder moved into position. I applied some thread lock to help keep it in position, but only nipped it tight to allow the ankle bolt to locate through into the thread.

I’ve added the file to my Prusa page.

The wooden foot shell got cleaned up inside to allow the new glass fibre to bond properly. Good as new again.


September 23, 2022

Transmitter modification - remote for the ‘Trading Card Dispenser’


As much as I luved my wrist strapped remote control unit <Blog link, for activating R5's trading card dispenser, it is not so easy to operate, whilst holding the transmitter.


It's even harder to remember which on activates the TCD and which one fires the Bad Motivator system lol.
I originally went with a simple clip attachment <-Blog link, to the transmitter for the remote to clip into.

These both worked fine and the files can be found on my Prusa account page.
(The watch remote's are not presently up, but will be soon.)

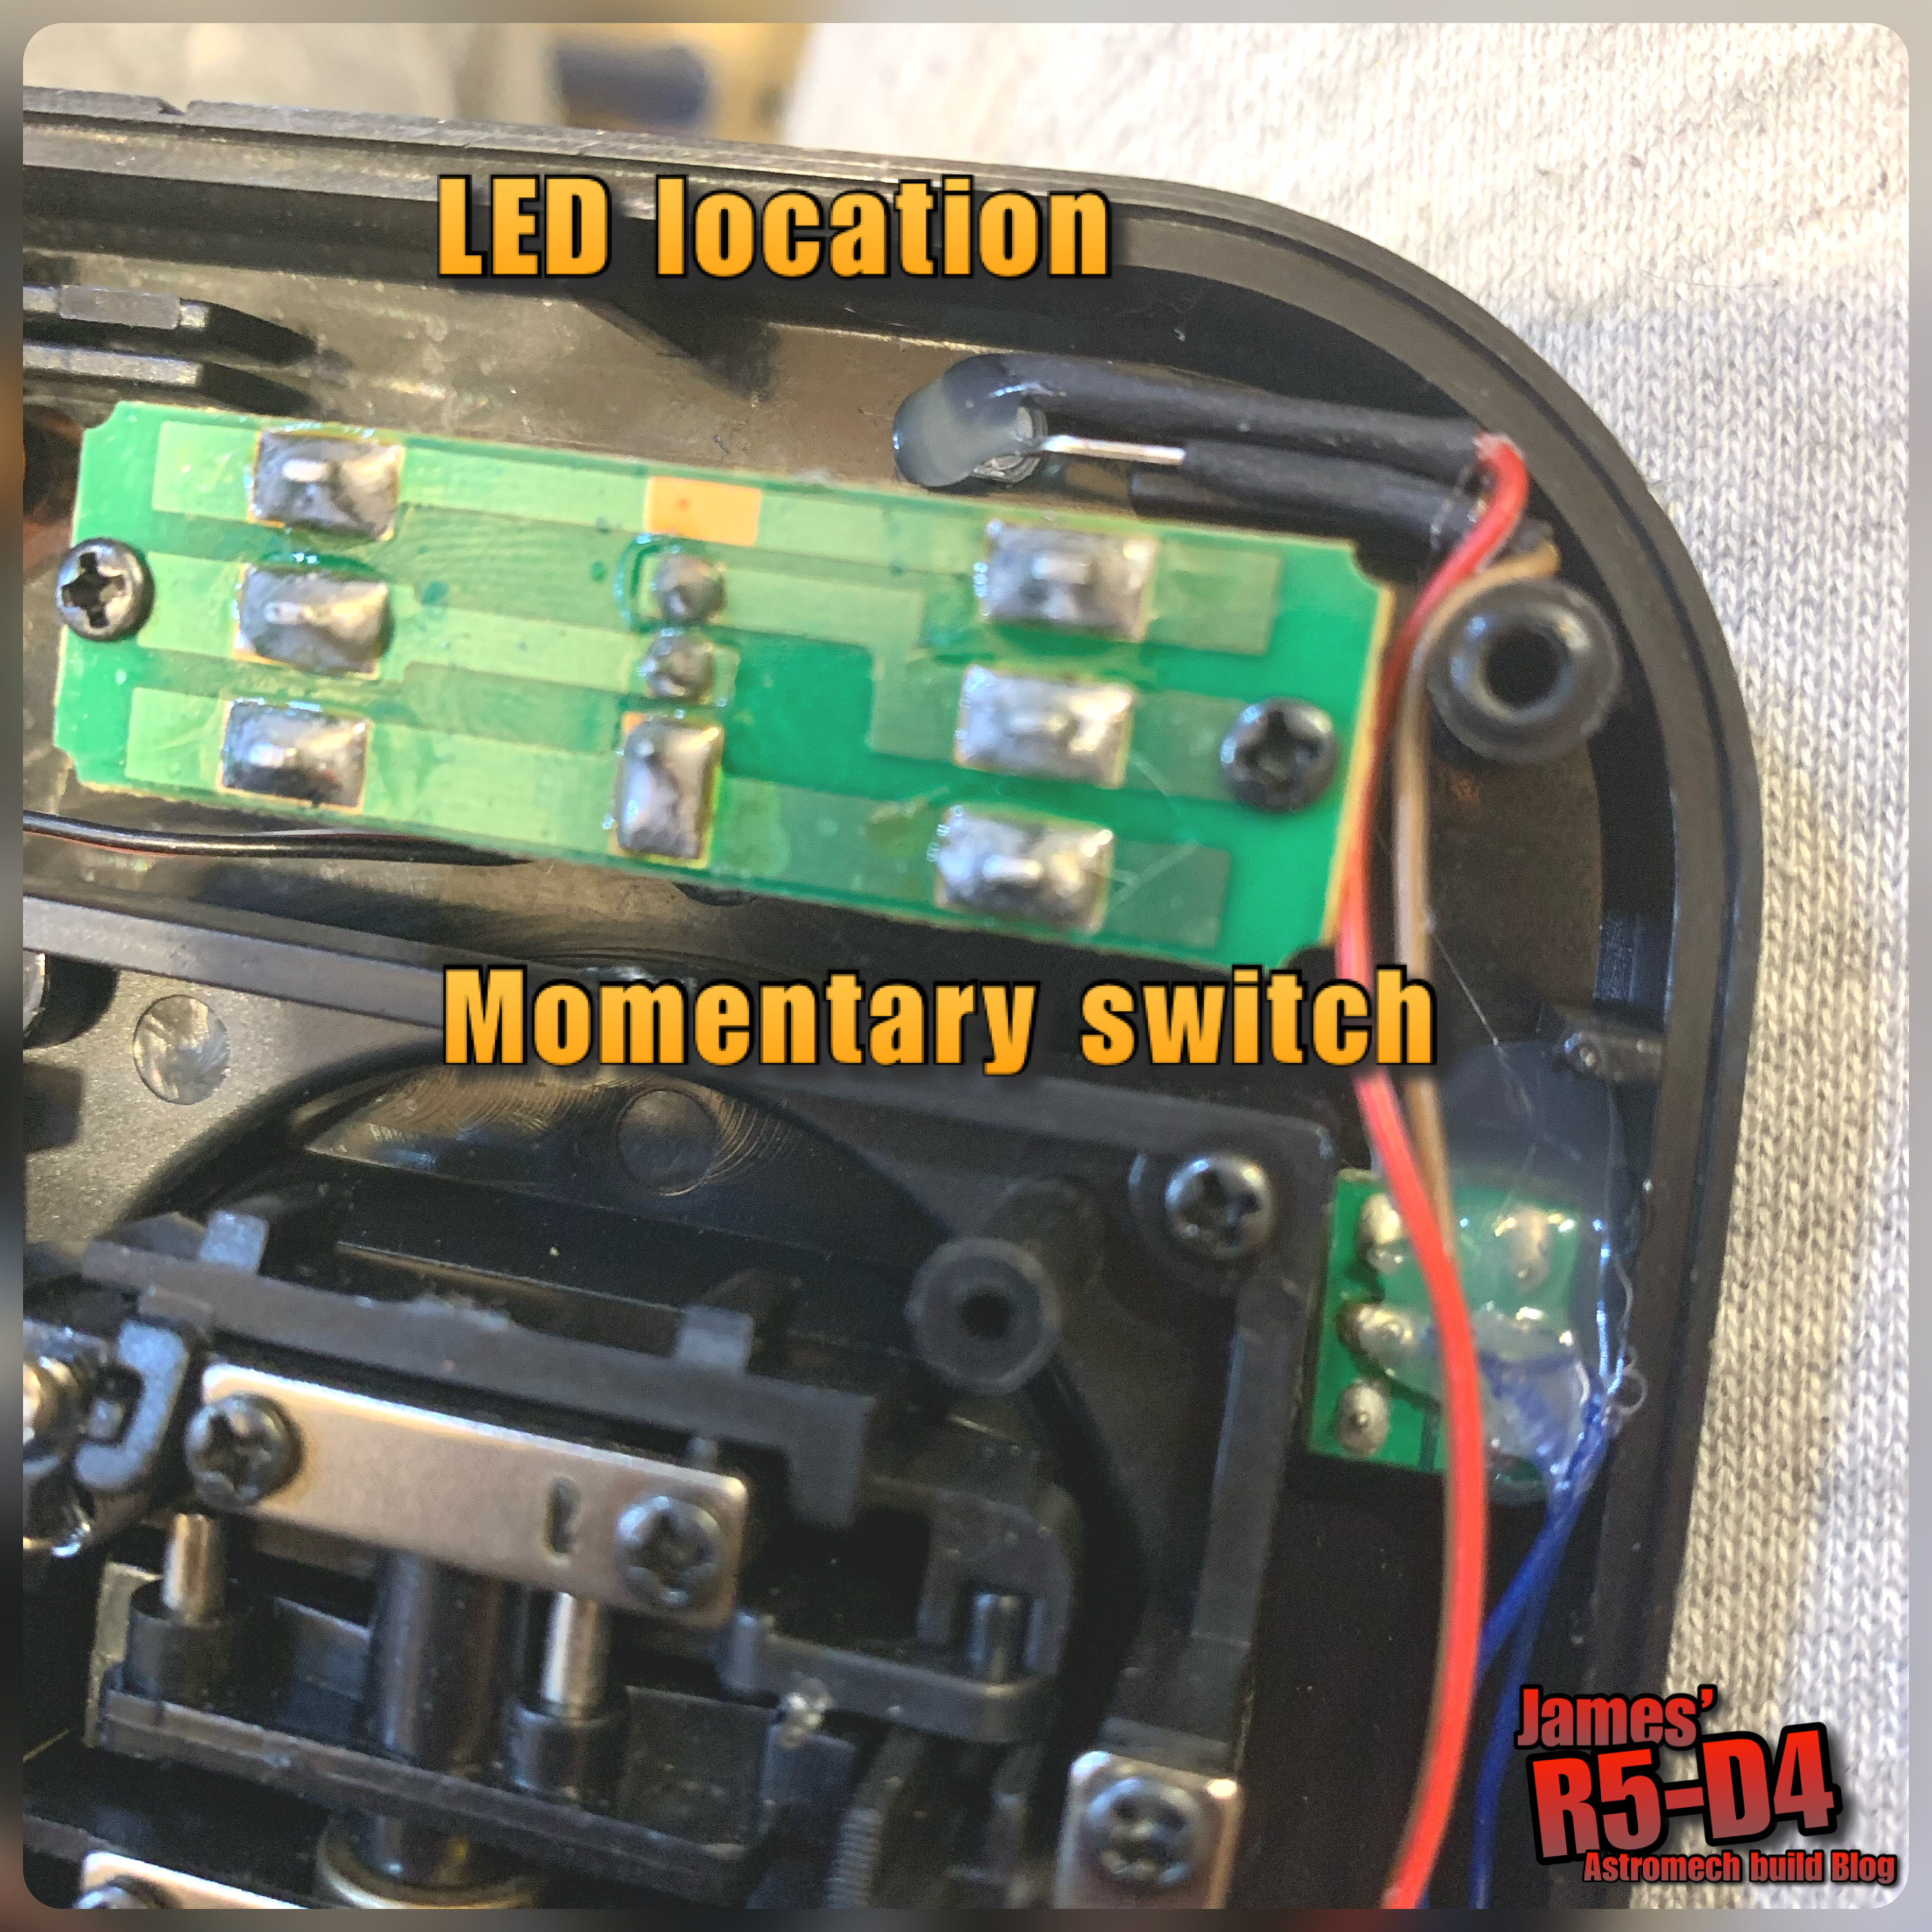
So after some thought and tinkering, I found a momentary switch and tested it on the remotes contacts to check that a remote switch WOULD still work lol. Two dabs of solder onto the contacts and the remotes remote switch was on. Next up was the LED, again, having it show that I HAD actually pressed the button, I wanted an indicator. A quick test with the contacts of an LED onto the contacts of the board mounted on, showed that it lit up. Two more dabs of solder and we were in business.

I positioned the LED next to the Utility arm's switch. Both these were secured in place with hot glue.

Above picture: the switch is just below it. The momentary switch was positioned a bit further down due to space, but it's still in a good place to press, without loosening your grip on the transmitter.

Front view of LED and new momentary switch.

Then came the really tricky part lol, finding a position to locate the actual remote's board. I covered exposed contacts with electrical tape, before placing the remote's board inside. I then applied more tape over it to secure it. I did think of securing with hot glue but decided not to.

Just need to test it next....

Yep, it lights up lol.

July 02, 2022

3D printed ‘Trading Card Dispenser’ parts request

Was asked if I could 3D print off and send over a set of the TCD, Trading Card Dispenser.

Didn’t have much free printer time, but managed to get a set done over the weekend.


Only another 15hrs to go……


Postage is always a nightmare cost wise, but managed to get a good price, with tracking and signed for delivery. Didn’t want to go to all this trouble and then it not arrive.

Packed up using recycled paper, thanks Amazon 😂👍🏽.


Weight…..

Just waiting for the okay to post.

After a mare with the postal service, eventually it got posted…..

April 27, 2022

Trading Card Dispenser - version 2 (file link)

Finished off the assembly/printing instructions and uploaded all to my Prusa profile.

Click on the link to check it out.

April 26, 2022

Trading Card Dispenser : Version 2…. part 3 news update

 Version 2: news update……


…….Due to illness, the last three weeks, I’ve not been able to finalise uploading the new stl files or finish revising the new instruction/assembly sheet PDF.


A side note:
Bought components required, springs, motor, wheel and pin, remain the same as version 1, so you maybe able to salvage these components to use on this version 2 if you have already built version 1.

I will be uploading the files to my Prusa account and I’ll post up on here/astromech forums/Facebook/Twitter once this has been completed, which should be in the next few days.

Am really excited to be able to share this version 2 as a lot of people have been messaging me about it lol.

**UPDATE: now uploaded**

March 31, 2022

Trading Card Dispenser : Version 2…. part 2

First test printing of the parts at 0.15 layer height.
Then trimming and filing off layer lines so that everything that 'touches' runs smoothly. The card plate and the top plate are printed so they have smooth surfaces from the glass print bed.

Before gluing on the top plate, the card plate and springs have to be installed first. I had to check the cards would fit ok....

Next up was to install the mini motor, wheel adaptor and rubber wheel. Then measure and cut the aluminium rod to length, and push it into place for the wheel support axel. The motor needs to be wired up still, in this next picture.

A few test to be carried out and also a modification to the original bracket to support the new unit, possibly……or the main unit could be redesigned to accommodate a bracket.

......UPDATE

So I drew up a new bracket case version (to fit into R5), and I also made it curved at the front, this is so that it would sit flush with the NEW Utility arm socket screen, that I also 3D printed off. It wasn't painted, so will have to do this before R5's next event.

They were all installed last Friday, ready for action at MegaCON Live in Birmingham, see other post about that day in Event Report.

March 19, 2022

Trading Card Dispenser : Version 2…. coming soon!?!?

I luv using my TCD, I pop open R5’s utility arm and dispense his trading card with press of a button.

It doesn’t hold many though and if you get carried away 😂, before you know it, the dispenser is empty.

After the recent event at ‘Stars of Time’, down in Weston, reloading the dispenser through the slot was a bit time consuming 😣😣😣

So I got to thinking of how to improve the design. I came up with a few ideas and will be test printing soon.

November 10, 2021

Trading Card Dispenser - in action!

 
I’ve had a few messages asking about my Trading Card Dispenser and how reliable it is. 99% it’s flawless, you just need to pre-test it once you’ve loaded your cards in. I found that the cards sometimes stick, but pressing the activation button (on your remote control) a second time, usually gets the card to fully eject.

You also don’t have to worry about dispensing another card as the wheel drive isn’t in contact with the next one until the previous card has been fully removed.
Hence why you can re-press the button if one card gets stuck.

I was able to test out the TCD and R5’s utility arm for the first time back in July, with the assistance of Giles to ensure a card was dispensed lol :D at the MOT event.


Click on the picture above for link to my short YouTube Channel video.

Components and parts list available on my Thingiverse page

I've since been working on an updated version......

December 13, 2020

James’ R5-D4 YouTube channel 2020

 Had this congratulations email today from YouTube for all my videos uploaded in 2020 lol......all 12 minutes of them :D . Not exactly ground breaking mind you, and a few million off any YouTube awards lol, but I appreciate everyone who has watched etc and I hope they have been entertaining or educational.

See screenshots below.... then head on over to my channel to contribute to the ‘ups’  & likes and shares, thanks everyone.


My YouTube channel link below:

https://youtube.com/channel/UCVWPGuMi4c6ngsx5xwH0kGg

December 05, 2020

‘Trading Card Dispenser’ utility arm inside panel 1.4

The rear utility socket screen is 99% complete. Finished off painting it today and fitted (glued) the rear piece in place (not in the picture below).

TCD utility arm socket screen

Next up was re-fitting this into R5’s utility socket......see below picture.

Utility arm socket installed in R5

Need to do a panel now for the top socket.