Showing posts with label Shoulder Hub. Show all posts

June 07, 2024

Shoulder hubs - Aluminium - Paul’s R2 No2

Paul is building a second R2 and had a semi finished pair of shoulder hubs. They were correct O/D, thickness and had four holes in, but were heavy, about 1.5kg!!

His friend wasn’t able to do more than this as his company was closing down. I offered to do my best bit of milling at my work.

First hub, was a very time consuming process. One which if I had thought about first, as I did on the second hub, I should of turned out the inner diameter to the required larger diameter, on the lathe, THEN got to work on the millers rotary table!


Above picture, show how much material had to be removed. Using a manual milling machine, means you having to do everything by hand lol.

Thankfully using the lathe sped up the process for the second hub.

Final weight of each was 1KG.

December 18, 2021

2-3-2 manual legs


This has been something that has bugged me for a while now. Transporting R5 in his 3 leg mode is not easy.

First was the new leg transport board.
This worked and R5 etc could be loaded up into my small car. But the legs then took up a lot of space (height wise) so making packing the dome(s) etc in, a tight squeeze.

I have been envious of droids that could be pivoted from 3 leg mode into 2 leg since i first made R5. If i had known then what i know now lol.

So after last weekend’s Builders meet, I decided it was time to upgrade……again.


I wasn’t able to use opposite bolt locations (4 off) due to my top plate bracket. So had to go with the four consecutive bolt holes.
This is fine as i can use the remaining hole as a locking one. The washers and wing nuts are temporary whilst the other side was worked on.
I’ve got some larger washers and nylock nuts coming.

Next will be designing a new transport sledge.

June 28, 2021

Shoulder Hubs - weight reduction - 1.0

When I was building R5...... way back, weight wasn’t a thought I had really considered. Making him as solid/sturdy as possible. So lifting him into the back of a car to attend events never occurred to me that it would become a thing lol.

Roll on a few years now and 'weight' is definitely an issue. As the legs are not to much of an issue, the feet and the shoulder hubs are. So I've made a start to reduce this weight some.

I marked on the hub an area that could be removed without structurally compromising them. I need to keep the holes for the bolts, to help prevent possible stress on the end fixings inside the wood.

Using my coping saw, I fed the blade through one of the holes already drilled in the hub.


It was a bit to late in the evening to try to use the jigsaw, hence using the saw. This took about an hour to cut out!

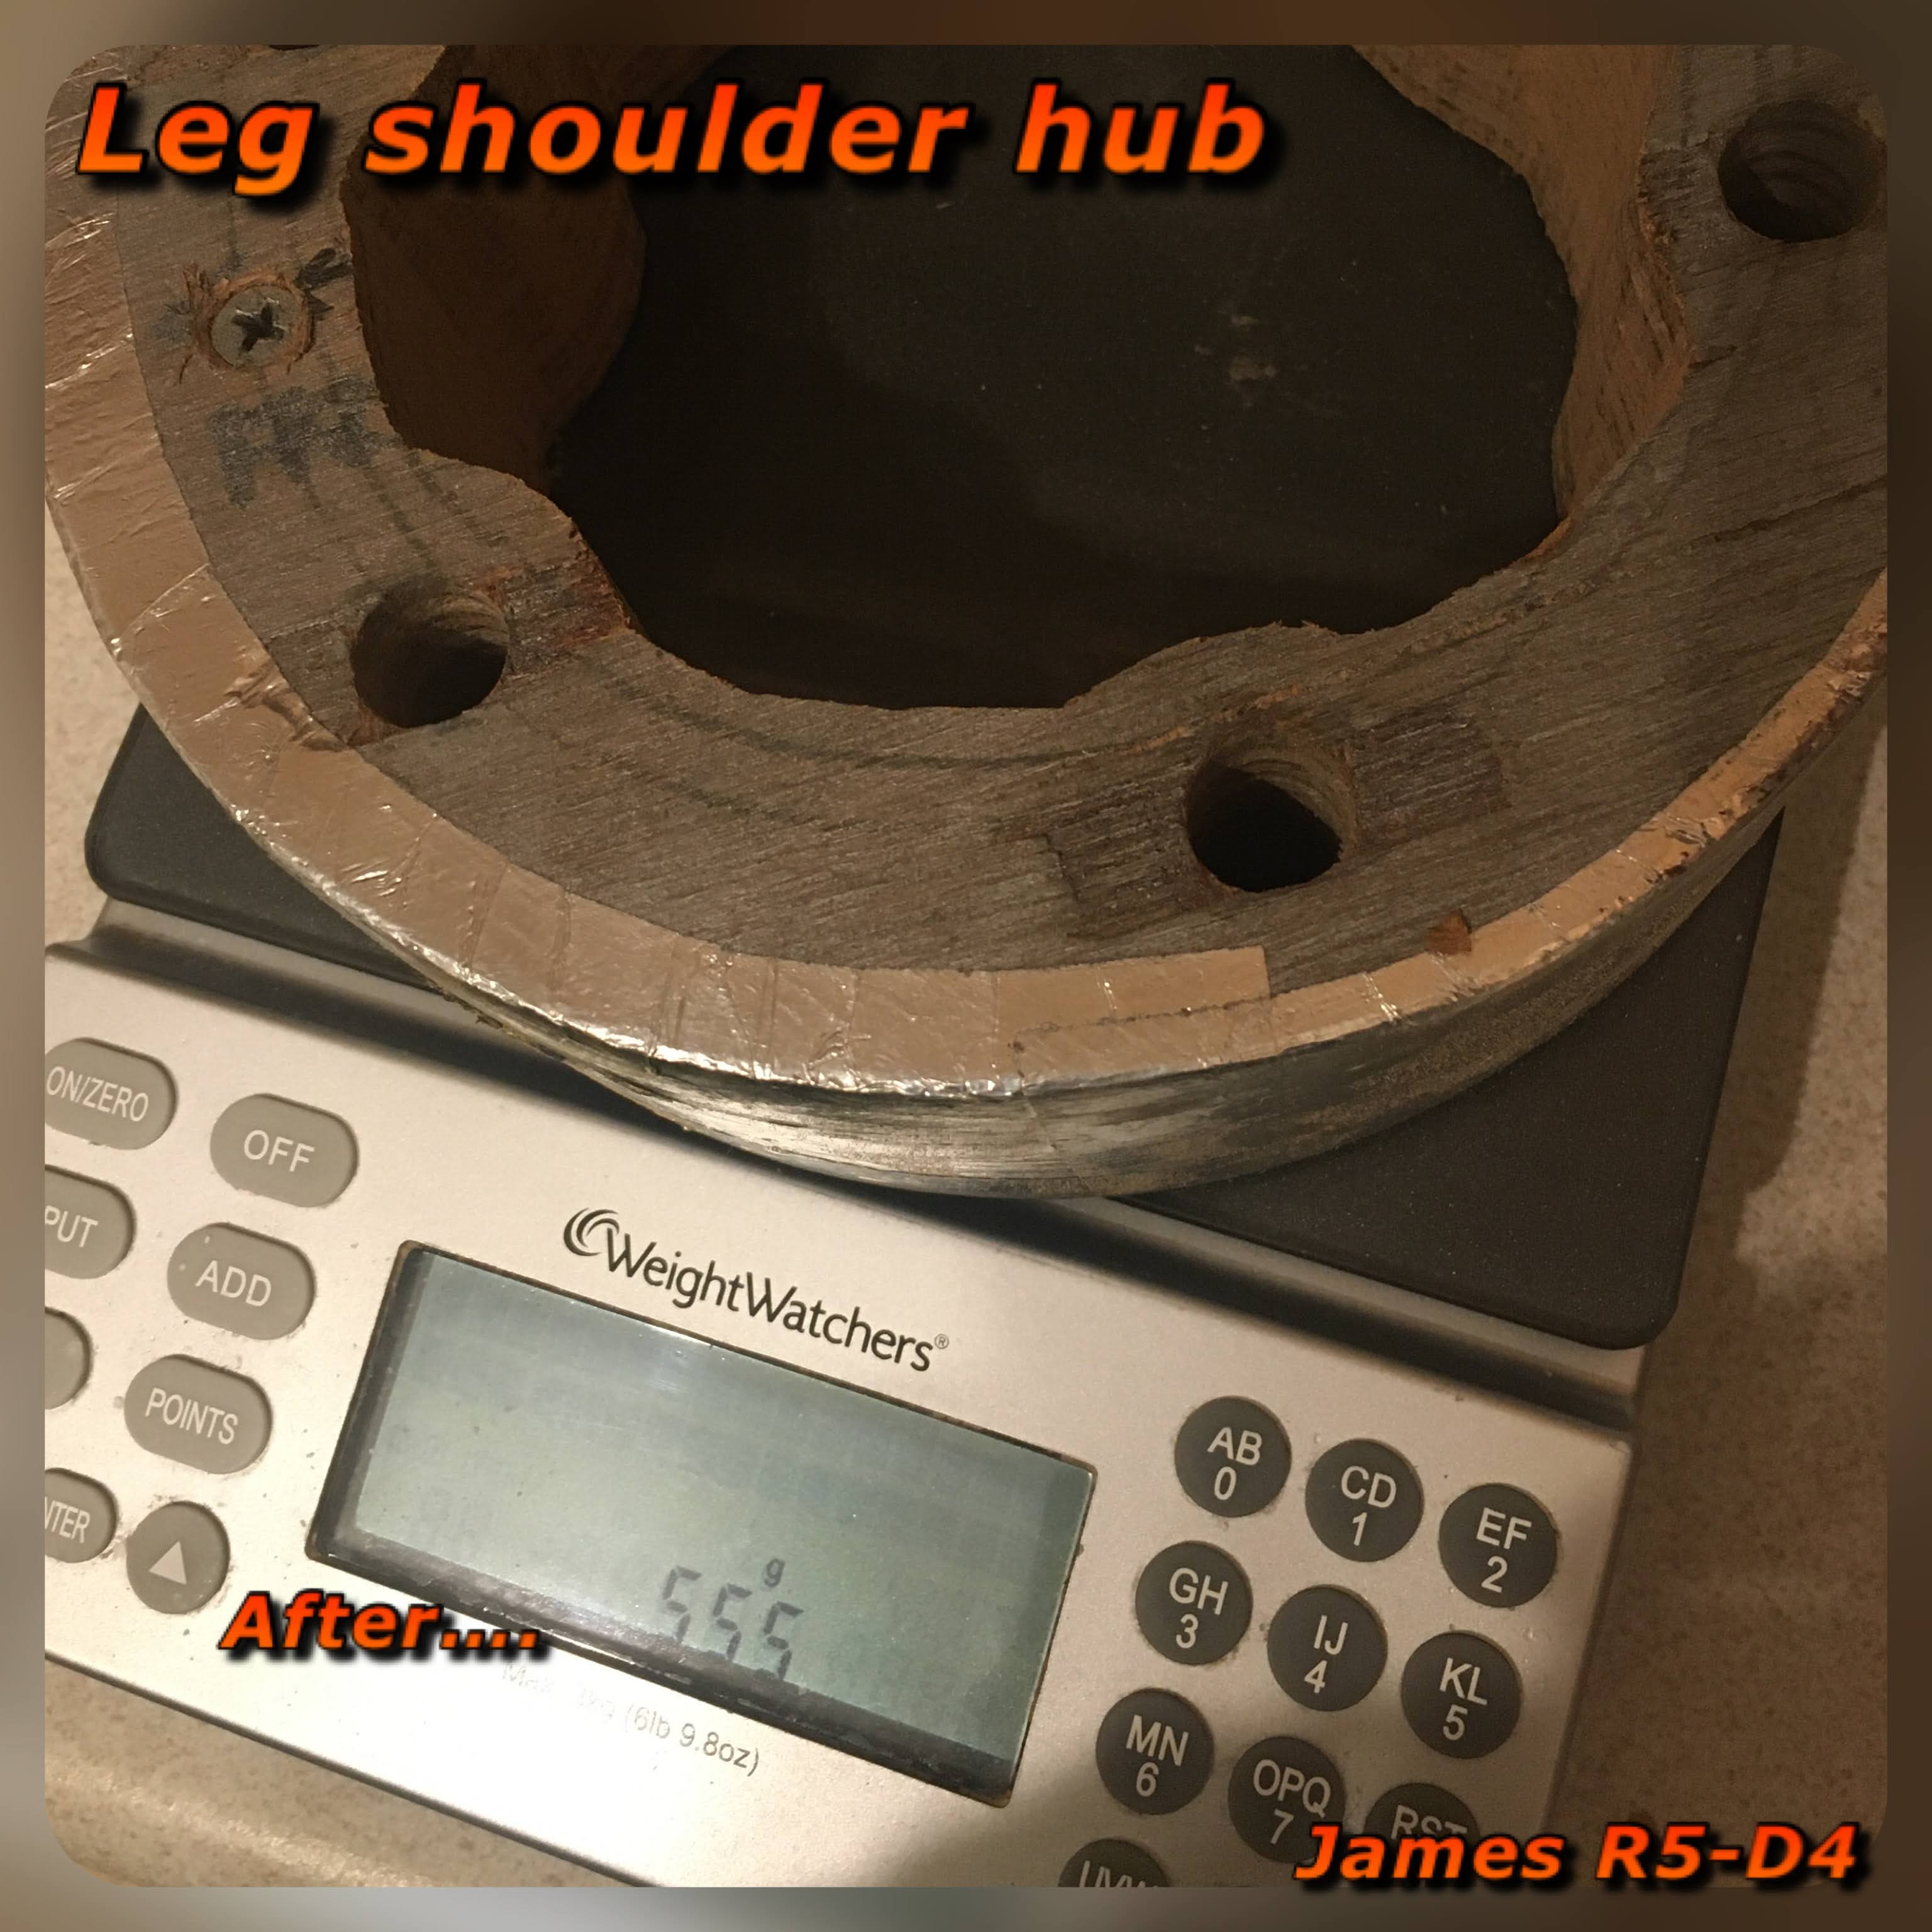
But the weight reduction results speak for themselves.


Weight was 936 grams, after removing the centre...... now 555 grams.

I just need to cut out the second hub next.

December 04, 2015

R5 damage repair update PART 2

I didn't post up pictures of the rest of the damaged area's on R5. Thankfully most of it was only on his shoulder Horseshoe.

I removed the loose wood filler then I sealed the hardboard with watered down PVA glue.
This helps the wood absorb the glue and makes it hard. Then once dried, I applied more wood filler again to the damaged areas.

After sanding and more filler, repeated until happy [and filler dried]. I gave the area a light spray with white and later, with clear coat.

After a few days, and once the shoulder hub was finished, I re-installed the hub & horseshoe and got to weathering it all again.

Here are the before and after pics:

Damaged horseshoe on left repaired & weathering [WIP] again on right.

The outer foot shell's have already been fixed.

R5 damage repair update

I needed a new Shoulder Hub to replace the one that partially broke [edged lip]. So got online to DJ Design and order a new set. These arrived in a few days looking great!

I've not ordered any of his 'new' revised components before as these were produced after I already had bought mine a few years before. They use less resin material on the un-seen areas, but still retaining strength. The finish of them is also better than the set I had before, not that there was anything wrong, but it is stated that with moulds you can get air holes, which my last set did have. Not that this bothered me as it just added to the worn, pitted, used Droid look. But this set has minimal to non what-so-ever!!


Link to DJ's shoulder hubs DJ Designs

So after a warm soapy water wash and fully dried, I got on with primer spray. I only sprayed up the face as, well, this is the only part you'll see.

Here's after primer, silver and clear coat.
R5D4

R5D4
Two slightly different angles in these pictures. My spraying is the cause of the 'crinkle' effect you can see in the upper area's of the hubs. I like doing this as it gives it the worn, corroded look and feel. Also helps when it comes to weathering the parts.

November 27, 2015

R5 damage repair!!

The high's and lows of droid building.....

You know when you think your in control but gravity reminds you your not!

Well that's what happens when a three wheeled unit rolls down a slope.....turns and falls over....in slow motion.

List of things that broke/broke off:

  • Shoulder horse shoe [it is a removable item]
  • One half moon crescent - popped off.
  • Shoulder hub - smashed edges.
  • Dome bearing [lazy suzan type]
  • Split Outer Feet shells [both]
I was in shock, fearing the worst, but once righted, and given the once over, R5 was back in action. Luckily he had turned and his fall was broken [no pun intended] by bush's. The foot shells damage was caused by the weight/force on them as he tipped over. Obviously they're not designed to take ANY weight on them as such.

I had to disconnect the dome motor as thankfully R5's dome locking nuts kept his head on, but the force of the fall, twisted and pulled apart the domes bearing race, there were bearings everywhere lol. I managed to press the two pieces a bit closer together, but they had separated and short of some proper tools, this wasn't going to happen.

So if you notice R5's dome doesn't look like it's on right in the MCM Birmingham photos, now you know.

So this week has been spent repairing the shells, with glass fibre and wood filler.
The black tape was very strong in holding the panels together.

The legs showed paint had cracked so sanded and fixed these. The horseshoe took most of the damage, but again, this was fixable with wood filler, sanding and painting. A new bearing race was ordered and refitted as well as a new set of shoulder hubs from DJDesign.


These just need spraying and for refitting back into R5.

March 12, 2014

Horseshoe No2 - Hydraulic & Buttons fitted

To make space in the bedroom [keeping the wife happy] I took the Horseshoe back out to the garage and fitted [bolted] the Hydraulic & the two Buttons back on. Then fitted the spacer and finally, pushed the location pegs into the holes on the Leg.

Leg No2, is now complete :)
R5-D4

January 29, 2013

Lots of work done......


Ankle Braclet
I cut out a piece of hardboard to fit at the back of the Ankle Braclet. Once sanded I sealed it with watered down PVA glue. It will need re-sanding once dried.

Coin Slot
Before I fitted the Coin Slots back into the body, I painted the visible frame black, that could be seen through the slots.

Leg No2
Sprayed primer over Leg No.2. This helps to show up all the bits that need attention! I wil also need to drill and add a few more stratigic holes to help clamp the pieces tighter together. I did this before then applying more wood filler to gaps and all over where needed.

Horseshoe
Whilst the wood filler was setting on the leg, I started spraying Primer onto horseshoe.

Booster Cover
Masked off the 'blue' on the booster cover and then applied primer over the lower half & in the grooves. Left to dry, then later I sprayed it up blue. Need to buy another small can for finishing off the Octagon Port wall edges.

Shoulder Hub
This resin item had already been cleaned, just not got round to painting it. So on went a few light coats of primer. A few as you want to get the paint in all the corners, without the spray 'running'. Spray, leave, spray a bit more, leave......you get the picture :)

Outer Foot Sheel No1.
I already had this piece cut out. I just needed to cut the angles & it to length. It fits on the back face of the foot [actually the inside part of the foot, where the 'foot battery' sits. I bonded it in place with p40. Ooops, when I taped it up, the piece was slightly too long when I measured to check squareness etc. Luckily I had some scrap wood that was enough to move the piece to make it the right length. And then left it all to set. Next I then cut plastic pipe I had for the curved section. Using my coping saw I cut away most of the board I had left on. I then used my dremel with sanding drum attached, to create the curve.

November 27, 2012

Main Leg 2 - 2.3

T-nuts are now in place so I test fitted the leg studding through the body, shoulder discs & into the Leg. Thightened up the internal nuts, pulling the studding tight onto the T-Nuts [fitted inside the leg]. Once happy, I fitted all the screws in place, clamping the leg sections together. Next I attached the rear & front ankle plates, that thicken up the ankle. Before I went any further, I opened out the hole in the Leg to accept the Shoulder Hub, as I'd forgot to do this the other day, lol. I then added aluminium strips as guides to the side edge of leg & started to apply wood filler. Also applied to the ankle side edge & edge of shoulder radius. Once dried I started to file flat any high spots.

September 03, 2012

Noooooooo - Shoulder Hub damaged

Stripped all the parts I'd fitted to Leg No1 & was sorting where there was space on the shelf in the garage to put them, when I caught the Shoulder Hub and it fell off. Bounce, bounce, bounce...... crash!!! It fell onto some boxes before hitting the floor. Damage.....yes, as little bit has chipped off, but it is fixable and obviously, won't be noticeable.


May 01, 2012

Leg Assembly 2.3 - Hub hole

Finished the outer hub hole diameter cut-out over a month ago now. Used a cutting tip that came with the router adaptor. I forgot I had. This cut through the wood so much easier :)
Today:
Next I needed to cut the inner recess to depth. So that the Hub would sit flush with the leg.
I used the cutter I bought off e-bay a few weeks ago.
Adjustable Circle Hole Cutter

Started to cut through from the front, then turned the leg over to finish the cut from the other side, as the cutter holders would of damaged the outer hole on the front face.
Shoulder Hub, recessed into the Leg.

April 30, 2012

R5-D4 Body & Leg

Wanted an updated picture of build so far. Just the body and leg. Will have to sort a stand so I can fit the centre leg/foot and re-take this picture.


Photo taken on a slight angle to give the right impression of how he should look :).

March 01, 2012

Painting parts...

Restraining Bolt - weathered effect:
After looking at other builds, I decided to weather my restraining bolt and also add some detail to it. Used black paint and applied with a small brush.
I used Humbrol black, that I bought years ago and used for painting up my Stormtrooper helmet.
When dry, on the aluminium, it still looks wet like oil.


Shoulder Hub - weathered effect:
Applied black paint to the inner recesses.

February 14, 2012

Leg Assembly 2.2 - Hub hole

After several more coats of white paint, all over, the leg is now looking like the real thing!

I clamped a piece of wood in the vice, I then clamped the leg onto this. Placed some thick cardboard between the leg and the clamp to protect the paint work.

Next I drilled holes inside the area to be cut out for the Shoulder Hub to fit into. I then started to use my dremel fitted with a sanding drum to finish off the circle to size.

I started to sand the edges round. But my last sanding drum wheel broke. So that's all for now.
I still need make another counter sunk hole for the Hub to fit into. Have ordered an Adjustable Circle Hole Cutter Power Drill Bit Tool Saw to help with this next step. It will also save me time when making the second legs, hole cut out.

Shoulder Hub No1

I did this at the weekend.

After following the instructions on preparing the hubs ready for spraying, I sprayed with several light coats of grey primer. Once this had dried, I proceeded with silver spray paint.
R5-D4's shoulder hub made by Don Jarr
Still to come is a clear coat, to protect.

I still have to decide on how to 'fix' the hub into the leg. I may just go for a push fit.

January 07, 2012

Shoulder Hubs came today.....

I know I said I would be making everything on R5, that I possibly could. But I've been tempted by these for months now via regualer notifications off ebay lol.
So decided to buy a set.


They came today. They are REALY good!!


He sells other R-unit parts and other prop components.
Oh yeah, he is based here in the UK too!

April 15, 2011

Taking shape - Frame Build

Cut two front uprights for the arm enclousers, drilled and screwed them in place.


Had already cut two arced sections out of MDF, also for the arm enclousers. Had to correct the dimension for their position, due to the dimensions given for the two upright pieces, takes into account that they should be recessed into the base and top! Drilled and screwed them in place.


Still need to cut out and fit the upper most curved part of the arm enclosure.


Next I needed to fit two additional spacer plates, 8mm, to the shoulder disc's, one either side.
When I was working out the distance needed to clear the body dia, I mis-placed a dimension, meaning the two side pannels were not far enough apart. Ther one thing following planes, but following two different sets of planes, that's when it get's confussing :-D lol.


And here they are in place.

I drilled through the spacers to allow the bolts and power cables access. The extra holes are to help reduce weight. In principle that is lol.

And heres the body so far.