Showing posts with label Restraining Bolt. Show all posts

September 05, 2024

R5-2JE astromech: Anniversary

Today, September 5th, back in 2018, I got to work on a little project code named 'TRIXIE'.

R5-2JE astromech - The Rise of Skywalker


Due to change of plans on set, I didn't get to operate R5 that day, but I did get to assist Lee Towersey, and R2, on set, stood opposite the Falcon 😍. Sam P, was eventually the operator of R5 as well as his own droids, a few days later.

Another amazing opportunity (the third one) that I am truly grateful for to of experienced. Being behind the scenes is hard work, but worth it 😊.

#R52JE is named so for three very special reasons 💓💓💓

R5 has appeared in three films (different colour schemes), this being the only time the droids designation suggested was used.
'2J' represents my two eldest children, Jessica & Jacob, and 
'E' for my youngest daughter Evie.

For those interested, R5 has the unique features of his centre leg only having one ankle cylinder, and a restraining bolt! Have a search for images and see if you can find him lol

#droidbuildersuk
#astromechdroid
#theriseofskywalker
#r5
#trixie
#droidfactory
#toy

July 14, 2020

Funko Pop Astromech - 3D.......complete!

Last Friday, was a long day of working on finishing off the 3D modeling.

  • Body - rads added to corners.
  • Dome - full build, with eye's, sensors, dome rods, pie panels & antenna.
  • Then just for these pictures, some colour added. 
Funko Pop Astromech 3D
R5 colour scheme added, missing pin striping on dome.
A few alterations as they were bugging me....
The antenna, now points forward & I've added a restraining bolt, to match mine and R5.

I'll hopefully get this all printed soon, and then once happy, I'll upload to my Thingiverse page.

July 05, 2013

R5-D4's Head 3.4 - silver tape applied

I was originally planning on spraying the silver dome band. But thought I'd give the silver tape a second chance lol. My last go at using the tape on the leg spacer discs didn't end well.

I first wrapped the tape around and cut to length. Then applied, peeling the backing tape a bit at a time. I then trimmed the width and stuck the excess under the edge. I then used a cloth to smooth any bumps & creases out.
R5-D4

Then I fitted all the dome components back on.
R5-D4

R5-D4

R5-D4

All ready for tomorrows appearance at my children's school summer fair :)

January 09, 2013

Restraining Bolt - dirt Pt2.

Applied some black paint on the body, around the restraining bolt.

I then used a piece of tissue paper soaked a little in white spirit [paint cleaning solution] and gently wiped it off and down the body a little.
The camera flash doesn't help this picture, but I'm happy with the look and I can add more colours etc later.

September 30, 2012

Restraining Bolt - upgrade

Having read posts on forms about the origins of the 'Restraining Bolt' and it probably being a camera lense/adaptor of some sort. I decided to upgrade my own bolt by addeding a straight knurled edge around the outer most diameter.
 
The link below will take you to info about this find.

I still might add a drill hole to the front of the Bolt.

June 29, 2012

Body Skin 3.4

Finished off recessing another panel the other night.
Only took an hour to 'slice' the wood off to depth LOL.
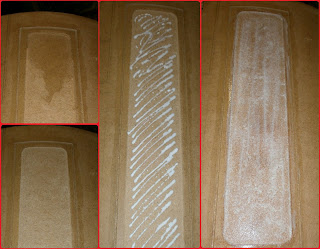
Then once sanded to get rid of the fibres [bottom left picture], I applied PVA glue [middle picture], then with a paint brush and water [right hand side picture],
painted the PVA all over the recess.
Once dried it was all sanded over again and wood filler applied to areas to smooth over.


Whilst waiting for this to dry I got to work on filling in the gap around the should disc. This was caused by misalignment of marking to where the actual shoulder disc should of gone. (I'll know better for the other one). I'd wrapped cardboard around the edge of the disc and then masking tape to stop the resin coming out. I then applied the first coat.


I also screwed the Restraining Bolt bracket onto the frame.

June 28, 2012

Restraining Bolt bracket

Here is the bracket that will be fitted behind the Restraining Bolt, to ensure it doesn't come off.
 Position marked for hole.
Hole in top to screw to frame.

June 22, 2012

Body Skin 3.1

Sprayed pocket parts white , then glued top part and bottom/sides together.

Marked up side vent slots.

Masked off the shoulder hole, to be filled in with P40 and then sanded smooth.

Sanded the filler around the rear Coin Return.
And then painted over it with silver to blend in.


Grooved and recessed one panel [pic below].
Then a lot of sanding and PVA glue to smooth and seal the cut wood.
Next, to apply some wood filler.


Positioned restraining bolt on body. There is a washer on the hex side of the bolt, but made up a restraining plate bracket and fitted it behind the skin, just to make sure it stays there lol.

This is to prevent the bolt from being pulled out/through the skin!

March 01, 2012

Painting parts...

Restraining Bolt - weathered effect:
After looking at other builds, I decided to weather my restraining bolt and also add some detail to it. Used black paint and applied with a small brush.
I used Humbrol black, that I bought years ago and used for painting up my Stormtrooper helmet.
When dry, on the aluminium, it still looks wet like oil.


Shoulder Hub - weathered effect:
Applied black paint to the inner recesses.

June 16, 2011

A busy week

I'v been busy this last week machining the lower front vent surround. Milled it to it's outside dimensions.


Just need to drill & mill out the internal part, then mill the 4 Degree angle on the back face.
Unfortunatly the Milling machine was then out of action for a day or so not wanting to waste any time, started machining up a Restraining Bolt on the lathe.


Then, after finding the part-off tool, parted off and tap an M10 thread in the rear face.


Also this week I've been filling and sanding plugs and other holes in R5's base (where I had had to cut all the way through it), and also covering screw heads.

Have also marked up some templates, for building the centre leg.