What with R5 being on display this Saturday, am a little nervous, to say the least!!
Been trying to get as much done and finished before the big day, so yesterday, I sprayed up Leg No.2 white. I gave it a few coats, but as the can was running out, decided to concentrate on the outside/front. I won't clear coat it till the whole leg has been sprayed, but it still looks good.
I also sprayed silver the second Hub, that didn't turn out great the first time. And the rear strip for the Ankle Bracelet.
Then last night I started to assemble all the components I had for it. I first screwed into place the main Ankle Bracelet. It's screw although countersunk, is also covered when the Booster Cover is in place. Next on was the Booster Strut, which sits in the hole of the Bracelet and an angle bracket secures the top block to the leg. The Booster Cover then is just a push fit with the dowels, into the leg. The Ankle Cylinder [with wedge & holder pre-attached] are push fitted into place, along with the two Ankle Details. The Hub is also just pushed into place for now. And lastly the Horseshoe goes on.
Lastly, I started to dirty up the whole leg.
**UPDATE**
I've now fitted the Large Data Port, touched up the Octagon Ports edges with metallic blue, fitted the lower vent pocket mesh screen.
Outer Foot No.2 - UPDATE
Been working on the crescent detail, to finish off the top section of the shell. Also drilled out the knurled hose fitting holes and added the top strip detail. Only going to be able to primer it up for the show tomorrow.
Droid Builder

Showing posts with label R5-D4's Octagon Port. Show all posts
Showing posts with label R5-D4's Octagon Port. Show all posts
April 26, 2013
January 27, 2013
Body Skin 4.6 - R5 see's red :D
Well, before we get to the red. I needed to finish off with white around the rear Octagon Port. So I masked & blanked it off and sprayed up white.

It does need another coat as the grey primer can just still be seen to the right of the port.
Then it was onto the good stuff :D
I've been itching to spray up the two front/side recessed panels in red!
So on went the masking tape and news paper, and then on went the paint.

Look at the glossy shine :D lol
(only for it to be dirtied up later on hahaha)
Then, I masked off and sprayed up the other side panel.

Due to my recessing skills or lack of them, some of the 'side walls' weren't as deep all the way around the edges.
This then meant that the masking tape allowed some of the red paint to bleed out onto the main white panels.
I was a bit disapointed at first, but re-assured myself that once the 'dirt/oil' = (black paint) was applied all [most] of this would be covered up.

The Utility Arms are still covered up, and will do until ALL the painting, including clear coat has been applied.
----
I also started on the first of the last three panels.
So I scored and grooved out the lower rear vent with pocket. A light sanding of the grooves before applying watered down PVA glue to seal the surface.

January 07, 2013
Body Skin 4.5 - Silver Panel work
Finished of cutting out the two remaining slots on the Side Vent.
I fitted the 'Pocket' that goes in the Pocketed Front Vent. This along with the Front Coin return and also the rear Octagon Port, were secured with P40 resin.
Any gaps were later filled with wood filler.
I fitted the 'Pocket' that goes in the Pocketed Front Vent. This along with the Front Coin return and also the rear Octagon Port, were secured with P40 resin.
Any gaps were later filled with wood filler.
 |
| Front Coin Return & Pocket Vent bonded into place with P40 resin. |
 |
| I also glue in place a piece of wood to locate the rear screen for the Pocket Vent. |
Decided that R5's body needed some colour, so masked off the skin and sprayed up the front Pocket Vent, the front Coin Return & the newly prepped Side Vent, with silver.

 |
| Side Vent sprayed silver |
 |
| Side Vent, Pocket Vent & Front Coin Return |
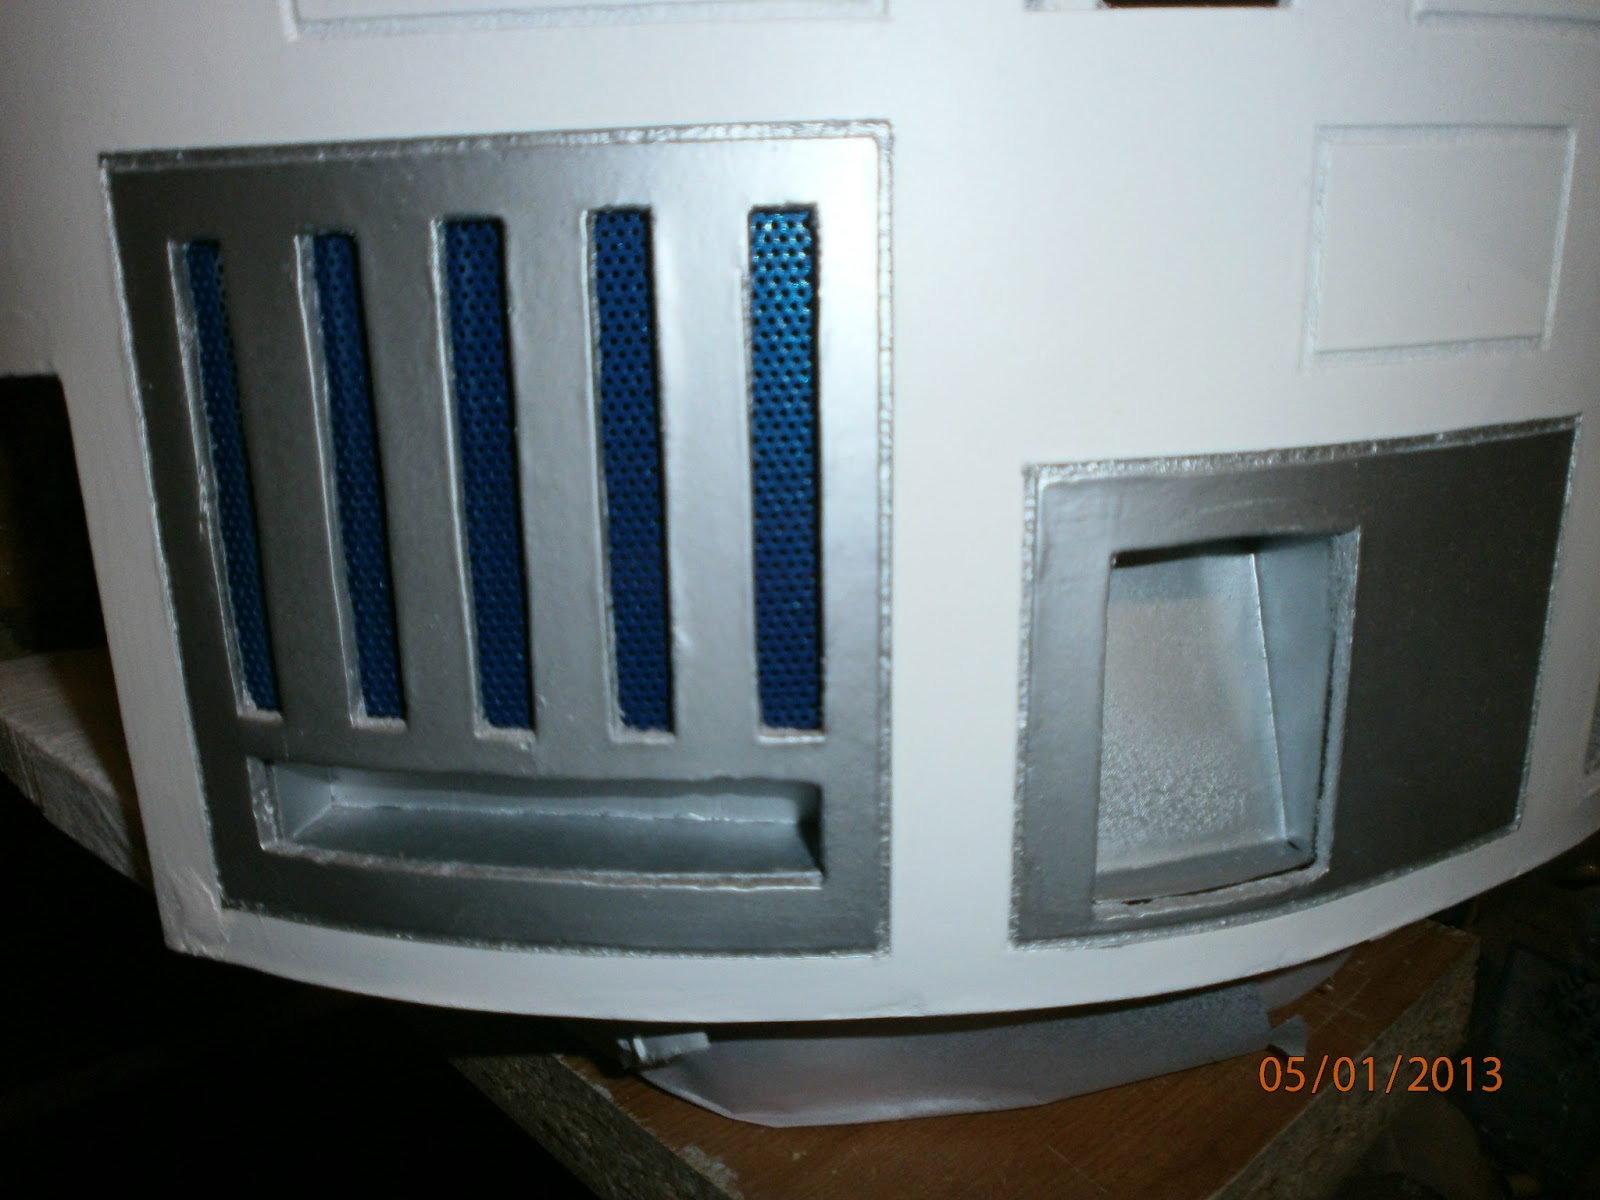 |
| Pocket Vent & Front Coin Return |
I then masked off the front Vent Panel, where the two central vents will be fitted, and sprayed this up with metalic blue.
 |
| Central Vent Area |
 |
| Central Vent Area |

November 14, 2012
Body Skin 4.3 & Octagon Port 2.5
Body Skin 4.3
Have started to apply masking tape over the Utility arms. I'll then mask off other areas that I don't want primer on. Then spray up the utility arm area & sockets and also re-do all the other areas of the body that have had wood filler applied to smooth over.
Have started to apply masking tape over the Utility arms. I'll then mask off other areas that I don't want primer on. Then spray up the utility arm area & sockets and also re-do all the other areas of the body that have had wood filler applied to smooth over.
Octagon Port 2.5
Here is the rear Octagon Port, now secured in place with it's angle bracket. It just needs P40 resin applied around the edges, inside the body and then wood filler to the front edges/gaps.
 |
| picture of arms starting to be masked off |
Octagon Port 2.5
 |
| Front Octagon Port fitted inside the body, masked off and area sprayed with primer. |
 |
| Here is the front Octagon Port after I'd sprayed the area around it white. This will also be covered, to prevent over spray inside of the port. |
Here is the rear Octagon Port, now secured in place with it's angle bracket. It just needs P40 resin applied around the edges, inside the body and then wood filler to the front edges/gaps.
 |
| Rear Octagon Port. |
November 11, 2012
A small update......
Not been able to do much work on R5 these last few weeks, which is a little frustrating. Family holiday, decorating the home, health issues to deal with. But I have managed to do a little bit here and there.
Booster Cover
I made up two cardboard boxes, wrapped with selotape, and applied wood filler around them to make the two recessed areas of the curved section. Have to sand the curve in and see how it holds up. Attempt two will be P40 resin, as on cover no1.
R5's Body
I sprayed the lower area of the body with white paint, mainly around the front Octagon Port. This is so that I can touch up the Port itself with blue paint. I still have other areas to primer spray still, but this way I'm still able to do little bits. Once all the primer has been applied, I'll mask off areas and give R5 some more coats of white. Am not to fussed with him not being perfect, all this will (I hope) just add to the weathered & used look.
Octagon Port (rear, No2)
I've cut to size the angle bracket needed to secure the rear octagon port in place. These aren't really needed, but they do help secure the centre aluminium piece of the port and will aid the port from potentially being 'pushed' through into the body. The area inside the body will of course be bonded to the octagon port with P40 resin as well.
Battery Power
Lastly, I've put on charge a 12v 17amp battery, I found I still had lol. It was out of a not so good car jump starter pack! It may/will come in handy, and if nothing else, it is giving me an idea as to the kind of weight R5 will have inside him.
September 30, 2012
Body Skin 4.2 - Primered up!!
I know I should of done this before fitting the Utility Arms & Octagon Port, but I got carried away with figuring out how best to fit them. So before I do anythin else I've started on primer spraying up R5's body. I masked off the Skirt, Utility Arm area & the front Octagon Port.
Then started spraying.


 |
| The masking tape was to stop the arms from opening when I was moving the body :) |
 |
| Although smooth'ish, the recessed panels still need some wood filler to smooth them out more, to my liking. |
Next will be light sanding of primer and wood filler and then apply more primer.
Octagon Port 2.4 - Rear Port build
Used masking tape to cover over the back plate, then marked out the slots to be cut out. Using a Stanley knife, I scored and removed these pieces.

 |
| Rough cut out of skiin for rear octagon port. |
Then primer spray, blue & then clear to finish. Next is to make the side walls.
I also roughly cut out the hole for the Octagon Port in the body, but due to my not so accurate frame build, I needed to cut into the rear upright.
Octagon Port 2.3 - front now fitted into body
Screwed angle bracket into base to hold in place (no picture), then applied P40 resin around the outside edge of the Octagon Port and skin, inside the body. Once this had dried, I started filling in the gaps with wood filler. Sanding and more filler was then applied to build up the areas.


September 26, 2012
Octagon Port 2.2 - photos
Here are pictures of my 1st Octagon port almost complete. Just need to fix the sides in place and then install. There will be additional work to fill in gaps, smooth off and paint touch up's.


 |
| 1st Octagon Port almost finished. 2nd Port's back panel now cut out and ready for marking up. |
September 24, 2012
Build update, work done last week....
Rear Utility Arm socket:
Drilled locating holes in the perforated metal. Primered it, then sprayed it up Black.Photo's to follow.
Octagon Port:
Cut down the angle bracket and drilled a new fixing hole, that will be used behind the Octagon Port.Photo's to follow.
Skin:
Applied wood filler around the bottom of the skin/base to fill in gaps.
Also 'grooved' out the side panel, next will be to do the slots.
Photo's to follow.
R5D4's weigh's how much!?!?!
Been meaning to do this for a while now, so thought I'd weigh R5's built bits made so far.Centre Leg & Foot complete = 4Kg's
Main Leg No1, with no Foot = ??
Body, with no head = ??
September 19, 2012
Octagon Port 2.1
Started on new side pieces for the Octagon Port. These will all be cut out individually and made to fit. I have also grooved them so that the rear metal plate, from by first attempt, will sit inside them. I also added some more board to the rear, this should help with keeping everything solid. I'm also planning on adding a metal angled bracket behind for the centre aluminium piece to bolt through and secure all in place.


P40 resin has now set and wood filler applied to gaps, panels then all lightly sanded and sprayed with primer. I've started on the other pieces and the same process will be applied to these. Final assembly will be once all panels are sprayed up in blue & clear coated.
September 13, 2012
Octagon Port 2.0 version in wood
As R5's build has gone on, my ability to understand how best to make things ot of wood has improved......slightly, lol. My first attempt at making his Octagon Ports out of metal were ok, but I wasn't 100% happy with it, so I didn't make up the second one.
 |
| First Octagon Port, but not happy with side panel bends etc. |
I have now decided that I'm going to make them out of wood, hardboard. This should be easier to build and assemble & neater looking then the metal version. I will be keeping and using the two aluminium centre pieces I made.


So will start on version 2.1 tomorrow :)
September 19, 2011
Leg cut out & painting components.....
1.5hrs to mark out and cut out first main leg. Three pieces thick, two 18mm + one 8mm = 44mm thickness [guide dimension only]
Picture below has the wood template fixed on still, but rain stopped play at this point. I cut out the centre piece's stabiliser socket. I'll use this as a guide to cut out on the other two main pieces


Next, i'll screw the leg pieces together. There is a lot of shapeing and wood fillering to be done.
I sprayed up the one Octagon Port, Coin Slots and the top parts of the Ankle Details [and inserts].
All these components had previously been sprayed with white primer. The results were not what I expected. Where as the Cylinders had been primered grey, the 'dark' under coat made the metalic blue the 'shade' I wanted. The white primer made the blue a whole shade lighter!! I had already un-masked the Octagon Port back plate.


Picture below has the wood template fixed on still, but rain stopped play at this point. I cut out the centre piece's stabiliser socket. I'll use this as a guide to cut out on the other two main pieces


Next, i'll screw the leg pieces together. There is a lot of shapeing and wood fillering to be done.
~~~
I sprayed up the one Octagon Port, Coin Slots and the top parts of the Ankle Details [and inserts].
All these components had previously been sprayed with white primer. The results were not what I expected. Where as the Cylinders had been primered grey, the 'dark' under coat made the metalic blue the 'shade' I wanted. The white primer made the blue a whole shade lighter!! I had already un-masked the Octagon Port back plate.


The other components I might re-mask, re-prime in grey and re-spray in blue to get the shade I want. As for the Octagon back plate, this one might have to stay this shade and be fitted to R5's rear.
I then spent another hour shaping the octagon port walls, cutting out a cylinder wedge side template out of cardboard, cleaning off tape residue on coin slot face.

May 31, 2011
Octagon Port back plate
Masked off the back plate and cut out the segments to be sprayed with primer.

Ignor the off centre segment line markings. I corrected these in the shaded areas ;-).

Ignor the off centre segment line markings. I corrected these in the shaded areas ;-).
Octagon Port 1 construction centre piece pt2
Had spare five minutes and a free lathe, so machined up the other octagon ports center piece.
Thread tapped a hole in the back for location & fixing together.
Thread tapped a hole in the back for location & fixing together.
May 25, 2011
Octagon Port 1 construction UPDATE.....
Finished off bending the second plate up, for the other half of the wall surround. Depending on how R5's skin is constructed, will determin how much needs to be shaved off the Octagon's walls.
(As they should be curved to fit the diameter of R5's body).

Next I machined the centre diameter part. This has a screw thread in the back to secure it and the support bracket, which locates it onto R5's base.

The next part is to mask off the parts that need painting blue and after this, the parts will be glued, bolted together and secured to R5's base.
(As they should be curved to fit the diameter of R5's body).

Next I machined the centre diameter part. This has a screw thread in the back to secure it and the support bracket, which locates it onto R5's base.

The next part is to mask off the parts that need painting blue and after this, the parts will be glued, bolted together and secured to R5's base.
May 23, 2011
Octagon Port 1 construction begins
Lunchtime, I cut out the first two of the three [four] pieces, needed to make up my first Octogan Port. The back plate and one of the side pieces. I made this into two sections so as to be able to bend the angles correctly.

I also left enough to bend tabs for the back plate to attach too. I just need to cut out and bend to shape the second [piece 3] for the sides and then I need to machine up the centre diameter piece [piece 4].

I also left enough to bend tabs for the back plate to attach too. I just need to cut out and bend to shape the second [piece 3] for the sides and then I need to machine up the centre diameter piece [piece 4].
May 20, 2011
Octagon Port construction
Had a few ideas about how to make up the Octagon Port units. The one I'm gonna try first is by making a flat rear plate and then a long strip, with bent angles to form the sides. I'm then going to machine up the central diameter piece and screw/bolt this to the back piece.
Subscribe to:
Posts (Atom)