Droid Builder

Extra Projects & Event Page's
- Home
- Trading Card Dispenser (NEW version 3) - TCD [2020/2022]
- Trading Cards
- R5-D4's ....Bad Motivator development
- R5-D4 - silver neck details
- R4-D4 - Dome [wood build]
- R0-D4 Dome [wood build]
- 3D Printing
- *** Star Wars Shoes ***
- GOUD-4 Messenger Droid - Solo ASWS
- Event: Mshed Bristol 2025
- Event: Mshed Bristol 2024
- Event's 2018
- Event's 2017
- Event 2016 - "Celebration Europe"
- Event's 2015
- Event 2014 - Chippenham Sci-Fi
- R5-D4 - events page - The beginning (2013)
- ** R5-D4 patch **
- R5-D4 Photos
- Costume for my Son - Han Solo -
- Costume for my Son - Boba Fett
- Droid Caller - Han Solo style
- Scanning Crew Container - Transmitter Storage Box
- Stormtrooper - me
- Rogue One - trading card storage box
- Rogue One
- Jabba’s gate prop for Celebration 2023
- Treadwell Droid - WED-15-77
January 31, 2013
Outer Feet 1.4
First thing in work this morning, I cut the last two pieces of wood. These two strips go next to the curve and then on the outside edge. They are quite flexible because they are thin, so hopeing the P40 resin will strenghten them once bonded together and with the outer & curved pieces.
January 29, 2013
Outer Feet 1.3 - now with curves
Lunchtime, I trimmed off one end of the shell so as to get a good fit for the curved pipe to rest on. Once happy with this, I made a paper template and traced the curve onto the opposite end. Then, cut excess off and finished off with Dremel sanding drum.
Next up, bonding the curve onto the foot.
Lots of work done......
Ankle Braclet
I cut out a piece of hardboard to fit at the back of the Ankle Braclet. Once sanded I sealed it with watered down PVA glue. It will need re-sanding once dried.
Coin Slot
Before I fitted the Coin Slots back into the body, I painted the visible frame black, that could be seen through the slots.
Leg No2
Sprayed primer over Leg No.2. This helps to show up all the bits that need attention! I wil also need to drill and add a few more stratigic holes to help clamp the pieces tighter together. I did this before then applying more wood filler to gaps and all over where needed.
Horseshoe
Whilst the wood filler was setting on the leg, I started spraying Primer onto horseshoe.
Booster Cover
Masked off the 'blue' on the booster cover and then applied primer over the lower half & in the grooves. Left to dry, then later I sprayed it up blue. Need to buy another small can for finishing off the Octagon Port wall edges.
Shoulder Hub
This resin item had already been cleaned, just not got round to painting it. So on went a few light coats of primer. A few as you want to get the paint in all the corners, without the spray 'running'. Spray, leave, spray a bit more, leave......you get the picture :)
Outer Foot Sheel No1.
I already had this piece cut out. I just needed to cut the angles & it to length. It fits on the back face of the foot [actually the inside part of the foot, where the 'foot battery' sits. I bonded it in place with p40. Ooops, when I taped it up, the piece was slightly too long when I measured to check squareness etc. Luckily I had some scrap wood that was enough to move the piece to make it the right length. And then left it all to set. Next I then cut plastic pipe I had for the curved section. Using my coping saw I cut away most of the board I had left on. I then used my dremel with sanding drum attached, to create the curve.
January 27, 2013
Body Skin 4.6 - R5 see's red :D
Well, before we get to the red. I needed to finish off with white around the rear Octagon Port. So I masked & blanked it off and sprayed up white.
It does need another coat as the grey primer can just still be seen to the right of the port.
Then it was onto the good stuff :D
I've been itching to spray up the two front/side recessed panels in red!
So on went the masking tape and news paper, and then on went the paint.
Look at the glossy shine :D lol
(only for it to be dirtied up later on hahaha)
Then, I masked off and sprayed up the other side panel.
Due to my recessing skills or lack of them, some of the 'side walls' weren't as deep all the way around the edges.
This then meant that the masking tape allowed some of the red paint to bleed out onto the main white panels.
I was a bit disapointed at first, but re-assured myself that once the 'dirt/oil' = (black paint) was applied all [most] of this would be covered up.
The Utility Arms are still covered up, and will do until ALL the painting, including clear coat has been applied.
----
I also started on the first of the last three panels.
So I scored and grooved out the lower rear vent with pocket. A light sanding of the grooves before applying watered down PVA glue to seal the surface.
Outer Feet 1.2 - now with two ends
Mixed up some more P40 resin and bonded in place the other end for the foot [No.1]
I also marked out the base ring onto some 18mm thick plywood. I'll follow the same route as I did with building the centre foot.
Main Leg 2 - 2.5 Ankle Detail work
Busy weekend:
Drilled the marked areas on both the Ankle Details and on the leg itself. Marking was done using a cardboard template :). Available dowel was cut and glued into the Ankle Details but not into the leg as this still needs to be sprayed and a few more bits to be finished on it.
Drilled the marked areas on both the Ankle Details and on the leg itself. Marking was done using a cardboard template :). Available dowel was cut and glued into the Ankle Details but not into the leg as this still needs to be sprayed and a few more bits to be finished on it.
January 24, 2013
Outer Feet 1.1 - template & build
21.01.13
I transferred onto cardboard, the dimensions from my 3D CAD drawing of the Outer Foot shell & then cut them out. The front and side pieces fitted together perfectly! This means I'll be able to work on them as well, so not waisting any available build time.
So I've now transfered over the cardboard templates onto wood, and cut them out.
23.01.13
Used P40 to start bonding the 1st 2 sides of outer foot shell, plus 1 top piece. layed them on template to make sure sides are square.
Leg No.2 - Horseshoe No.1 - 1.6
Drilled out the fixing holes in the horseshoe already there, to pushfit in the dowel pegs.
Here it is test fited in place along with it's other components.
Here it is test fited in place along with it's other components.
January 21, 2013
Two Year Anniversery Build Date
Today marks [roughly] the second year anniversary of starting to build R5D4.
The first part i made was to machine up the shoulder buttons.
The first part i made was to machine up the shoulder buttons.
I can't believe it has taken me this long, just to get to where I am now. I knew it wouldn't be a five minute job, as there is a lot more work involved, than just cutting out pieces of wood and screwing them together! lol. That and having a family life and all that goes with it :).
I've also learnt alot about my own abilities and found them wanting hahaha.
I've also learnt alot about my own abilities and found them wanting hahaha.
The other side of it, is now my youngest daughter wants me to build her an R2 unit and in pink! Apart from the time to make it, which now I know what I'm doing, would hopefully be less......I don't have the space to store another R2 unit! I'm not 100% sure where R5 is going to live when he's completed!! Although I can probably guess (garage) hahaha.
Well, I hope to get R5 completed ASAP, he may not be motoriesed by then, but he will be structurally complete. Moveing parts can be completed afterwards......but he will move! :)
Well, I hope to get R5 completed ASAP, he may not be motoriesed by then, but he will be structurally complete. Moveing parts can be completed afterwards......but he will move! :)
January 18, 2013
Leg No.2 - Horseshoe No.1 - 1.5
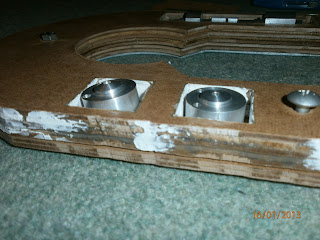
Drilled clearance holes in the back pieces of the horseshoe. This will allow the bolt heads to be recessed inside, to clamp the hydraulic in place.
I cut these bolts tooooo short, so will be using others lol.
Have also done two of the four buttons. [drilled & thread tapped them]
The top 'button' is slightly angled upwards. So i cut a small piece of hardboard & glued it in at the bottom of where the hole would be. I'll then fill in to form the angle. I also marked where the holes are to be drilled for the buttons.
 |
| Small piece of wood placed to start my angled face |
Applied wood filler around the inside of the recess, sanded and repeated......
Also applied wood filler around the outside to start to build up areas.
January 15, 2013
Booster Cover 2.5 - The second Leg
Whilst waiting for the glue to set, I set to work on paining the sockets in teh top of the Booster Cover. Unfortunatly, the small modelers tin of paint had become un-usuable. So I had to mask it all off and spray up with silver paint.
I'll have to buy some more, as I'll need it to do the grooves all over R5's body!
Leg No.2 - Horseshoe No.1 = 1.4
So last night I finished preping the pieces of the horseshoe ready to be glued together. I've only glued the top five for starters, the ones with cut-outs in them. I've done this so that I can apply wood filler to the inside walls of the cut-outs and should be easier to sand the surfaces flat.
 |
| Pieces being clamped together. The bolts were kept in to keep them aligned. |
 |
| Applying the wood filler [white] |
Because the top parts of my leg(s) are not 100% square/accurate lol. Rather than use a frame to square up the horseshoes, I'm using the bolts that originally secured and squared them up.
January 14, 2013
Leg No.2 - Horseshoe No1 = 1.3
Fixing holes x3, drilled in leg. These will accept the dowels, that I've cut to length, to secure the horseshoe onto the leg.
I trimmed the spacer to size (it's slightly smaller around all it's outside edges) & added location holes to match the other pieces. Applied more watered down PVA glued all edges. And left to dry.
Next is to smooth over the outside edges. I then need to apply wood filler to smooth over any visiable 'grain'. Ready then for spraying to start.
January 11, 2013
Leg No.2 - Horseshoes No.1 = 1.2
Cut out the centre area on both group parts. These pieces will be assembled large, small, large, small and so on. This will give the 'groove' effect which can be seen running around the inside edge of the horseshoe.
Above picture shows me starting to cut out the recess areas.
I've only cut through some of the pieces to achieve the correct depth.
January 09, 2013
Restraining Bolt - dirt Pt2.
Applied some black paint on the body, around the restraining bolt.
I then used a piece of tissue paper soaked a little in white spirit [paint cleaning solution] and gently wiped it off and down the body a little.
The camera flash doesn't help this picture, but I'm happy with the look and I can add more colours etc later.
Leg No.2 - Horseshoes No.1
I started on this back in April, I made a cardboard template of the horse-shoe. I did this as the first template attempt using the plans and printing out didn't go to scale. This way, all should work. Then used it to mark them out on 3mm hardboard, that I had already.
Then set to work cutting them out.
UPDATE 09.01.13
I decided that really I should attempt to make the Leg Horseshoes. So 10pm last night, I was back out in my garage and started work on cutting out the first set. I bolted the first four pieces together to drill out the centre hole. I then bolted the second set together so as to drill out the larger dia hole.
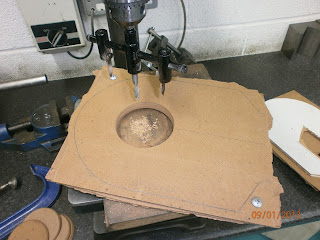
This morning, in work, I drilled/cut out the central holes using my adjustable hole cutter.
You can see the cut-outs on the lower left and the second set of horseshoes to be cut out on the right.
January 07, 2013
Body Skin 4.5 - Silver Panel work
Finished of cutting out the two remaining slots on the Side Vent.
I fitted the 'Pocket' that goes in the Pocketed Front Vent. This along with the Front Coin return and also the rear Octagon Port, were secured with P40 resin.
Any gaps were later filled with wood filler.
I fitted the 'Pocket' that goes in the Pocketed Front Vent. This along with the Front Coin return and also the rear Octagon Port, were secured with P40 resin.
Any gaps were later filled with wood filler.
 |
| Front Coin Return & Pocket Vent bonded into place with P40 resin. |
 |
| I also glue in place a piece of wood to locate the rear screen for the Pocket Vent. |
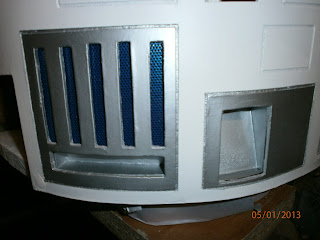
Decided that R5's body needed some colour, so masked off the skin and sprayed up the front Pocket Vent, the front Coin Return & the newly prepped Side Vent, with silver.
I then masked off the front Vent Panel, where the two central vents will be fitted, and sprayed this up with metalic blue.
Ankle Cylinder for Main Leg No.2 - 2.2
I've eventually got round to taking some photos, don't really like to post without them, as it's a bit boring and a picture makes things easier to understand :)
Well I drilled, out the two wood pieces and then PVA glued in the two 'dowels'.
Booster Cover 2.4 - The second Leg
It's been over a month since I first wrote this post.
Wasn't happy with the fit of the Booster Leg Strut's top square piece sitting inside the dog house of the Booster Cover. It didn't go far enough up inside it. So got to work with a file and now it fits much better. I used up what was left of the primer and also the blue spray. No point in spraying all over as still have the grooves to cut.
UPDATE:
I also had to machine down the diameter of the Booster Strut, as it was a bit snug fitting. The Cover opening was at fault.
UPDATE 04.01.13
I marked up and using my dremel, cut out the grooves in the Booster Cover, next is to primer, blue spray and clear coat.
January 05, 2013
Happy New Year 2013......
At last I have been able to do more work on R5.
What with Christmas, kids, toys and other family stuff, having to take priority lol, oh and the weather being a little dryer and warmer, I've been able to get in the garage.
Updates to follow, but I've done a little more work on the leg & booster, some spraying [which looks good], and can now post up other bits now I've been able to take some photos.
I'd like to have R5D4 ready for when/if, Star Wars, A New Hope is released in 3D [???] Motorised by then is another thing lol, but complete as a display would be good enough :)
Subscribe to:
Posts (Atom)


.jpg)


