Droid Builder

Extra Projects & Event Page's
- Home
- Trading Card Dispenser (NEW version 3) - TCD [2020/2022]
- Trading Cards
- R5-D4's ....Bad Motivator development
- R5-D4 - silver neck details
- R4-D4 - Dome [wood build]
- R0-D4 Dome [wood build]
- 3D Printing
- *** Star Wars Shoes ***
- GOUD-4 Messenger Droid - Solo ASWS
- Event: Mshed Bristol 2025
- Event: Mshed Bristol 2024
- Event's 2018
- Event's 2017
- Event 2016 - "Celebration Europe"
- Event's 2015
- Event 2014 - Chippenham Sci-Fi
- R5-D4 - events page - The beginning (2013)
- ** R5-D4 patch **
- R5-D4 Photos
- Costume for my Son - Han Solo -
- Costume for my Son - Boba Fett
- Droid Caller - Han Solo style
- Scanning Crew Container - Transmitter Storage Box
- Stormtrooper - me
- Rogue One - trading card storage box
- Rogue One
- Jabba’s gate prop for Celebration 2023
- Treadwell Droid - WED-15-77
Showing posts with label Littlebits. Show all posts
Showing posts with label Littlebits. Show all posts
April 20, 2020
Thingiverse Page - James_R5-D4 = Free downloads
Not done much on R5 these last few days. Have been answering questions about my Adafruit enclosures via my Instagram and Thingiverse pages.
So whilst I was on my Thingiverse page, I thought I'd checkout the views and downloads counts lol.
First up, top 7 Things viewed over the last year:
No.1 top spot, is my Trading card dispenser, lol this is like Top of the Pops 😂.
Next up, top 7 Things downloaded over the last year:
The Fake electronics board parts are what I created to be used for R4-D4's electronic panel on his dome [check out the page at top for the build].
Next up is my Trading Card Dispenser, this one is also No1 in my viewed 'Things'.
In third place are my Frankenstein neck bolts 😄. These I literally drew up and managed to get printed in an afternoon for work college who mentioned he was doing fancy dress the weekend lol.
March 12, 2020
Littlebits - Star Wars Droid Inventor Kit - pt 10 (2020)
I've now uploaded the stl files to my Thingiverse page. As well as the standard 'open' pie hole lid, I've also uploaded the 'bad motivator' lid version.
Littlebits - Star Wars Droid Inventor Kit - pt 9 (2019)
22.10.19
Lid update.....R5 now has a 'Bad Motivator':
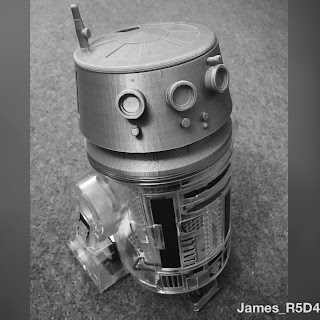
Printed off the updated R5 lid, which now has the correct orientation 'antenna' and also the 'bad motivator'.
The antenna's front circle needed to be facing the front in relation to the pie panel opening and the bad motivator positions.
I've uploaded a short video onto my You Tube account, it can also be found on my Instagram page.
UPDATE: 12,3,2020
The files have now been uploaded to Thingiverse
October 21, 2019
Littlebits - Star Wars Droid Inventor Kit - pt 8 (2019)
So the extra tinkering I thought would help with the lid fitting better, radius'd edge, didn't and made the gap bigger. The idea for the lip is just to locate it centrally for gluing to the head. So I went back to alter the lip edge a bit more, I'll test print it this week.
Whilst I was at it, I re-positioned the antenna to face forward, it was just a little thing but it was bugging me lol. I also added a version with a 'bad motivator'.
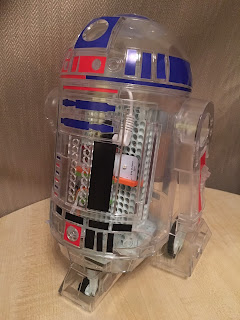
This is the Littlebits droid in it's R2-D2 guise.
.......and below as R5-D4
Whilst I was at it, I re-positioned the antenna to face forward, it was just a little thing but it was bugging me lol. I also added a version with a 'bad motivator'.
Both 'lid' options will be available on
my Thingiverse account.
Littlebits - Star Wars Droid Inventor Kit - pt 7 (2019)
Last week my youngest daughter got out the Littlebits R2-D2. She had been doing some work in school and it re-ignited her imagination with electronics.
So back in work I re-opened the 3D files I had drawn up for the R5-D4 dome and got back on tinkering with the final design from earlier this year. Click here for part 6.
With our new works 3D printer and my new design, I had more confidence that this would print/work second time around.
So back in work I re-opened the 3D files I had drawn up for the R5-D4 dome and got back on tinkering with the final design from earlier this year. Click here for part 6.
With our new works 3D printer and my new design, I had more confidence that this would print/work second time around.
With the print time at just over 12 hours, and all the settings set to standard, due to my limited knowledge of them lol.
This picture shows the support structure.
Once happy with everything, I set the print to start just before I left work.
With my fingers crossed for a successful print come the morning......
*
* *
* * *
* * * *
* * * * *
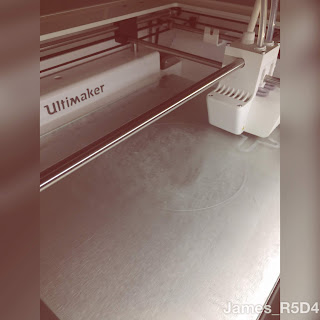
.......The morning came and YES, success! I've not felt this good about a 3D print in a long time lol, especially after the previous dome print fail. Here's the pictures before removing from the print bed.
The print quality is fantastic! Even when removing the supports, the finish is still great.
I just need to finish removing all the support material and see how well the 'lid' fits the dome.
Once everything is sorted, I'll post up this print on my Thingiverse account.
I'll post up more next week.......
February 13, 2019
Littlebits - Star Wars Droid Inventor Kit - pt 6 (2019)
So yesterday on my lunchtime, I had a look at the 3D drawing of the dome. I had done some upgrades since I had last printed (and it failed), but I wanted to look at splitting the dome into two parts. This would save on 'support' material (needed) to support the top area, which may of led to the print failer on the last attempt.
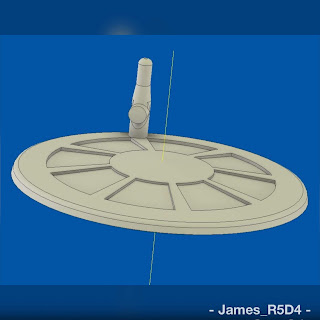
I left the antenna on, and again, I'll see how well this prints as it may be easier to print it as a seperate item.
You can see from this next image the differences & improvements made.
Also the motivator hole was in the wrong place, this I've removed from the updated version.
I've tried to make this as simple as possible as it is just for fun. I'll post up both the two part and the single part dome on my Thingiverse account once I've printed the two part dome.
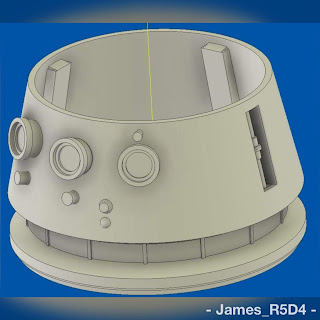 |
| R5 dome for the Littlebits R2D2 droid |
And here's the lid. It has a lip to locate onto the main body.
Images also on my Instagram 'james_r5d4' account
I left the antenna on, and again, I'll see how well this prints as it may be easier to print it as a seperate item.
You can see from this next image the differences & improvements made.
Also the motivator hole was in the wrong place, this I've removed from the updated version.
I've tried to make this as simple as possible as it is just for fun. I'll post up both the two part and the single part dome on my Thingiverse account once I've printed the two part dome.
To get instant notification of when this is uploaded,
as my Thingiverse account is linked lol,
follow me on Twitter @jamesr5d4
October 08, 2018
Littlebits - Star Wars Droid Inventor Kit - pt 5 (2018)
After a few more tweek's, I set up the .stl file for printing. I had originally planned on printing upside down with support, but then went with how I had started printing the first attempt last year. So, the right way up. To save time, I put it in 'fast' mode and 0.3 layer height. Fill at 30%.
It didn't take long to dawn on me that perhaps supports would of been a good idea lol, see above picture, but this was a one time print/test so not the end of the world and I can fix bits. At least you know to use supports! I think this may be down to the 0.3 layer height, fast speed & fill, as usually angle edges don't give me any problems.
Then came the 3 main eyes......
I had to get in there with the ruler to support the print until it had a few layers on it.
Whist this was printing, I had a few alterations so this .stl & the revised one will both go up on Thingiverse. The alterations include thickening of some of the walls at the bottom, enlarging the two side dome rods and moving them in side the recessed box a bit more, so they are supported. The internal dome roof area has been simplified, single angle face.
Then it was home time. I had to leave it running, and thoughts were that everything else should be ok.....
I came in Monday morning to this.....
No idea what went wrong here???
So I cut off this mess and when I get free time, I'll re-print just the top hat of the dome and glue it on lol.
October 03, 2018
Littlebits - Star Wars Droid Inventor Kit - pt 4 (2018)
It's almost a year since I last posted up about creating an R5-D4 dome for the Littlebits astromech. I had done some work since, but as it was still a work in progress so I didn't post anything up. Earlier this year I signed up to www.thingiverse.com to upload some of my work to share. My link is www.thingiverse.com/James_R5D4
This is just a representation of R5's dome, scale is roughly that of the Littlebit's R2 dome. The last print attempt failed, but that was OK, as the bottom ring was used to check the fit of the dome onto the body location ring.
I posted up images yesterday on my Instagram account and after a bit more work this morning, I've almost finished the build.
 |
| New dome features |
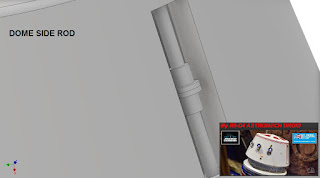 |
| New dome side rod |
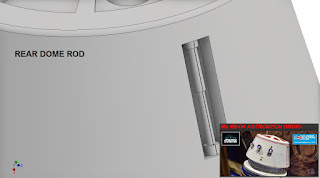 |
| New rear dome rod |
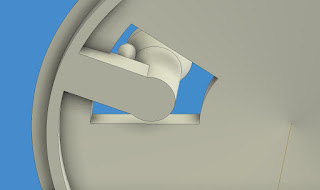
I redid the pie panels, now filled in & also added recessed areas for where the antenna & motivator will fit.
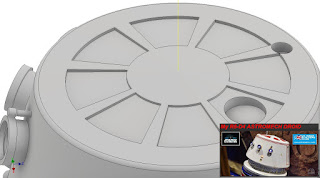 |
| Antenna & Motivator sockets |
I'll post up again once the last two parts have been drawn up. Not sure if to add these as one piece dome or as three seperate parts (dome, antenna, motivator), for ease of 3D printing orientation.
October 25, 2017
Littlebits - Star Wars Droid Inventor Kit - pt 4 The Build
So last Sunday afternoon, I managed to get my two together long enough for me to give them the R2 Inventor building kit.
My youngest daughter was more enthralled then my Son (just turned a teenager lol), but both sat down to first start downloading the app, and to then get out all the components and start arguing about who was going to do what lol.
My youngest daughter follows more after me for being 'creative' etc which is great, so she was the one who took charge, following the simple and straight forward instructions, via the App. (PS, my Son has other talent's, like being an international football star, lol)
She was soon playing all the sound bites that were available. This was great and very responsive.
As a parent the one big thing about buying something that requires batteries......is when the item actually COMES with them!! A defo MAJOR plus point! As this kit comes with it's own 9v battery! So no hunting round the house looking for one.
The circuit boards are extremely well made and visually to a high standard! Most impressive! And the 'only one way' connection of the magnetic contacts makes assembly simple and easy to use.
All the components clip onto the main internal frame easily and can be removed the same way, without difficulty.
And it wasn't long before the body and legs, which all just clip together, (my Son was allowed to do this lol) were assembled and our new droid was moving and beeping.
Feature 1: The recorded message.
You can record your own message and send it to the Droid, via the App, for it to replay on your button pressing command. She thought this was amazing! (tho it's not an instantaneous upload to the Droid), but is pretty neat.
In order to move onto the next stage you need to 'complete each mission'. This involved dis-assembling the droid (by following the App instructions) we didn't actually do this. Only then can you move onto the other build 'missions' (this is because they are locked).
But before she could do this, she wanted to start applying the stickers. She did ask, but I said she could do whatever colour scheme she wanted. So red/blue and black it was.
Blue pie panels, but the rest of the dome and body are a mix of the others lol.
I can't remember now what she named him 😃
The other 'missions' involve dis-assembling the components and re-arranging them to be able to operate the 'waving arm' (from the front body slot), this uses the centre foot stearing motor, 'dome rotation', using the main drive motor etc. This makes sense, even tho as an actual Astormech builder, you have it in you to ask 'why didn't it come with extra motors etc lol'.
My kids are on half term break from school, so I've only been told what they've been up to with the droid while I've been at work, so I'll do another update once the other 'missions' have been assembled and tested out.
More Blog updates to come......
October 19, 2017
Littlebits - Star Wars Droid Inventor Kit - pt 3
Printing started Tuesday morning on the new R5 dome....
But the PC 'shut down', (over night printing) so it didn't get to finish. Will look at the support structure and possibly re-design it into the build to save time and filament.
8 hours, the time taken is mostly due to the support structure, which we hadn't considered as the program doesn't actually show what the support structure will look like, neither does it give you a print time, which might also indicate it's going to take forever to print! :D
Looks like it maybe next week now, till the printer is 'free' to try again.
October 16, 2017
Littlebits - Star Wars Droid Inventor Kit - pt 2
With loads of people & Littlebits on Instagram, posting up pics of creations for their droids, I thought I needed something 'special' to modify the droid for the kids.
The plan was this weekend to get the kids to build it, but as always plans changed so hopefully, this weekend coming......plus I'll have the dome done by then as well.
There can be only one.....as Colin MacLeod once said, lol (Highlander film peeps), modification that this droid needs.......so I drew up an R5-D4 dome.
I did it simple, (tho it now doesn't look simple in this pic), but picked out his main recognisable details lol, three big 'eyes', neck detail and gave him a mini antenna. This is version 4 attempt, couldn't help myself lol.
Will post up pics once printed.....
October 03, 2017
Littlebits - Star Wars Droid Inventor Kit
Seems a long time ago now, but when we were at the
Force Friday 2 (link to my Blog post) event at John Lewis,
the Littlebits team were there with their Droid Inventor kit.
The attending club members chatted and were asked if we would like to review the kits.
At the asking price, I personally couldn't justify buying the kit.
These last few weeks, I've seen other's, review the kits and so assumed that a quota had been met and that I wouldn't be needed for testing purposes 😄 lol.
So yesterday, the wife messaged me to say a package had arrived, I hadn't ordered anything??.......oh wait, my new club top perhaps??
Got home to find this.....
It was a busy evening last night, and my kids had already gone to bed.
We have a busy next few days and then I've an important event on Saturday.
So I won't be able to let the kids at this till Sunday at the earliest 😄 & I'll be asking them to write me a review (which I'll take full credit for.....spelling mistakes an all 😄 lol)
A big thank you to the people at Littlebits for this.
For their main website, click their name at top of page
or search up online for UK shops
The attending club members chatted and were asked if we would like to review the kits.
At the asking price, I personally couldn't justify buying the kit.
These last few weeks, I've seen other's, review the kits and so assumed that a quota had been met and that I wouldn't be needed for testing purposes 😄 lol.
So yesterday, the wife messaged me to say a package had arrived, I hadn't ordered anything??.......oh wait, my new club top perhaps??
Got home to find this.....
 |
| WOW! 😲 |
We have a busy next few days and then I've an important event on Saturday.
So I won't be able to let the kids at this till Sunday at the earliest 😄 & I'll be asking them to write me a review (which I'll take full credit for.....spelling mistakes an all 😄 lol)
A big thank you to the people at Littlebits for this.
For their main website, click their name at top of page
or search up online for UK shops
Subscribe to:
Posts (Atom)


