Showing posts with label storage box. Show all posts

November 24, 2025

Treadwell WED-15 : Mast Storage Box build

September 2025

As the title suggests, this is a box that will store Treads Mast, and also for transportation to events etc. I won’t have to worry about it being knocked etc.

Started again on this, (September), I copied and modified the 3D lid corners etc from the head box build.

List of parts:
  • Base corners 3D printed [already printed - 2024] but were reprinted in TPU.
  • New lid parts, based on 6mm thick MDF, head box used 4mm.
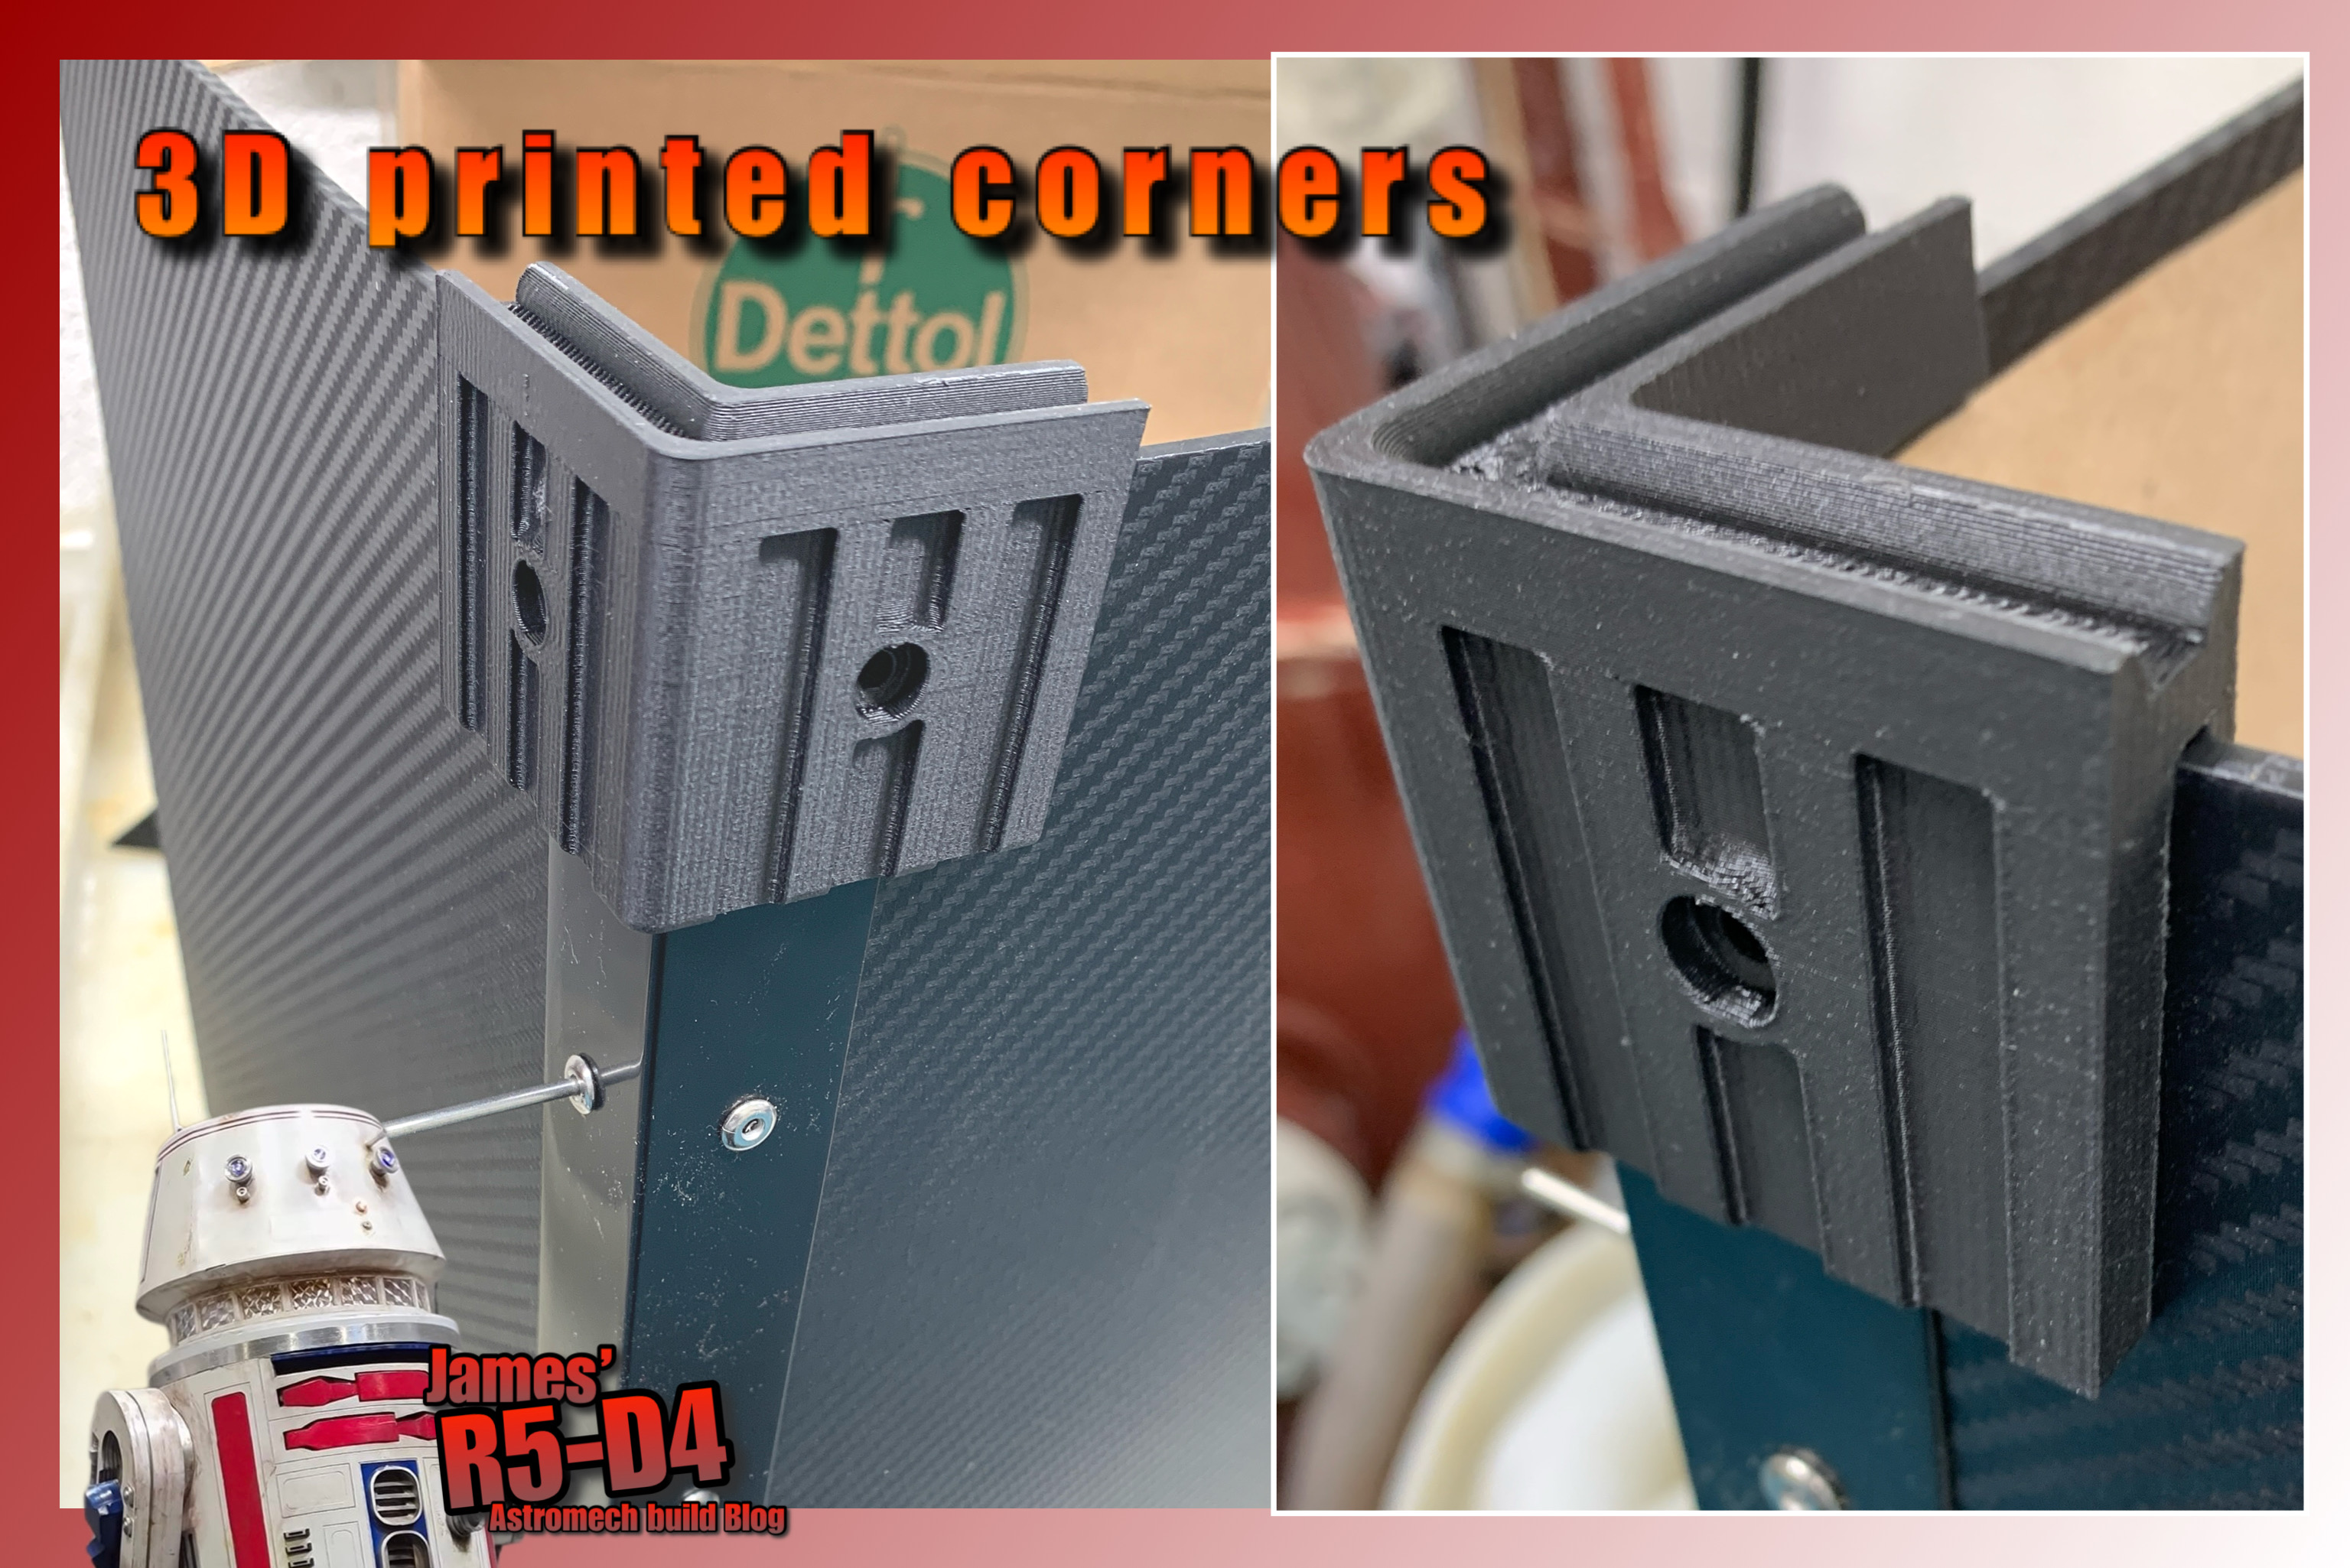
  • New design for lid corners & lid edge pieces - 3D printed.
  • 6mm thick MDF, due to box length.
  • 30mm x 30mm black plastic angle, for the joint edges.
  • Fake carbon fibre wrap.
  • Clasp latches (didn’t use).
  • Foam padding.
  • Strap material (already have).
And so it begins…. 25/10/25
Base board cut to size

Next up was cutting the right angle plastic strips. These will be fixed through to the board.
Next was drilling corner feet location holes. These were originally going to be pop riveted like the head box but the thicker wood meant countersunk bolts and nuts.

Started with the base board, cut to size. Used the last pieces of carbon wrap from the head box on it. It has 3D structural support angles that will help to strengthen the sides/base. See picture below.

These are all drilled and bolted along with pop rivets fitted. Next up was the first end panel, cut/covered/holes drilled and bolted to the 3D printed base corner piece.
 

The lip/lid corners/lengths needed a redesign [picture above, right] from the head box as the lid didn't need additional support/strength due to the MDF's thickness.

Needed to buy some more wood lol, this will complete the remaining long side and the lid itself.


The foam strips I had in the garage from a previous project.

Assembling the base corners I noticed that the strain on them was more than on the head box, and the recessed corners caused the bottom half to split. So I re-printed them in TPU.

With the second sheet of wood I was able to complete the other side and start on the lid piece. Redesigned the 3D printed lid edges. I also drew up and printed off some strap catches out of TPU and also some, flexible hinges, again out of TPU. These will be secured in place with bolts etc.

Next was to TPU print some carry handle fixing points.


I hand stitched the edges to secure the straps onto the fixings. These straps were long enough to take the load and were fixed at furthest points possible, for balance etc.

Final pieces, to cover the lid in vinyl wrap, weather protection for the wood mainly, and two velcro lid straps.
I’ll post up some finished photos in a follow up Blog post, probably in the Xmas event next weekend.

Prusa account - free 3D stl files.
I'll upload the 3D files from this project to my account [link here].

October 17, 2024

Treadwell WED-15-77: mast box build (not yet made)


March/April 2024
With the tracks completed
(at the time of writing this), and after making the head box, I needed a storage/transport box for the ‘mast’ section.

This was going to be built using the same design as the head box. I 3D printed the corner pieces again and then modified a copied version into a middle section.

I bought some more carbon fibre wrap and plastic edging.

October 2024: this still hasn't been built yet.

February 04, 2024

Treadwell WED-15 : Head Box build - part 2

January:
Note: Handles arrived, 😂 lol but the weight of the box isn’t enough to overcome the springs in them 🙄😂. So I went back to my original idea of 3D printing recessed handles.

The first test one was okay but my middle finger knuckle would make contact with the edge opening. So revised this for version two.
Printed version 2.

Marked position and drilled/cut out opening.

Was a nice snug fit.

Just needs a dust off and pop new plastic pop rivets in. The metal ones were to much and started to damage the plastic handles. These plastic ones, just help hold the handles in place.
On to handle no2.

Time to cut the foam.

First piece being test fitted.

Next pieces.

The sides will need cut outs for the handles.

Picked up some spray glue to stick the foam in with once all pieces are cut.

January 13, 2024

Treadwell WED-15 : Head Box build - part 1

December 2023:

Head box - transportation/storage
This was something I needed, so I measured & sketched up a suitable size box, allowing for foam padding. The box lid is going to be the top third of it, so that the foam insert, helps hold the head in place.


  • I already had 3mm thick wood hardboard.
  • Bought a length of some black 90° angle plastic.
  • Bought some carbon fibre wrap and some catches.
Cut some of the wood to size, but didn’t have time to cut the fourth panel. (Forward to January 2024). All the panels are going to be secured with pop rivets……hopefully. They seem to be doing okay so far.


January 2024:

Cut the fourth panel out. Then cut all the panels to create the upper lid pieces. The smaller pieces in the picture below. [These I didn't actually use].
Cut to length the 90° angle plastic, and miter trimmed the edges.

Cleaned the edges and then took them inside the house to measure up the available wrap.
I made sure there was enough to overlap the edges and stick to the inside faces. I also made sure that the wrap weave was all going in the same direction.


Next was to mark and drill holes for the pop rivets. Not sure yet if i need to add a second internal 90° length of plastic.

I marked and drilled each hole one at a time and used rivets to help locate correct position for the next hole.

Corner pieces: Base
Looked at buying some, but wasn’t happy paying for something that wasn’t going to work with my design……so I drew one up in CAD. Added recessed so that the plastic angle would fit underneath. Securing holes for fixing to the wood panels. Added some ridges to the sides.


First 3D print worked. So set the printer to run overnight. These didn’t print, need to check and clean the printer??
But got them printed in the day. Am really happy with how they turned out. They really add rigidity to the box sides.

Next up was to add plastic side edges, drilled and temp held in place with rivets.

Corner pieces: lid 1 & 2
I then got on with designing and printing the lid corners. These have a lip to fit over the sides and then a recessed lip which will hopefully align with the upper lids corner pieces.

The upper wood pieces previously cut, now aren’t needed as the box has enough height to accommodate the ‘head’ + foam insert protection. [measure twice, cut once lol]

The upper lid corner(s) was drawn up for 3D printing. These have one length edges as well.

Next up was the edges around the lip of the box. These incorporated flats for the clasps. First lid corner/length piece printed, sketch image above, and picture below.

Even after cleaning the nozzle, the Ultimaker is still acting up, so can’t do any overnight printing. Came in next morning to find print had paused again.... noticed an exclamation warning...... on clicking on it, it showed the print HAD paused at layer 69, because I had told it too!!! 😂😂😂😂 I remember now seeing if the pause function worked, but as recent prints weren't high enough, I had forgotten this tick box. Hopefully everything will be back to normal.

First box length piece printed, after pause restart lol. I printed it longer than needed so it could be trimmed down to size. It's not a tight fit between the corners.

I drilled a hole for the pop rivet. But will add two more either end [see image below].
Next up was to position the clasp and screw it in place.
Each day, another piece was printed. To help strengthen the lid joins, I've printed some corner that fits on the inside edges.


The box isn’t going to have a lid handle, but two side ones. These I've bought off eBay.

I also printed off some yellow infills to identify the front orientation fo the lid to the box.

I’ve ordered foam for inside, so fitting of this and the handles will be in part 2.

July 23, 2020

Workbench Lockdown 2020 - storage unit

More organising & making.

Was going to start on fitting a sliding shelf for storage under the draw. I can put all my electronics/electrical components in/on it for easy access.

But before I made a start, I instead started on making a wheeled storage unit for under the bottom shelf. I wanted it to hold my drill and drill bit boxes and anything else could be stored in it.
wheels, storage box

I cut the base and fitted casters I already had. The above picture shows the short side opening for the drill and bits boxes.
storage box

The above picture shows the unit almost complete. The wood is not very good, (hence the clamp and PVA gluing layers together), but it was free a few years back and now it’s being put to good use.
I have a ratchet set but wanted it vertical for easy access. So cut up some of the scrap material and made a bracket that the box slides down into.
storage box
Ratchet tool box with handle, had a wood fitted strip to help retain it in place. Can be just seen in above picture.

Next up I added some fold-able shelving. I wanted to be able to utilise the depth of the box, without restricting access to the lower, not used to much, area. Some left over wood, just the right size, some supports and a pair of hinges I've had for ages lol. The two pictures below, show before & after with shelf in use
shelf shelf

And a quick video showing it in action lol.
shelf
I had bought some LED lights to help see under the bench and illuminate the shelves as the ceiling lights cast shadows.
Under bench lighting
These are really bright and will come in handy.

Lastly, for now, I wanted somewhere to have my soldering irons in reach. So made up a holder that slides over the edge, the cables just go into the box.
.......pic
soldering iron holder

I've still got plans for more upgrades...

October 02, 2019

March 29, 2019

New Tool Box....

.....I've been meaning to get myself a proper storage/tool box for events for a while now, as my first two attempts were either not big enough (my first tool box - red) or as in the case of my wheely crate, not strong enough.

This was my first repurposed tool box, which just carried tools in. But as R5 has never needed on site maintanance, except when he had a drive belt snap (C.B), I was carrying everything but the kitchen sink in it. So I now only carry essentials.
R5-D4, tool box

The wheely crate's front stands caught on the edge of a curb and cracked the side along to the joint. This meant it wouldn't support the insert base properly, which bent under the weight of R5's batteries. The batteries & the battery boxes plus other little bits would be carried in this, before it broke.
R5-D4
This weekend the club attended MCM Comic Con in Birmingham. Now, there's not much I can do about having to carry two domes (R4-D4's was going on the display stand), but I also then had three other bags with stuff in to carry from the car to the stand. So decided that 'now was the time' to upgrade my storage/tool box.

A lot of the builders took Lee's lead and bout this type. But at the time I couldn't afford (or justify) the cost. Then the other week I saw one in a local'ish B&Q store (UK). Reduced down to £55.

So yesterday I popped in and was lucky enough to pickup the last one in the store.
This has three main compartments & was just big enough to carry everything I need.

I'll still need to carry the rear hatch, though I have a few ideas to make this a thing of the past as well lol.
After I had arranged everything inside, it was time to add stickers..... first being my own R5-D4 one.
R5-D4 sticker

.....I'll add other sticker pics later..... ;-)

September 06, 2017

Trading Cards Box - UPDATE - compartment 1.3

After filing, primer spray & then matt black spray, the insert looked like this....

Once it was all dried I then sprayed some red into a cup so I could hand paint the text to finish off.

I hot glued a strip of foam into the bottom of the box, under where the cards will sit. I found this helped to make taking them out as when you push down on them, they tip slightly due to the foam compressing.

And here's the insert fitted (press fit in only) into the box.
I tried the insert with a stack of my cards and it all fits and looks great!

And as someone commented on my Instagram account.....yes, R5 does fit :D

Trading Cards Box - UPDATE - compartment 1.2

So here is the glued together parts.
Test fitted the bottom section inside the box.

Here's the top:

And then glued together, fitted inside the box:

Next up is to paint, filler, sand, more paint......you get the idea lol.

September 05, 2017

Trading Cards Box - UPDATE - compartment 1.1

In my last post, I said I wanted to look at padding out the box as I didn't want the cards rattling around inside and getting damaged.
The Rogue One Trading Card box
As you can see in the picture above, the cards aren't a tight fit!

I didn't like the idea of padding as it can be untidy once cut. So as we still have the 3D printer in the office, I got to measure up and designed an infill compartment for it.


But before I printed it off in full, I just printed the top section first.

This way I could check the fit. The corner angles weren't bang on, but then I decided that the recessed look was better.
(Originally the top section was going to be flush with the top of the opened box.)

I then had to reduce the inside piece to fit the new height.

Doing this in two sections was also a good idea as it meant I didn't have to dig out the support in the recessed text section. And super gluing the two pieces together was made easy by the fact the pieces were held in place by the insides of the box.