Showing posts with label LED's. Show all posts

June 11, 2024

Chris makes - website shout out!


One of my good friends, Chris, has a website/Blog with his builds and he also has a shop.
Link: https://chrismakes.uk/

He is a fellow droid builder, but he went to the next level of building and has created his own, wearable C-3PO suit!

His love for tinkering has then led him to make and sell 3PO eye lighting kits. So check out his website/Blog and shop for more!


For Chris’ website/Blog, click on the link here.

January 13, 2024

Workbench upgraded: reorganisation of everything.

November : 
My workbench was becoming over crowded again and I needed to reorganise it. The back wall needed a larger area, so I combined two boards to increase the width. I then started adding shelves, utilising ones I already had. Using the items I had, I could space them better.
Unfortunately my garage door is an up and over, which limits how far shelves can go, due to the arc the door takes

I ordered some LEDs strip, but they aren’t bright enough to light the bench surface. But are ok just to illuminate the shelf’s. So another light source is needed. I did 3D print some brackets for the LEDs to fix too.
The bench was in transition when photo was taken lol. An unexpected project to service an Ender3 3D printer for a friend who was selling it as he’s upgrading. Swapped out the hot end for a new one, cleaned and dusted, checked belts and greased the lead screw (December 2023).

I started sorting out my boxes of screws, bolts, bits and pieces, electronics etc.
The magnifying LED light unit had to be removed from the bench, this is going to be relocated up off the bench.

The main problem with the bench was the lower shelf, in that the chair wouldn’t fit under it, which meant it stuck out and took up space. So using my angle grinder, I cut away a length of the angle before using my jigsaw to remove the wood, so it would fit under.

This makes it more comfortable to work at it. I refitted the small shelf and also added one below, this is now for the main storage (screws, bolts) boxes.

The second vice, I’m not sure about at the moment, using it to support the extra surface board is handy but also restrictive. So I’m thinking of rebuilding a soldering station in that area. The vice was simple enough to remove, so a soldering station idea is a future project.

September 17, 2023

R2-D2 Teeces dome LED’s

September 2023

Mike wanted to reinstall his Teeces LED’s in his R2 dome again. This was after his last set of logic’s from DP, got ripped out when wires dropped and got caught in the dome gear.

So I uninstalled the DP set and made a start on cleaning things up. I made up some cardboard templates for the holes, marked the position and drilled into the resin DJ Design components using a manual hand drill and a 3.5mm drill bit. I cut down some 20mm long M3 threads and screwed on a nut to depth required. I then fitted them through the cardboard template into the pre filled holes with Araldite epoxy glue. I then fitted the screens to help with alignment.


The three Holoprojectors required new location holders, so they were sent to the printer.

I also needed to print two new PSI board holders, after a slight design modification for a better fit.

Whilst these were printing, i made a start on connecting up the cables and wiring the switches back in.


Cables and switches done. Second switch is now for controlling the holoprojectors independently.
Just waiting on them being delivered.

Another happy customer 🙂👍🏽

May 21, 2023

Treadwell WED-15 droid build : Part 16 - Eye Lenses


The version 2 lenses came out okay. Gave them a little wet sanding with some aluminium grit sandpaper to make them look opaque, below image.
version 2 lens on left

Version 1 on the right, which had the print lines still visible.
Version 2 on the left, much better.

Servo Arm bracket:
This is more of a wedge than a bracket lol. It fits inside the opening and wedges the servo in place to stop it from moving. I didn't have one dimension so I went large and was then able to trim it to fit around the servo. It's a tight fit, but that was the point.

LED holders:
I drew up and printed off some LED holders for these large opaque 8mm's.

These are 5v ones and need to be wired up to a suitable supply.

May 11th:
First chance to do some work on WED. Got out the car body filler and filled in over the fibre glass join gap, front and back. Before it fully hardened, I trimmed the edges flat.

Additional work was to add supports for the centre span. This is to also add structural strength. The wood was cut and drilled/screwed into place, top and bottom.


Front panel:
To finish off the day, I measured and cut first piece of wood for the front angled surface. I chamfered the leading edge to sit flush with the front edge of the lower frame. To support these, I’ll either add wood or 3D print supports. See below for the 3D printed supports.

The single panel did require some added strength, so I cut out a second, slightly smaller in size, panel to be glued underneath. This required the use of some spare wood, G-clamps and my vice.

The two pieces clamped together.

Logic Housing:
The week started with drawing up the ‘Logic Housing’ grill panels that go either side of the central mast mount. I could just buy some perforated metal sheet, but where would be the fun in that. So I decided to design and 3D print the pieces.

I can’t remember where I saw it, or if I confused what I saw (in a picture) but I thought I had seen the perforation being square ‘holes’. So my first print was this:


Test fitting 1 idea done, so I redrew the panels as perforated circles.


Test assembly

I also reduced the panels thickness down to 2mm, something I will reverse for the next prints, as these new ones were OK, but felt like they wouldn’t stand up to much wear’n’tear. I could (carefully) stand on the 4mm thicker panels and they didn’t break.

Here’s the old square logic cover (left) with the new (right) circular panel cut out.

Once the rest of the panels were printed, I test fitted onto the shell. Liking the look, so will reprint at original 4mm thickness.

Panel supports:
I also drew up and printed off, lid supports.

I still need to design a way to secure the lid(s) in place, but am happy for now.

Finally: I placed one of R5’s batteries inside WED to check height and possible location.

I need to get on with the wheel drive system, but trying to find suitable wheels/size is not so easy. So I’ll keep on building until then.

Rear panel:
Marked up and cut out the rear sloped panel. Shaped the edges to fit the angles on the front lip.

The new Logic housing parts will hopefully of printed without filament jamming on the real.

Rear panel supports to be printed.

April 23, 2023

Treadwell WED-15 droid build : Part 15

With Celebration ‘Europe’ over for a few years lol, and after having a rest from it all, it was time to get back into building WED-15.

When at CE, I was chatting with Chris ‘3P0’ Williams about WED as he wants to also build one. Said I needed to clean up the 3D files and organise them to their latest version, that I had used or that had needed altering after I had printed them.

There are of course builders DIY blueprints , not the actual ‘77 droid ones unfortunately, but close enough. And as mentioned before, I had gone with the rectangular to rectangular eye version, which on closer inspection of screen grabs, I can see that these are wrong. Never mind. I may look at creating a square to square version later on.

April 20:
The new extended servo leads require connectors fitted. And the Claw arm ones needed to be insulated as they are inside the aluminium tube, with no connector blocks.


With the Claw arm servo, fitted lower down the mast, was a reminder of how fiddly connecting it up to o the linkages was 😂. I need a new clamping bracket for it though to brace the servo from moving.

The first three servo leads, are sheathed inside expandable sleeving. The arm servo lead is, for now, loose inside the mast.

Spent ages trying to arrange the servo leads for the neck and eyes so that they don’t catch on the metal rod that reaches up from the arm servo to the linkage pivot point.

New Lens mould:
3D printed of a much better, smoother finished lens blank. Sanded it smooth even further. Then mixed up the mould putty and applied it over the blank. I then flipped it over so that its base would be flat with the bench.

Left for a day and then removed the blank.
Left it for another day, no free time to actually do anything more.


Day 3, I mixed up the two part resin and poured it into the mould.
I used a lighter held over the surface to remove the air bubbles. Whilst this was drying, I removed the two first attempt lenses and tried to smooth out the print lines.
I also lightly sanded the new lens to make it more opaque. I could of bought opaque resin in the first place 😂.
  • Looking to add some LED’s behind the eyes, so more wiring possibly required.
  • Should really start working on the base.


October 20, 2022

Let there be light…..inside R5

This is something else I’ve been meaning to do for years. Install a light inside R5’s body for work purposes.

So I dug into my box of LED’s and found one of the new round COB ones that I’ve used for R2’s Holoprojectors.

CAD’ed up a holder after locating a suitable position that illuminates the full inside.
I then drew up a switch holder to be able to secure it to the side of the frame.

NOTE:
If you’ve not got one, get yourself a digital Vernier. This is so much easier than trying to measure with a rule. Don’t forget to take into account the expansion of the filament after printing, remember, as it reduces the size of openings.

Next up was to print them both off. As with all development ideas, slight modifications…..and second time prints a charm 😂👍🏽

I’d already soldered up the LED and the switch with lengths of cable. Next was to install them into position. Once in place, routing the wires over to the 12v terminal and connected them up.

Batteries in and flipped the switch…..let there be light 💡 


September 23, 2022

Transmitter modification - remote for the ‘Trading Card Dispenser’


As much as I luved my wrist strapped remote control unit <Blog link, for activating R5's trading card dispenser, it is not so easy to operate, whilst holding the transmitter.


It's even harder to remember which on activates the TCD and which one fires the Bad Motivator system lol.
I originally went with a simple clip attachment <-Blog link, to the transmitter for the remote to clip into.

These both worked fine and the files can be found on my Prusa account page.
(The watch remote's are not presently up, but will be soon.)

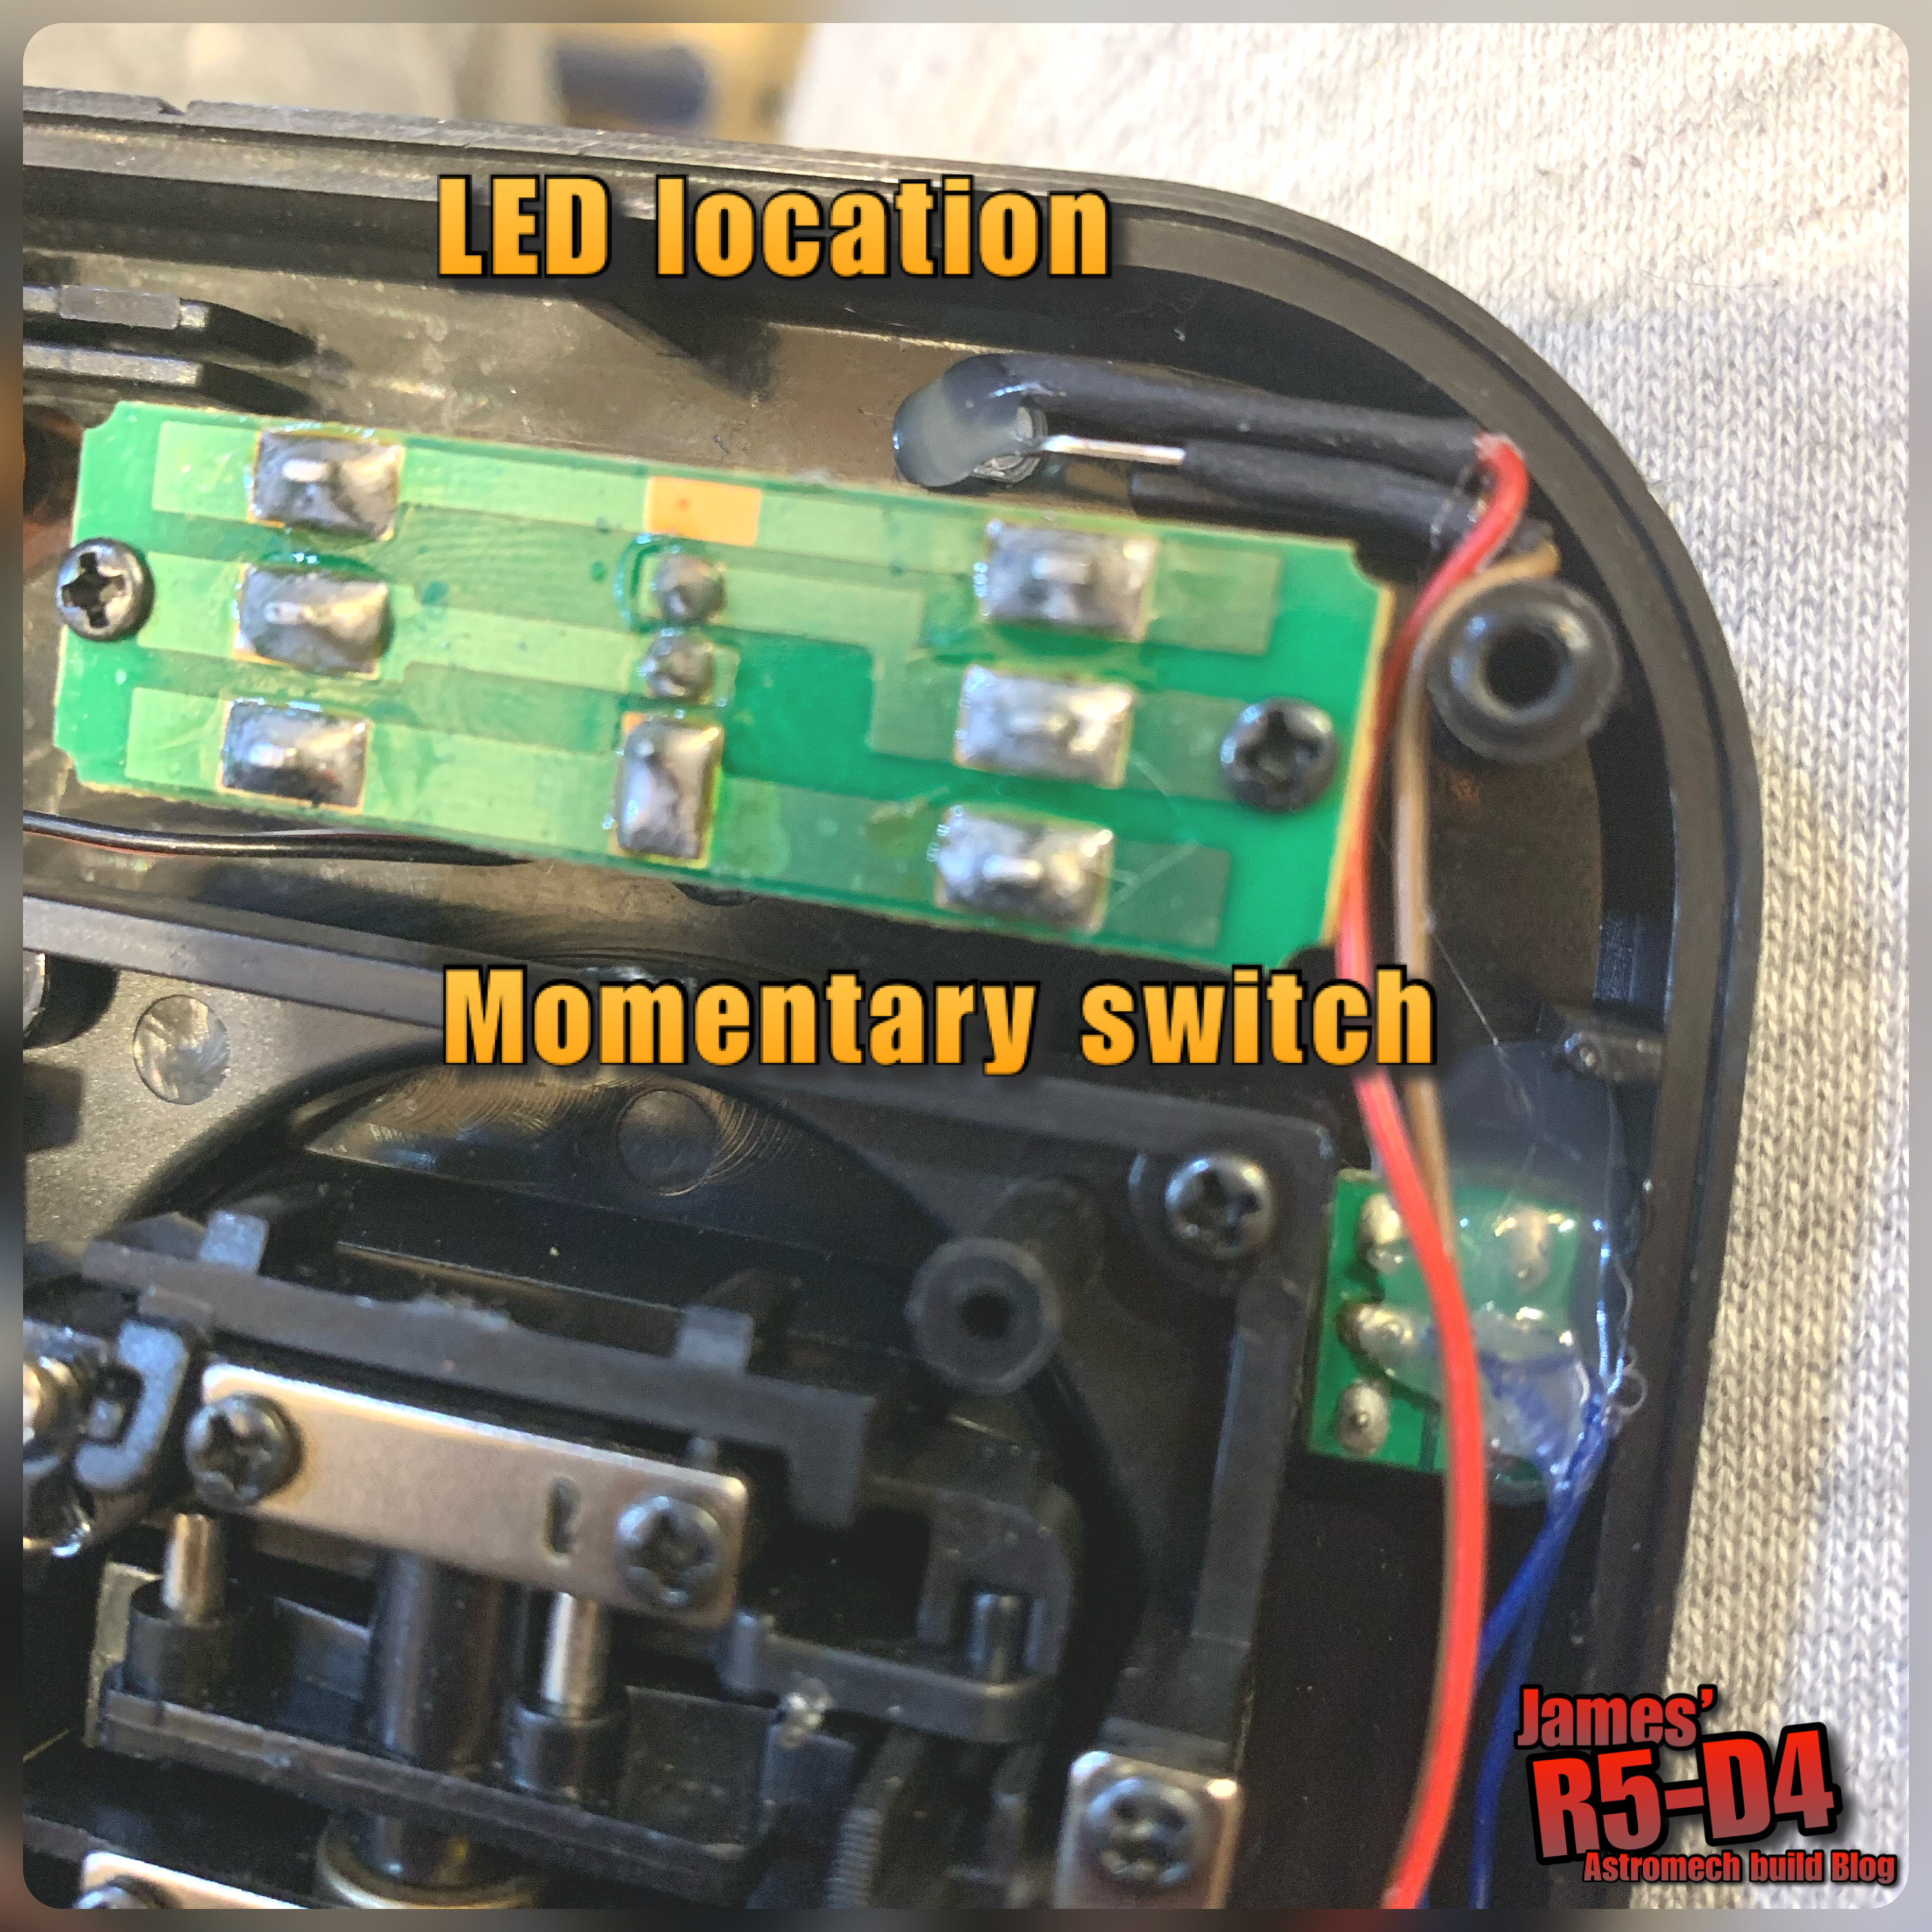
So after some thought and tinkering, I found a momentary switch and tested it on the remotes contacts to check that a remote switch WOULD still work lol. Two dabs of solder onto the contacts and the remotes remote switch was on. Next up was the LED, again, having it show that I HAD actually pressed the button, I wanted an indicator. A quick test with the contacts of an LED onto the contacts of the board mounted on, showed that it lit up. Two more dabs of solder and we were in business.

I positioned the LED next to the Utility arm's switch. Both these were secured in place with hot glue.

Above picture: the switch is just below it. The momentary switch was positioned a bit further down due to space, but it's still in a good place to press, without loosening your grip on the transmitter.

Front view of LED and new momentary switch.

Then came the really tricky part lol, finding a position to locate the actual remote's board. I covered exposed contacts with electrical tape, before placing the remote's board inside. I then applied more tape over it to secure it. I did think of securing with hot glue but decided not to.

Just need to test it next....

Yep, it lights up lol.

May 25, 2022

Another R2D2 type dome - part 3 [AstroPixels]

Back in January, I had the call from Mike for ANOTHER set of Teeces for ANOTHER R2 dome 😂. The plan was to wire up bought LEDS, but thankfully he managed to get hold of the real deal ones.

Next up was to get some Holoprojector LED’s.

….roll on to May, and Darren P, had released his R2-D2 lights kit!

Link to AstroPixels

So Mike purchased the kit and even installed it all himself…..it’s that easy to do!! And it starts up first time when power was applied.

He just needed me to connect up a power switch.


March 06, 2022

Solo - a Star Wars story - Irradiator Illumination Bank 3D printing Part 5


Progress so far:
  • Clips printed to hold the ‘windows’ in place.
  • Spacer/washers for the handle pivot points.
  • Handle details.
  • Handle sprayed up.
  • Sourced additional greeblies.
  • Illumination ideas.
Window clips:
These are to be glued in place, probably hot glue, to hold the two half's of the windows in place. They wedge under the windows.

The handle:
This got sprayed up in the silver and I printed out some small greebly details to add to the plain sides. I also printed out some poly washer/spacers for the pivot points.

Additional greeblies:
I went searching for parts to add to the overall appearance. I dug out old 3D printed pieces from previous builds as well as things that have been seen in the ‘SW Universe’ directories.

Illumination:
The unit needs lighting, so have been looking at how best to achieve this.
I’ve come up with a few ideas, but the top window illumination has been sorted.

This LED unit has five really bright LED’s, four of which shine towards the windows.

May 24, 2021

Teeces LED work for Mike's dome 2 [May 2021] part 2

 After removing the LED's from the first logic panel, cleaning all the solder off. I reapplied the LED's, now with shorter legs lol and this also meant that they would line up better with the holed logic panel.

First up was applying the chip holder, pins, resistor & capacitor..... was still waiting on the 0.1uf.

Next up was applying the rest of the LED's to the PSI's.

Takes a bit of patients, but it is worth it lol. Was still waiting on the chips and the small capacitors........when I got a message off Mike :D

Whilst rummaging through his collection of parts for his droid build(s), he found a full pre-built set of Teeces lol.
So I'll finish these off and hand them back as possible seconds or spares.