Not posted up for a while, been busy working on and re-working Jessika Pava helmet.
Jessika Pava Helmet
It definitely needed to be smaller, which I posted up a while back, so have been re-working the size, fibreglassing, body fillering, sanding re filling ....repeat. The next plan is to go the cast route which I've been reading up on. You tube to the rescue lol, as i think this would be best. Wouldn't want anything to happen to the helmet and it be damaged.
Due to work issues, internet access has been restricted, and this was the only available free time I could update this blog, it will have to wait now till the new year.
Rogue One
WOW!!! I took the wife and kids to see the film on the Thursday (here in the UK) and we weren't disappointed!! It had everything a 'war' film should have plus it was Star Wars lol.
A lot of people have moaned about changes made, but personally i felt the film flowed and the continuity flowed though out. No spoilers, ill just say I wasn't disappointed and the kids enjoyed it too, which if kids get it, why can't adults ??? Lol.
Friday, was an early start and a long'ish drive to Milton Keynes, to meet up with fellow UK R2 Builders and Joker Squad. We were attending the iMax cinema's Rogue One day. Was great to catch up with everyone and raise cash for charity.
Will add updates and photos in the New Year.
There's another builders group day after Christmas to look forward too as well.
So for now, I'd like to wish everyone who follows this blog & has visited here a happy & Merry Christmas and a prosperous New Year. Lots of good things to look forward to in 2017, so stay positive people :)
Im now on instagram also on Twitter and Facebook lol.
Droid Builder

December 22, 2016
November 24, 2016
Jessika 'Testor' Pava - helmet - 1.9
Two steps forward, one step back :(
Thought I was getting somewhere, but had a few set backs on the build.
Found another weak point on the helmet. So had to chip off the filler and remove
the paper. Then found there wasn't any fibreglass behind! One thing with using yellow paper is that it's not easy to see the difference.


So this needs fibre-glassing and then re-filling.
Next was the blast shield
Well, what a mess! The sides
didn't take the right shape of the helmet, the main curve section moved when the
fibreglass was setting and the recessed channel section didn't fit the helmet. This
became more noticeable when test fitting.
Didn't take any photos as was to disappointed
So I cut off the side flats. Trimmed down the upper
curved section as was too large and the recess channel more noticeable as a
mis-alignment with the helmets. When lining this up the shield is lopsided. Am
going to try to recover this...... But not happy with the wasted time, money
& materials :(
But was STILL not happy.....hence no pictures.
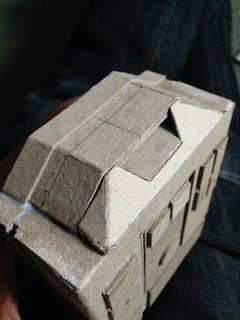
Decided to carry on with working on the raised ear area crescent, as can just be seen in the above picture. Below, I made up some cardboard walls. I covered the cardboard with masking tape as this stops the filler sticking to it and leaves a smooth finish.


 Taking shape. Some sanding, shaping and then more filler in the gaps.
I also filled in some other areas.
 This rear area needed to be raised up to by symmetrical


More disappointing updates to come.....
But was STILL not happy.....hence no pictures.
Decided to carry on with working on the raised ear area crescent, as can just be seen in the above picture. Below, I made up some cardboard walls. I covered the cardboard with masking tape as this stops the filler sticking to it and leaves a smooth finish.


Hole filled in as well on rear of helmet

I also filled in some other areas.


More disappointing updates to come.....
November 23, 2016
Rogue One - UK tickets - got mine!
So Rogue One tickets went on sale here in the UK on Monday 21st.

I was up working Sunday night till 1am Monday morning, but I was to tired, so I decided to leave it till the morning when in work lol.
Why buy them soooooo early??
Well last year I left buying them for a few weeks as, 'there will be plenty of tickets left.....' Sorted out with my brother & best friend, about going......and then for the opening day (evening) the local cinema time slot was fully booked!! There was no way that I wanted my kids to miss out, so searched cinemas a bit further away and eventually managed to get tickets!
This worked out great in the end as loads of my kids friends had also (unbeknown to me) bought tickets for the same time slot :) win, win!
I'm also away on the Friday 16th for an event with fellow UK R2 Builders Club members, so I HAD to see the film on the Thursday night with them :)
November 18, 2016
Jessika 'Testor' Pava - helmet - 1.8 - Blast shield
17.11.16
The printed off template I had used for the blast shield, I wasn't 100% happy with. The shape didn't seem to match that of the helmet dome. I know this version was designed for use with matt, not cardboard tho. The sides are larger than they should be, just to add strength to the paper for when applying the fibre-glass matting.
I cut down the 'step' as looking at reference pics, it was to 'high'. Basically I just cut the distance in half.

I plan to fibre-glass the ends first to then be able to fix the blast shield in place on the helmet. This will, I hope, help with being able to then apply fibre-glass matting to the blast shield to get the correct shape.

Got both ends glassed up and also the leading edge to help keep the shape.

Helmet & blast shield test fitting
 Which gave the shield enough strength to be placed on the helmet to test it.
As you can see the helmet has received some marking up. This is to guide me later with filler, shape & also to dremel to create ridges etc.


More work hopefully over the weekend.....
The printed off template I had used for the blast shield, I wasn't 100% happy with. The shape didn't seem to match that of the helmet dome. I know this version was designed for use with matt, not cardboard tho. The sides are larger than they should be, just to add strength to the paper for when applying the fibre-glass matting.
I cut down the 'step' as looking at reference pics, it was to 'high'. Basically I just cut the distance in half.

I plan to fibre-glass the ends first to then be able to fix the blast shield in place on the helmet. This will, I hope, help with being able to then apply fibre-glass matting to the blast shield to get the correct shape.

Got both ends glassed up and also the leading edge to help keep the shape.


As you can see the helmet has received some marking up. This is to guide me later with filler, shape & also to dremel to create ridges etc.


More work hopefully over the weekend.....
Jessika 'Testor' Pava - Flight suit & Chest Box 1.6
16.11.16
Started on painting up the chest control box.
Used some sample cardboard and applied paint to see how best to apply. Used a brush which didn't do so good. So my daughter suggested the sponges :). Applied a few layers to build up the coverage of white, allowing it to dry between coats, without it soaking in to much and warping the card. I didn't use any special paints, just kids stuff.
Once dry, I mixed up some white & black to get a dark grey. This I then painted into the grooves.
 I then dry brushed over the edges etc to get the worn look. Next up was mixing some white & blue to get a light blue for the two buttons.
18.11.16
I've almost finished the painting now. Mixed up some white and black to paint the grey switch's.
Just need to paint the central button silver.
Started on painting up the chest control box.
Used some sample cardboard and applied paint to see how best to apply. Used a brush which didn't do so good. So my daughter suggested the sponges :). Applied a few layers to build up the coverage of white, allowing it to dry between coats, without it soaking in to much and warping the card. I didn't use any special paints, just kids stuff.
Once dry, I mixed up some white & black to get a dark grey. This I then painted into the grooves.

18.11.16
I've almost finished the painting now. Mixed up some white and black to paint the grey switch's.
 |
| X-wing TFA chest box, 95% painted |
 |
| just one more button to be painted |
November 16, 2016
Jessika 'Testor' Pava - helmet - 1.7
11.11.16
When able to, I've mostly been applying filler to the helmet, sanding and shaping and repeating.
I ran out of the second tin of resin, so need to get some more. Want to add more fibre-glass matt to really reinforce the helmets rigidity. I've had positive comments from work colleges which is always a good thing lol.
15.11.16
Picked up a new tin of resin Saturday, but wasn't able to do any fibre-glassing till Monday in work. The paper around the rear edge has seen a lot of action with handling of the helmet. Am also aware that the paper had started to break away, it hadn't bonded with the other paper. So as the fibreglass had already given the edge shape, so I ripped off the unstuck paper.
 I'd had to do this in two other areas where curving the helmet meant taking the 'corners' off the Pepakura and so, took off the paper, which again, hadn't absorbed the resin fully. I didn't want the filler to come loose where it was thin. For this reason the inner areas of the helmet marked in black marker needed reinforcing.


16.11.16
Applied a second layer of fibre-glass & resin to this area to re-reinforce it structurally.

Whilst this was setting, I mixed up some more filler and applied it to the other edge of the rear crest.

More filler, sanding & filling to go.....
When able to, I've mostly been applying filler to the helmet, sanding and shaping and repeating.
 |
| cheek section taking shape |
15.11.16
Picked up a new tin of resin Saturday, but wasn't able to do any fibre-glassing till Monday in work. The paper around the rear edge has seen a lot of action with handling of the helmet. Am also aware that the paper had started to break away, it hadn't bonded with the other paper. So as the fibreglass had already given the edge shape, so I ripped off the unstuck paper.
 |
| ripped off the unstuck paper |


Once this is hard I can carry on with applying filler to the outside.
16.11.16
Applied a second layer of fibre-glass & resin to this area to re-reinforce it structurally.

Whilst this was setting, I mixed up some more filler and applied it to the other edge of the rear crest.

More filler, sanding & filling to go.....
November 15, 2016
Jessika 'Testor' Pava - Flight suit & Chest Box 1.5
11.11.16
Forgot to post up the hose cap internal fixing pics. This should help prevent twist.


Forgot to post up the hose cap internal fixing pics. This should help prevent twist.


~~~~~
12.11.16
Saturday I had five mins to sort out my 'electrical' box's lol, basically bags of bits an pieces. I dug out some battery holders & thought I'd quickly test the brightness of the LED.
Next up is the painting.....
Saturday I had five mins to sort out my 'electrical' box's lol, basically bags of bits an pieces. I dug out some battery holders & thought I'd quickly test the brightness of the LED.
 |
| The battery on the left is a mini 12v one, giving quite a bright LED. The battery on the right is a 3v button type. The brightness was a lot dimmer. (not to easy to see in the pics, due to the camera adjusting tho) |
Next up is the painting.....
November 11, 2016
Jessika 'Testor' Pava - Flight suit & Chest Box 1.4
I found some spare ABS sheet that came with my FX armour, years ago. And marked up the ejector brackets for the harnesses.
 These are scaled down to suit my daughters outfit.
The green LED arrived yesterday & so of course I had to fit it in to check.


Next was to apply wood filler to the joins. Because the cardboard is layered up it's really stiff and so the filler actually works. Below pic is the morning after, once it had dried and was sanded.

I had to fit the hose on to show my daughter, who was very excited. These were taken before wood filler was applied.


The green LED arrived yesterday & so of course I had to fit it in to check.

Inside of box showing LED (this will be hot glued in place)
& view from the front.

Next was to apply wood filler to the joins. Because the cardboard is layered up it's really stiff and so the filler actually works. Below pic is the morning after, once it had dried and was sanded.

I had to fit the hose on to show my daughter, who was very excited. These were taken before wood filler was applied.

X-wing chest box & hose (which will be cut to length)

November 10, 2016
Jessika 'Testor' Pava - Flight suit & Chest Box 1.3
Top section of box.
I measured and then cut to the length I needed, but then remembered that the angled end sections don't reach to the edge. So I had to cut it in half and trim down to correct length.

Then I started on the front angular, cutout section.

 This was my first time at cutting angles etc and just like the rest of this build, enjoyed the thinking behind how I was going to do it.
Here is a test fitting before the next stage.

The next stage being the cut out on the front angle.

Next was to add support to the internal flat, I just layered up more cardboard.

And then glued it into place.


I need to add the top pieces, to cover the visible join lines etc.
I measured and then cut to the length I needed, but then remembered that the angled end sections don't reach to the edge. So I had to cut it in half and trim down to correct length.

Then I started on the front angular, cutout section.


Here is a test fitting before the next stage.

The next stage being the cut out on the front angle.

Next was to add support to the internal flat, I just layered up more cardboard.

And then glued it into place.


I need to add the top pieces, to cover the visible join lines etc.
Jessika 'Testor' Pava - Flight suit & Chest Box 1.2
Had two mins, in between kids TV programs, over the weekend, to get daughter to stand up and try on her flight suit. This was so I could measure & cut to length the belt and straps.

Thinking again tho that he buckles are a bit heavy, so may need to look at alternate ones, smaller, lighter or to make some myself.


 Outside view, before last piece of cardboard was glued into place.


Thinking again tho that he buckles are a bit heavy, so may need to look at alternate ones, smaller, lighter or to make some myself.
~~~~~~
I have been looking at how to attach the hose to the chest control box, securely. Searching through my 'plastics' box, I found an end cap off a photo copier toner cartridge from work. The course thread it uses to fit into the machine, is just the right size to thread onto the hose. How lucky is that!!

pictures of toner cartridge cap

picture of toner cartridge cap fitted onto hose
~~~~~~
Here's the hole I made in the bottom of the box. This it to locate the cap.

Next I started to glue the flat pieces of cardboard that I had cut out to accept & hold the trimmed down cap. The cap & block are then glued into place, all with PVA glue.


View, inside of box. To help stop possible twisting of the cap, I trimmed some of it off and glued some layered up cardboard across the half cut down cap.
Subscribe to:
Posts (Atom)