Showing posts with label Matt Black paint. Show all posts

February 19, 2023

Treadwell WED-15 droid build : Part 13A - moulding lenses

The mast sections were masked off, primer'd and silver spray painted.

This included silver spray painting the claw arm parts.

I’d ordered some more primer as well as some clear mat spray to coat to seal the paint.

The mast was getting close to being finished. So I thought I’d turn my attention to drawing up the wheels, in case I decide to 3D print them, here they are added to the assembly model.
I looked at the print time for the main drive wheel in ABS, lol that’s definitely a weekend print.

After finding out that there’s a mold function in Cura, I thought I’d have a go at casting the lens. So I ordered some 1-1 ration clear resin to test.
This was a test pour as not to waste. The 3D printed mold, was not as good idea as first thought lol 😂  so on to plan B, using a proper mold material over the top of one of my previous 3D lens. We had some of this two part molding putty that when mixed together sets to a solid but still pliable material. So before it set, I placed it over the top of the polypropylene lens I had printed a while ago. Left it overnight to fully cure.
Then in work the next day, I mixed up the resin and poured it into the rubber mold.


The result isn’t that bad:
It takes about 24hours to fully cure.

Next part to be painted, I masked up the servo neck collar as it required a black band. I used matt black spray I had left over.

And the result:

I had chosen matt finish for the clear coat. I was a bit disappointed at first as it dulled the shiny chrome look of the parts, but after a while it grew on me. It looks like real un-machined Aluminium now. It will look different again once weathering is applied.

I reassembled the claw arm components along with the servo pivot horn to activate the lift mechanism. Really happy with this. 
The main pivot rod needed to be angled and bent into place to better fit the servo position.
This is where the servo will be located.

Next was to mark (see below picture) and cut the PVC pipe to allow the components to fit inside it and the mast.

The list of little things is a long one.
  • The rear lens holders needed to be glued in place.
  • The recess in the front of the second eye needed to be cut to allow clearance for the rear lens holder.
  • I needed to add captive threaded brass inserts to tabs to help secure the two sections of the eye together. This will allow future easier access to the servo inside, see next picture:
  • The claw arm needed some work on the piston rod fixing part of it, see next picture. I cut a cleat end off to keep the threaded tube part, and I filed the sides flat on a nut to go on the rod end. Added a drop of thread lock.
  • The base plate has now had M6 coach bolts and nuts fitted to better hold it and support the mast structure. I feel better about it’s strength and stability now.
Test fitted the mast and head assembly together, along with the arms, into the track base unit.

April 12, 2021

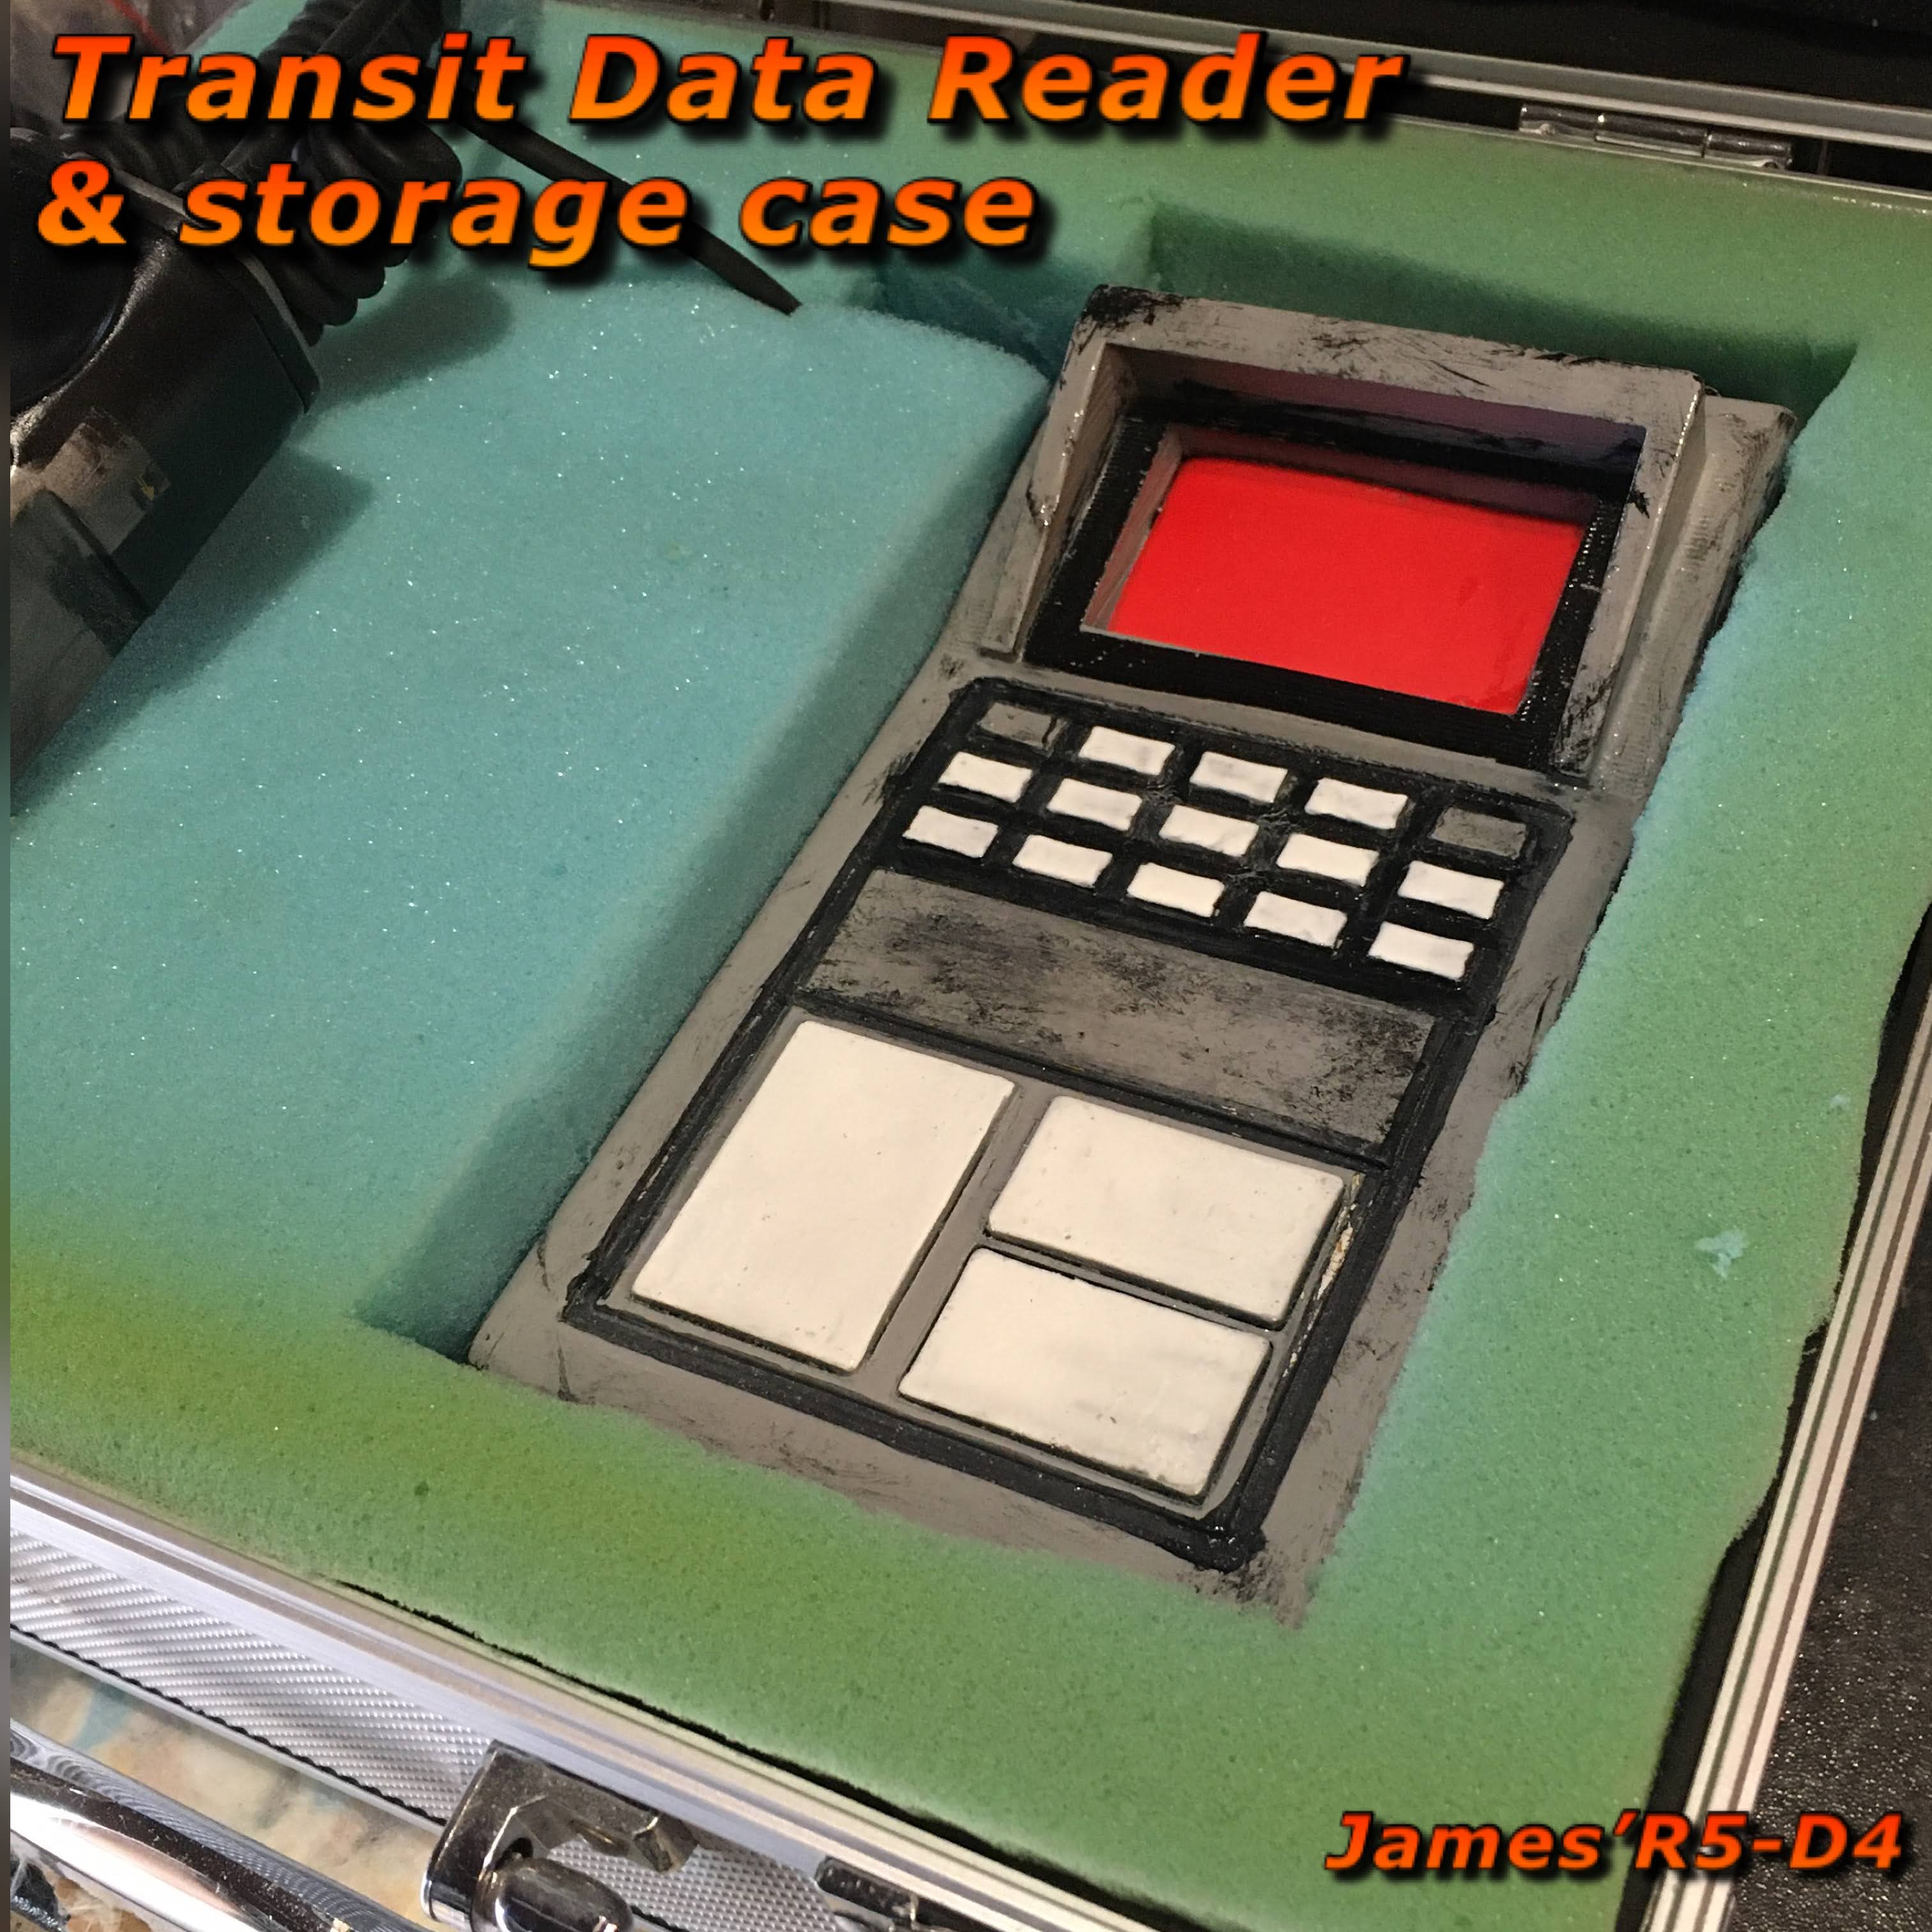
Transit Data Reader - for R5-D4's Utility Arm Socket screen (Part 2)


Installation of the electronics.

I had to print off a small housing for the original electronics panel that required to be re-positioned outside of it's battery box, so that the button could be pressed. This also required the battery terminals to be de-soldered from the board and wires attached to make the compartment separate.

This picture shows the lite panel, before I sprayed up the box.

I've added a coiled cable from an old mobile phone car charger lol. This then connects to the 'plug socket' end with the magnets fitted.

I added some clips to the inside of the bottom opening, for the hatch lid to sit on (one thing I had forgotten to do on the original design).

I've been thinking about what colour to paint the 'plug socket'. First I sprayed a black and grey combo to match the box, then went with black and silver [for the connection interface].

I needed a carry/protection case, found an old RC Transmitter box. Fitted it with foam I had leftover from a past project, and trimmed it to fit inside the case.


March 17, 2021

Transit Data Reader - for R5-D4's Utility Arm Socket screen (Part 1)


This is a similar design based on this image (below), taken from the Solo 'Official Guide' book. I thought this would be a good idea to have to connect up with R5’s utility arm socket and use it as a data transfer terminal. Similar to those seen in the original Star Wars scene to download the plans for the Death Star & then similarly to when R2 downloaded the data in The Rise of Skywalker.

To keep things inline with the retro feel, I found some coiled cable from an old car mobile phone charger, that can be connected up to the reader and the plug.

The design was originally sectioned up into a upper and lower section, but I decided to print this as a hollow one piece. There is a ‘hatch’ in the bottom to allow access inside. This kinda helped getting the supports out, but for future printing, the sectioned version would be the way to go! This took over a day to print lol.

The next job was removing the internal support :(
I hate wasting time & material!!

Next up though was sanding the unit & a coat of filler primer.

Once dried, a test fit of the EL panel. Which needed some slight filing of the hole to allow the plug to fit through.
Cut a piece of opaque plastic as a cover screen. This will get marked up later or a second screen will, fitted underneath it.


A coat of black matt paint was applied and allowed to dry. Later I then masked off to allow the front button panel to be sprayed white.
I didn’t have a grey paint, so thought I’d try the silver. But this was TO silvery for my liking. No amount of buffing and over spraying with black was going to dull or improve the appearance lol. So once sanded back, another coat of matt black was applied all over.

I made a stop at a ‘Halfords’ on return from school run and picked up (hopefully) a more suitable grey colour.

I’ll then masked off the lower part to remain black and give this a spray.
Much happier now with this look.... next up was applying colour to the recess and buttons. Using a thin brush, I sprayed black paint into a lid and brushed it onto the recess & also dry brushed the grey paint too. I then swapped over to the white for the three main buttons.

And here is the finished painted Data Reader:

Compared next to the original design.
~~~~~~~~~~~~

On the plus side, this has given me time to update this with a better, more open bottom hatch, fixing screw holes for brass threaded fittings, meaning that this can be printed in three parts, less support material = quicker print time.....

.....I’ve just ordered some more filament :D so no doubt a second print is on the cards....or should that be print bed :D

March 06, 2021

R4-D4 dome - Life-form scanner - part 18

Re-wire switches:

The two switches that I had, just inside the opening of the dome, needed to be relocated to just clean up everything. These switches controlled the 'fake' electronics panel LED's as well as the Holoprojector light LED.

Am thinking that the Holo LED will be controlled in the future via a remote, to increase it's brightness when needed.

.....next up....

Painting of parts:

I had applied filler primer and once dried, sanded lightly the components for the LFS system.

I wasn't 100% sure what colour would be best for the internal components of R4's dome, but as I had already sprayed the lid panel matt black. I decided that the main inside panel would work better this colour than say white.


The lower servo lift was also sprayed up black.
The servo cover & LFS screen, both got silver paint. The internal panels and top, got a dusting of silver to help highlight the details.

The screws I had inserted to keep paint out of the threads, I decided to keep, as they blended in better than the clean versions.

I then applied a clear coat and then some black to add to the weathered effect. The orange primer also appears to show through in some places. This isn't as bad as I first thought lol, as it actually looks like sand in the crevices etc..... result!

I then installed it all in the dome.


The bracket can be seen installed. Up next is finishing off the electrical install and then the Pololu controller and electrical hook up.

February 23, 2021

Utility arm UPPER socket screen (Part 4)

 Can’t believe it’s been two months since I fitted the upper utility arm socket screen!

In my attempt to finish off unfinished parts, I got on with weathering it. So far I have just added matt black , but like the lower one, I will add burnt umber & ochre yellow to give it that Tatooine sandy feel.
Utility arm socket screen

January 09, 2021

R4-D4 dome lid modification - part 3

 After two design attempts, third time was lucky lol.

And got itself 3D printed off.

Lid panel underside

I added a recess and opening for a single LED, in the design. After I had re-levelled the printer bed before printing this third version.

After cleaning up the print, it got a coat of filler primer paint. Whilst this was drying, I got on with other parts of this project. The lid panel opening edges had a coat of silver paint.

Painting the edge opening silver

Lid work, wood filler
The lid panel’s underside had a line added that would need wood filler to smooth flat. After it had dried it got a light sanding. It and the lids edges then got painted silver. (See above picture).

I decided to spray the 3D print, mat black and then dry brush it with silver paint.

Lid panel painted
I mixed up two part Araldite to fix the 3D print to the underside of the panel lid. Remembering to fit the LED lol. Whilst this was setting, I mixed up some more to fix the magnet into the servo arm that will fix onto the lid panel.

Lid hinge with magnet glued in place

The servo holder has also had some re-working done, to incorporate two magnets that will secure it to the inside of the lid.

.....picture to come.

November 29, 2020

The Mandalorian - R5D4 Holoprojector - 1.5

After the primer had dried, I applied a coat of matt black.

Holoprojector sprayed matt black

I left this to dry as I masked off the next component that needed spraying.


November 11, 2020

The Mandalorian - R5D4 Holoprojector - 1.2

Yesterday I masked off the silver ready to spray up with blue.

masked up ready for painting

It’s been a while since I’ve used this silver, and I wasn’t happy with how it was looking applying the blue over it caused the silver to come off when I wiped it.

blue paint applied, not happy with it though

wiped the silver off with the blue

Resprayed the blue over the black & this time it stuck. Removing the old masking tape, took off some of the silver paint, but I’d weather it anyway and this just adds to the effect. Lastly I applied a clear coat.
finished test spraying with clear coat applied

As can be seen in the above picture, I had printed off the lower arm & glued it on. This was part of the test fitting. Decided to just add the arm to the 3D holoprojector and print in two halves. More in next post.

November 08, 2020

The Mandalorian - R5D4 Holoprojector - 1.1

Today I cleaned off the version 3 print and prepped if ready for painting. I did a test paint on the version 2 first, see below for pictures.

Used filler primer, old tin I’ve had for a while, few coats, left to dry. Then used a matt black as an undercoat. Few coats, left to dry. Lastly, I used metallic silver. This stuff is great as it drys to a natural looking silver.

Primer, black undercoat, metallic silver topcoat

Mat Black undercoat

Metallic silver topcoat


Leaving this overnight and then mask off for the blue spray paint detailing.

Ordered some cabochons for the lens and also some G4 SMD LED’s after I had done some testing (before painting) with LED’s I had available. (picture below).

Test illumination of holoprojector


January 24, 2018

R4-D4 Dome work progress 3.8 - weathering

Monday I took the dome into work and sprayed a coat of clear over it.

On the evening, once home & dried, I made a start on weathering the dome with my usual colour's. I started on the circuit board, with matt black to tone down the silver. This then worked it's way down into the grooves of the panel below. Edges and pitting on the grooves and panel faces, help to create the worn used look, which when I first started using wood, realised who good it did looked when compared to 'real' worn/used metal.
matt black with burnt umber also added to the 'electronic' panel.

Dink's, scratches, surface imperfaction's, all add to the aged character of the dome 😊.

I then made my way gradually around the dome, with just the matt black paint.
Not all sides shown.

Rear, un-recessed pannel

Front


Lid

Next up is to add some burnt umber & yellow ochre paint to help blend the lower section in with the body.