September 30, 2012

Body Skin 4.2 - Primered up!!

I know I should of done this before fitting the Utility Arms & Octagon Port, but I got carried away with figuring out how best to fit them. So before I do anythin else I've started on primer spraying up R5's body. I masked off the Skirt, Utility Arm area & the front Octagon Port.
Then started spraying.


The masking tape was to stop the arms from opening when I was moving the body :)

Although smooth'ish, the recessed panels still need some wood filler to smooth them out more, to my liking.
Next will be light sanding of primer and wood filler and then apply more primer.

Restraining Bolt - upgrade

Having read posts on forms about the origins of the 'Restraining Bolt' and it probably being a camera lense/adaptor of some sort. I decided to upgrade my own bolt by addeding a straight knurled edge around the outer most diameter.
 
The link below will take you to info about this find.

I still might add a drill hole to the front of the Bolt.

Octagon Port 2.4 - Rear Port build

Used masking tape to cover over the back plate, then marked out the slots to be cut out. Using a Stanley knife, I scored and removed these pieces.

Rough cut out of skiin for rear octagon port.
 
Then primer spray, blue & then clear to finish. Next is to make the side walls.
I also roughly cut out the hole for the Octagon Port in the body, but due to my not so accurate frame build, I needed to cut into the rear upright.

Octagon Port 2.3 - front now fitted into body

Screwed angle bracket into base to hold in place (no picture), then applied P40 resin around the outside edge of the Octagon Port and skin, inside the body. Once this had dried, I started filling in the gaps with wood filler. Sanding and more filler was then applied to build up the areas.


September 26, 2012

Octagon Port 2.2 - photos

Here are pictures of my 1st Octagon port almost complete. Just need to fix the sides in place and then install. There will be additional work to fill in gaps, smooth off and paint touch up's.


1st Octagon Port almost finished. 2nd Port's back panel now cut out and ready for marking up.

Utility Arms 1.7 - Arm No2

Wood filler, sanding, more filler, more sanding, primer, filler, sanding, last lot of primer.
Next white Satin coat of paint. Then Metalic Red, followed by clear top coat.
And Utility Arm No2, is complete.

Rear perforated mesh, painted black also fitted. You can see through, because the rear hatch wasn't fitted at the time.

September 24, 2012

Build update, work done last week....


Rear Utility Arm socket:

Drilled locating holes in the perforated metal. Primered it, then sprayed it up Black.
Photo's to follow.

Octagon Port:

Cut down the angle bracket and drilled a new fixing hole, that will be used behind the Octagon Port.
Photo's to follow.

Skin:

Applied wood filler around the bottom of the skin/base to fill in gaps.


Also 'grooved' out the side panel, next will be to do the slots.
Photo's to follow.


R5D4's weigh's how much!?!?!

Been meaning to do this for a while now, so thought I'd weigh R5's built bits made so far.
Centre Leg & Foot complete =  4Kg's
Main Leg No1, with no Foot = ??
Body, with no head = ??

Blog hits = 7000

Just logged on to see that R5's build has hit the 7000 hits mark.
There must be a lot of people searching for the wrong stuff and getting my page by mistake lol
For those that have got here and read my attempts at posting, thanks for stopping by, am sure some of this must be interesting reading :) lol

September 19, 2012

Utility Arms 1.6 - Internal Socket Area


Rescued some more perforated 'scrap' metal, manually curved it into shape and then cut to size. This will have holes cut into it, later on, to allow the servo linkages for the Utility arms to fit through.

Octagon Port 2.1


Started on new side pieces for the Octagon Port. These will all be cut out individually and made to fit. I have also grooved them so that the rear metal plate,  from by first attempt, will sit inside them.  I also added some more board to the rear, this should help with keeping everything solid. I'm also planning on adding a metal angled bracket behind for the centre aluminium piece to bolt through and secure all in place.


P40 resin has now set and wood filler applied to gaps, panels then all lightly sanded and sprayed with primer. I've started on the other pieces and the same process will be applied to these. Final assembly will be once all panels are sprayed up in blue & clear coated.

Body Skin 4.1 - R5D4's different Panel

Carved out the 'R5' additional Panel. The one above the Coin Slots.
Then sealed it with PVA glue.

September 13, 2012

Octagon Port 2.0 version in wood


As R5's build has gone on, my ability to understand how best to make things ot of wood has improved......slightly, lol. My first attempt at making his Octagon Ports out of metal were ok, but I wasn't 100% happy with it, so I didn't make up the second one.
First Octagon Port, but not happy with side panel bends etc.
 
I have now decided that I'm going to make them out of wood, hardboard. This should be easier to build and assemble & neater looking then the metal version. I will be keeping and using the two aluminium centre pieces I made.
And here it is, test fitted in place...... nope, still not happy with how this looks.
So will start on version 2.1 tomorrow :)

September 12, 2012

Body Skin 4.0 - R5D4's different Panel

Some time ago, whilst surfing the net, I came across a post that showed something very interesting. It showed that one of the panels on R5D4, just above the 'coin slots' was different to the one on R2D2's. Builders who are building R2, using the plans, keep this panel blank, even if they 'swap over' components to change their R2 into an R5. But as can be seen in this screen grab, R5  has a recessed panel.

So in the interest of accuracy, well as close as possible with my efforts, I will be adding this recess to my R5.

September 09, 2012

Leg 1 update

Clear sprayed Leg No1 up, don't know or remember why I'd not done it before now, apart from the Horse shoe, it's completed ??? lol
 
Then I fitted the Ankle Cylinder/wedge/cylinder holder combo in place, this just clips over the holders [click here for how I made these]. Then glued on the Ankle Details. Used silicone sealant to hold the ends of the Ankle bracelet on, then screwed it down. The screw will be covered by the Booster cover. I then fitted and screwed the Booster Strut in place and finally used sealant on the dowels again, to fit the Booster Cover in place.

Astromech Droid Leg R5D4 R2D2

Drilled and threaded some holes in the shoulder stabilisers and clearance holes in the metal back plate. Then screwed in two cut down 6BA screws to hold in place. Thought this would be easier to hold them in the leg when the back plate is silicone'd into the shoulder socket.
R5D4 Shoulder Stabiliser
 

September 04, 2012

Utility Arms 1.5 - Arms 1 & 2

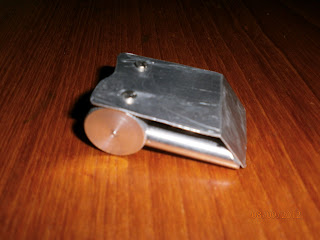
Wasn't happy with how my arm location clamp's were working or looking. So decided to just make some new ones. And then painted them black. Also made up an arm stop, to help stop the arms from being pushed inside R5's body. Painted this black too.
Inside view of Utility Arms

Lower arm pivot block, not painted as yet.
Lower arm not secured as yet, just placed in socket for the photo

More sanding and primer applied to the second Utility Arm.

September 03, 2012

Noooooooo - Shoulder Hub damaged

Stripped all the parts I'd fitted to Leg No1 & was sorting where there was space on the shelf in the garage to put them, when I caught the Shoulder Hub and it fell off. Bounce, bounce, bounce...... crash!!! It fell onto some boxes before hitting the floor. Damage.....yes, as little bit has chipped off, but it is fixable and obviously, won't be noticeable.