| UK R2 Builders Launch New Site | |
| Reported by Mark on 22 Sep 2013 23:22 | |

Mike Filippidis over at Astromech.info has gotten in touch to drop us a line about a vital new UK website.
|
Droid Builder

September 23, 2013
UK R2D2 Builders Club - Jedi News mention!
September 02, 2013
Front Vents - Resin Set 2.0
Originally written last year sometime lol.
I wasn't happy with the front vents that I had made. I know I spent a lot of time making them, but I wanted them to especially look right as these are the bits that people will focus on. So was looking to buy a set from Don Jarr via ebay.
Well I don't have to save up as was kindly offered a spare set from a member of the UK R2 Builders club. These are very much appreciated indeed!
I measured and marked a centre line for the centre vents. Then drew roughly where the outside cut should be, then I started with a drill hole and then started sanding out to size with my dremel.


I wasn't happy with the front vents that I had made. I know I spent a lot of time making them, but I wanted them to especially look right as these are the bits that people will focus on. So was looking to buy a set from Don Jarr via ebay.
Well I don't have to save up as was kindly offered a spare set from a member of the UK R2 Builders club. These are very much appreciated indeed!
I measured and marked a centre line for the centre vents. Then drew roughly where the outside cut should be, then I started with a drill hole and then started sanding out to size with my dremel.

 |
| This is one of the brackets I fitted to support the top vent. |
There will be more substantial supports for these as I can imagine these
being pushed in by kids! lol
And here's the top vent test fitted.

 |
| R5 - Top Vent test fitting |
July 16, 2013
Whilst searching the net, I found this :)
Blue milk special

This answers that unanswered question!!! lol
Check out the webpage for more great stuff :)
Blue milk special

This answers that unanswered question!!! lol
Check out the webpage for more great stuff :)
July 08, 2013
St. Mary's - Summer Fair 2013
So saturday, R5 made his 1st local (2nd public) event at my children's Summer Fair.
I think I can say that kids thought he was great lol. Even tho some were reminded not to touch, this seemed to fall on deaf ears, good job R5 is pretty sturdy, tho in my absence, when I was being a stormtrooper, my youngest TOLD her school friends, 'hands off he's [R5's] my daddys'! Lol, good girl.
I was surprised at how many dads were interested to know how he was built even one mum did too :) and when I actually had the time to build him! The popular question from everyone was of course, 'does he move?' lol. This will be the next phase of this build, saving funds is now in progress. Then, when the Dad's were told he's made out of wood, i think they were suitably impressed too :D.
He had a few photo's taken with his new school friends [pictures taken by kids parents, not by me].
He came away fairly un-damaged, i knew the utility arms & the 2nd unfinished foot shell [has now lower section] were potential weak points & sure enough the lower Utility arm pivot pin location came loose. Well it was only PVA glued in place and is fixable. The dome gained a few 'battle damage scars'..... in the form of face paint lol but again, nothing that can't be fixed. All in all, id say he stud up to the assault... I mean fair really well :).
I think I can say that kids thought he was great lol. Even tho some were reminded not to touch, this seemed to fall on deaf ears, good job R5 is pretty sturdy, tho in my absence, when I was being a stormtrooper, my youngest TOLD her school friends, 'hands off he's [R5's] my daddys'! Lol, good girl.
I was surprised at how many dads were interested to know how he was built even one mum did too :) and when I actually had the time to build him! The popular question from everyone was of course, 'does he move?' lol. This will be the next phase of this build, saving funds is now in progress. Then, when the Dad's were told he's made out of wood, i think they were suitably impressed too :D.
He had a few photo's taken with his new school friends [pictures taken by kids parents, not by me].
He came away fairly un-damaged, i knew the utility arms & the 2nd unfinished foot shell [has now lower section] were potential weak points & sure enough the lower Utility arm pivot pin location came loose. Well it was only PVA glued in place and is fixable. The dome gained a few 'battle damage scars'..... in the form of face paint lol but again, nothing that can't be fixed. All in all, id say he stud up to the assault... I mean fair really well :).
July 05, 2013
R5-D4's Head 3.4 - silver tape applied
I was originally planning on spraying the silver dome band. But thought I'd give the silver tape a second chance lol. My last go at using the tape on the leg spacer discs didn't end well.
I first wrapped the tape around and cut to length. Then applied, peeling the backing tape a bit at a time. I then trimmed the width and stuck the excess under the edge. I then used a cloth to smooth any bumps & creases out.

Then I fitted all the dome components back on.


All ready for tomorrows appearance at my children's school summer fair :)
I first wrapped the tape around and cut to length. Then applied, peeling the backing tape a bit at a time. I then trimmed the width and stuck the excess under the edge. I then used a cloth to smooth any bumps & creases out.

Then I fitted all the dome components back on.


All ready for tomorrows appearance at my children's school summer fair :)
July 03, 2013
R5-D4's Head 3.3 - neck detail 50% completed
The last two strips lengths were cut, watered down PVA glue applied to them, then strapped in place to dry in shape, later to be glued in place.

And here's his dome in first few coats of white.

Wired in a push button switch between battery & the light for R5's lower eye. Hot glued velcro to battery & upper face of cross beam of dome to hold battery pack in position [temp position].
 |
| Here is one of the strips once it had dried and strap holding it in place had been removed. |
~~~
Cut a scrap piece of wood, marked position of domes cross beams, and screwed into place. This is a temp thing for the summer fair event. The stop will allow the dome to rotate about 30 degrees either side of dead centre. This will keep his head central and stop anyone from spinning it 360 degrees. I also added some rubber [not shown in pic] to the ends of the stop to act as bump stops. Help to take any harsh knocks from over enthusiastic rotation of the dome ;D. |
| Dome rotation stop |
~~~
Trimmed to length and glued into place all the neck vertical details & then filled in gaps with wood filler. Once dried, Sanded all over. Next was primer all over. A light Sanding to flatten, then came the white. You should know by now I can't help myself, R5's dome components were fitted for effect lol.
 |
| Jawa Sandcrawler pose ;D |

 |
| A few more coats of white for the dome required |
June 25, 2013
R5-D4's Head 3.2 - Neck
Ok, so last week I made a start on R5's neck details.
First I measured and then with a straight edge and stanley knife, cut lengths of strip to go around the neck. I Applyed watered down PVA glue to soak into the wood to help make it more flexible, and harder once dried. This also stop's it absorbing to much of the paint. Fitting the 1st strip to dome. Tricky, used a strap to hold it in place while the wood glue drys.
This made fitting the strips a LOT easier.
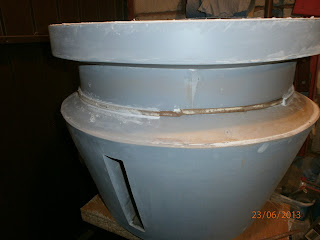
Neck verticals
The verticals have chamfered side edges. So to create this I cut lower strips at wider, using thin hardboard and then upper strips at 5mm wide. These were PVA glued, in the middle, then wood filler was applied to create chamfers. Once dried, they are lightly sanded smooth.

Here are two of the verticals glued in place. These were my first attempts, to layers and shaped the angles with a file.
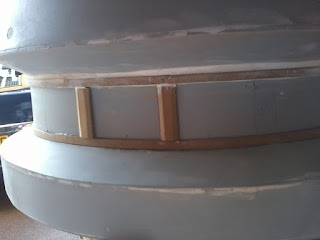

First I measured and then with a straight edge and stanley knife, cut lengths of strip to go around the neck. I Applyed watered down PVA glue to soak into the wood to help make it more flexible, and harder once dried. This also stop's it absorbing to much of the paint. Fitting the 1st strip to dome. Tricky, used a strap to hold it in place while the wood glue drys.
 |
| The bottom strap is holding the glued strip in place. The upper strap is 'shaping' another 'wet' strip. |
This made fitting the strips a LOT easier.

 |
| work in progress. starting to apply wood filler |
The verticals have chamfered side edges. So to create this I cut lower strips at wider, using thin hardboard and then upper strips at 5mm wide. These were PVA glued, in the middle, then wood filler was applied to create chamfers. Once dried, they are lightly sanded smooth.

Here are two of the verticals glued in place. These were my first attempts, to layers and shaped the angles with a file.

Lower horizontal strip, still needs an additional piece to achive the depth

June 19, 2013
Body Skin 4.7 - Painting Silver Grooves
The other week I started to paint all the grooves on R5's body, silver. This is to give the effect of the skin being dual layered and the under layer is still aluminium. When I did this on the rear hatch, I used loads of masking tape to prevent paint from going on the white painted skin.
This time, I trimmed the small paint brush to a fine point, saving on masking tape and time.
Doing only this much, took over an hour to do. Time fly's when your having fun lol.
 Not great images, but when viewed large, you can see the silver in the grooves.

This time, I trimmed the small paint brush to a fine point, saving on masking tape and time.
Doing only this much, took over an hour to do. Time fly's when your having fun lol.


Battery Box No2 - 1.0
I already had the ends cut out from when I built the first Box. But wanted to build the first one and if it worked out or didn't I could change Box no2 accordingly.
Stacked, drilled and screwed the end pieces together from the inside this time, ground the ends off, then applied some wood filler.


Then measured and cut out the side pieces. Pinned and bonded, on the inside, to the end panels.

 Next, the curved surfaces......
Stacked, drilled and screwed the end pieces together from the inside this time, ground the ends off, then applied some wood filler.


Then measured and cut out the side pieces. Pinned and bonded, on the inside, to the end panels.


R5-D4's Eyes - spacer's
Posted up last week about machining up spacers for the three main Eyes.
Here they are, made out of available Brass bar material.

Here they are, made out of available Brass bar material.

Subscribe to:
Posts (Atom)