October 31, 2017

R4-D4 Dome - curved woodwork panels 1.1

The glued panel held!!

Tuesday morning, in work, I released the clamps......and the panel stayed glued lol.
The baton on the outside, was to help keep
the panel flush with the triangle edge.

So after I'd stopped patting myself on the back lol, I got on with glueing up the other side of the panel......lets see how that goes!

October 30, 2017

R4-D4 Dome - curved woodwork panels 1.0

Cut out one piece of hardboard to test as I attempt to create a curved panel.

With my other domes, they fact they are 'round' has meant not to much trouble in curving the sheet into shape. When I say easy I mean hard lol. A cylinder is easy, but restraining straps on a 'cone' shape tend to slide up and off. And because this frame is not just a cone, but also has large flats, this doesn't make it very easy to hold in place.


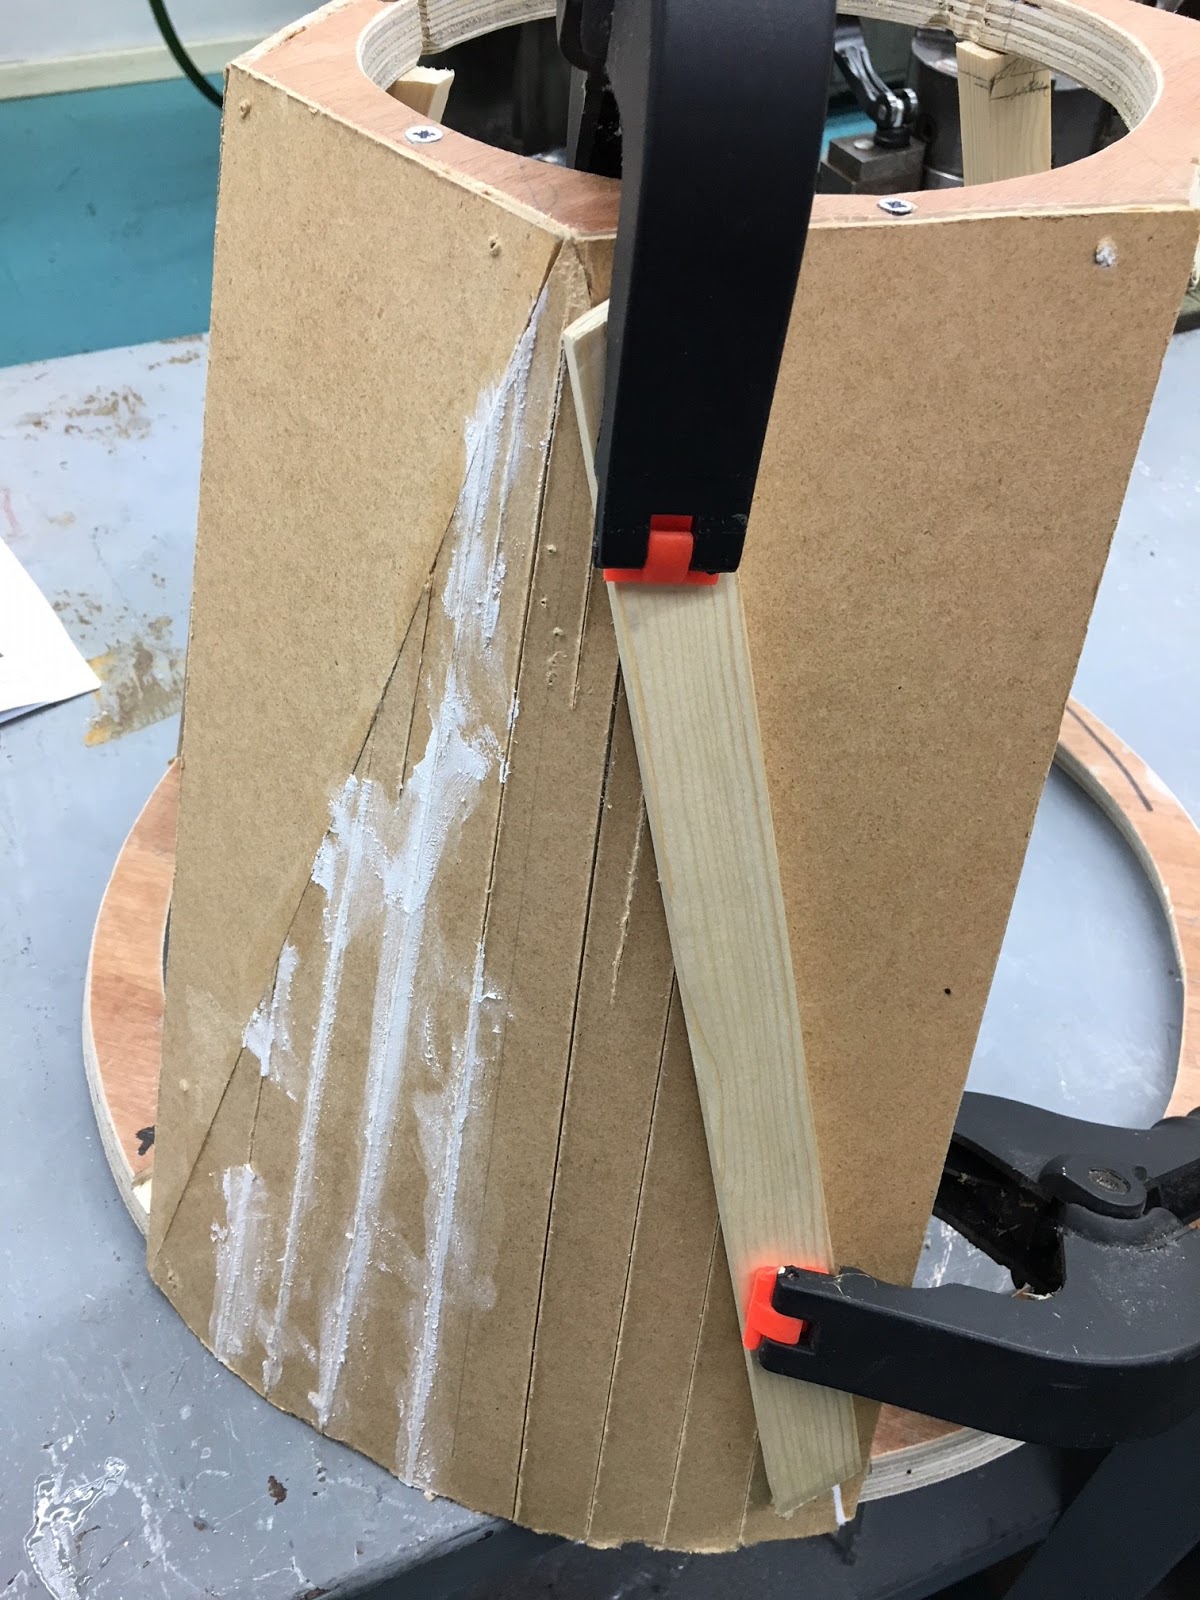
The lower section of the panel curves to the lower ring, quite easily, but the tapered/point....wants to remain flat. So I added score lines and 'helped' it to bend. Just like almost scoring through the wood to get a clean cut, the score lines help to reduce the resistance in the wood and allow it to bend (almost break). You can hear the fibers in the board tearing.

I needed an extra support to be able to press the panel against to hold and shape the panel.

 PVA glue applied to lower ring and one side of vertical edge.

 Panel in place and clamps applied.
I then cut up some off cuts and used this to help glue the panel in pace.
I also used panel pins on the end edges.

Clamps from rear, clamping blocks to hold everything in place.

I did this Sunday so will see how it all holds, will release the clamps tonight (Monday), will update next time.

October 27, 2017

New Dome - 3D holo eye - internals 1.2

So this is version 3, lol of my servo holder.

And here it is printed with the servo test fitted.

I need to re-do the holo eye internals for the LED's as I wasn't happy with the hot spots from them. And a diffuser wasn't doing anything to dim them.

New Dome - woodwork frame for........ R4-D4

There's still a long way to go, and home life has limited my available free time to actually work on the frame for the new dome. So I took it all into work to try and utilise my early morning starts & lunchtimes to crack on with this build.
This was my starting point, over a month ago now. I'm now happy that this is going to work to be able to share more of my work. The idea for the framework is a modified version, but also simplified version, of what I had seen online by another builder. Credit goes to : Scott Kraft (pithyscott on Instagram)


The side triangle panels will be possibly/temp held
in place with panel pins for the building purposes.
The above picture gives you an idea, the rear triangle is pinned in place.
The centre dowel was to help support the top while I messed around with the uprights.


 There is a upright missing on this side, this is because I need space for R4's holo eye unit to fit. I need to make up a different upright arrangement to support the triangle panel etc.

All uprights temp in place. Next up is to cut out the top plate, to save weight and also give access to inside the dome.

Here's the work for the holo eye box unit. Grooves cut into side panels for the front panel to sit in. Glued up and fitted together.


And the semi completed box unit. There are several different looking box designs, I've gone with fellow UK R2 Builders Colin & Brad (slightly different again).
This simple design suits me.


Next up was to glue in support fixing blocks, seen in picture below.
Still need to add two more to the lower angle face, to make four fixing points.

And here's a mock-up of some of the panels with the holo eye temp screwed into place.

Am on my 3rd attempt at a 3D printed servo holder to fit behind, am 90% happy I've got this sorted now.....well, until I get it all fitted up and it doesn't work! lol

October 25, 2017

Littlebits - Star Wars Droid Inventor Kit - pt 4 The Build

So last Sunday afternoon, I managed to get my two together long enough for me to give them the R2 Inventor building kit.

My youngest daughter was more enthralled then my Son (just turned a teenager lol), but both sat down to first start downloading the app, and to then get out all the components and start arguing about who was going to do what lol.

My youngest daughter follows more after me for being 'creative' etc which is great, so she was the one who took charge, following the simple and straight forward instructions, via the App. (PS, my Son has other talent's, like being an international football star, lol)


She was soon playing all the sound bites that were available. This was great and very responsive.

As a parent the one big thing about buying something that requires batteries......is when the item actually COMES with them!! A defo MAJOR plus point! As this kit comes with it's own 9v battery! So no hunting round the house looking for one.

The circuit boards are extremely well made and visually to a high standard! Most impressive! And the 'only one way' connection of the magnetic contacts makes assembly simple and easy to use.

All the components clip onto the main internal frame easily and can be removed the same way, without difficulty.
And it wasn't long before the body and legs, which all just clip together, (my Son was allowed to do this lol) were assembled and our new droid was moving and beeping.

Feature 1: The recorded message.
You can record your own message and send it to the Droid, via the App, for it to replay on your button pressing command. She thought this was amazing! (tho it's not an instantaneous upload to the Droid), but is pretty neat.

In order to move onto the next stage you need to 'complete each mission'. This involved dis-assembling the droid (by following the App instructions) we didn't actually do this. Only then can you move onto the other build 'missions' (this is because they are locked).

But before she could do this, she wanted to start applying the stickers. She did ask, but I said she could do whatever colour scheme she wanted. So red/blue and black it was.
Blue pie panels, but the rest of the dome and body are a mix of the others lol.

I can't remember now what she named him 😃

The other 'missions' involve dis-assembling the components and re-arranging them to be able to operate the 'waving arm' (from the front body slot), this uses the centre foot stearing motor, 'dome rotation', using the main drive motor etc. This makes sense, even tho as an actual Astormech builder, you have it in you to ask 'why didn't it come with extra motors etc lol'.

My kids are on half term break from school, so I've only been told what they've been up to with the droid while I've been at work, so I'll do another update once the other 'missions' have been assembled and tested out.

More Blog updates to come......

New Dome - 3D holo eye - internals 1.1

Servo holder unit, drawn up in Inventor CAD.
This is my third design attempt. I based it around using a micro servo unit, due to space.

I didn't draw in fixing holes to match up with the rear cowl component as thought it easier to drill it later free hand.

Well, I printed it off, and I think I still over engineered the design lol......back to the drawing board 😄

New Dome - 3D holo eye - internals 1.0

There's one thing that ALL R2 builders fear is having their Holo Eye's twisted around and around!
This apart from being annoying, after all the time and money put into our builds, but there's always that 'has any damage been done to the servo linkages inside the dome!' feeling for the rest of the event. 

This was something I've read up about over the years. Usually a quick, dome rotation 'frees' the finger twister lol.

So I had an idea to allow the holo eye to be twisted, without worry of either the servo linkages or the holo LED's wire being twisted.

This was my first idea, drawn up in Inventor CAD.


This is still a work in progress as I carry on building the rest of the new dome.

October 23, 2017

New Dome - 3D holo eye - painting pt1

Saturday between things to do, I got to spray up the Holo eye parts with primer/filler spray.
These pics are off it still wet, drying off.


Once dried, they looked like this.
A bit of light sanding and they were back to being smooth again.

~~~~~~~~~~

Today I sprayed up the upper cowl and the ribbed part of the Holo eye, with matt black.
Once these have fully dried, I'll sand them smooth again. The ball part of the eye body will be sprayed silver. I'll then dry brush the ribbed part to give it the weathered/worn look.

New Dome - 3D holo eye - LED's

Friday I printed off the LED support for the Holo eye. I push fitted five into the 3D printed holes and after some wire trimming, soldered them all up. There's limited space, plus the hole through the stem of the support is only large enough for single power cable.

Top two pics show LED's in place and wired up.
Bottom two pics show LED's lit up.


I've cut out a defuser but needs more defusing

October 19, 2017

Littlebits - Star Wars Droid Inventor Kit - pt 3

Printing started Tuesday morning on the new R5 dome....

But the PC 'shut down', (over night printing) so it didn't get to finish. Will look at the support structure and possibly re-design it into the build to save time and filament.

8 hours, the time taken is mostly due to the support structure, which we hadn't considered as the program doesn't actually show what the support structure will look like, neither does it give you a print time, which might also indicate it's going to take forever to print! :D

Looks like it maybe next week now, till the printer is 'free' to try again.

Bristol Builder Paul Felski with his R2D2 - Part 2.1


Here's the video & pictures to Paul's appearance on
BBC Points West, (UK views) from last night (18.10.2017).

The link (click below) is to the

Well done mate 😎

October 18, 2017

98K Blogs hits.....WOW part 2!

WOW!!!

.....was only a week ago that I posted up that people viewing this Blog had reached 97,000 hits.

And now, you've hit the 98,000! Big thanks everyone :)

I hope people find this Blog useful and informative or even light entertainment lol. R5's got a few events coming up in the next few months, so keep an eye out for these Blog updates.

Plus he's on Twitter & Instagram (click links to head over to them). Not forgetting R5's Facebook page. Instagram usually goes live first (as it's easy) then this Blog will get full details & more pics at next available time.

Comment below to say which social you follow.

October 17, 2017

Bristol Builder Paul Felski with his R2D2 - Part 2

After Paul appeared on 'Made in Bristol' TV program a few weeks back.

He was then contacted by our local News channel to appear on our regional show.

Due to appear tomorrow, Wednesday 18th October 2017 on BBC Points West.

I'll post up with how it all went, probably on Thursday. Good luck Paul.

New Dome - 3D printing parts - holo projector eye **Sanding**

To be fare, the printing wasn't that bad. I started off with a small file to take off the tops of the ridges, but soon got on with just using sand paper. Quite a course one, but soon found this did as good a job as the file. Next up I switched over to Silicon Carbide finishing paper 177. This stuff got the surface super smooth in no time. Still a way to go, but with filler/primer spray, this finish state could be good enough. I'll see.
holo projector eye
(Pic shows lower cowl for this picture for support)
The two parts (body & upper cowl) don't 'catch' when you rotate them together. . You can see the sanded (grey) print compared to the 'nozzle' ridged area.

October 16, 2017

Littlebits - Star Wars Droid Inventor Kit - pt 2

With loads of people & Littlebits on Instagram, posting up pics of creations for their droids, I thought I needed something 'special' to modify the droid for the kids.

The plan was this weekend to get the kids to build it, but as always plans changed so hopefully, this weekend coming......plus I'll have the dome done by then as well.

There can be only one.....as Colin MacLeod once said, lol (Highlander film peeps), modification that this droid needs.......so I drew up an R5-D4 dome.


I did it simple, (tho it now doesn't look simple in this pic), but picked out his main recognisable details lol, three big 'eyes', neck detail and gave him a mini antenna. This is version 4 attempt, couldn't help myself lol.

Will post up pics once printed.....

New Dome - 3D printing parts - holo projector eye

Downloaded the stl files from the Builders section, www.astromech.net, and asked Steve, my co worker (who has the 3D printer program), to start printing off a holo projector eye.

Parts 1 & 2, upper and lower cowl pieces were done in a few hours, but had to wait till the next day for the main piece to be finished printed.

Pics bottom, with support raft in first picture, second shows support raft removed.

Next up was the upper cowl part.
This didn't take long to print at all. So my Steve was able to start printing the main body.
All are in the process of being sanded, filed and generally smoothed as best possible, before I'll start primer/filler spraying them up.

Next up was to source a cabochon for the lens......3D print one perhaps?

But my friend Glynn saw my Instagram post and has offered me some, they're now in the post to me, thanks mate, much appreciated!