February 26, 2018

R5-D4 - Bad Motivator system upgrade 1.2

One of the thngs that bugged me was trying to solder the wires up inside the e-cig unit. It was never 100% successful with weak joints, dry joints etc.

So I looked into somehow modifying a pre-assembled unit and figuring how to get the air to flow though the unit. I found this unit on eBay (last year, for about £6) as part of my testing atomizer units.

I had been using these types of atomizers....
.....and I may still come back to these,
as they are easier to refill in the upright position.

But for this testing I'm using one of these.
I enlarged one of the holes in the base to allow are flow into the atomizer.
Then in AutoCAD Inventor, I drew up a collar for the plastic tubing to attach too.

And here it all is assembled. I tested it by blowing through the tube myself. It works, though I still need to fine tune it a bit more. The air flow felt restricted compared to original idea (see above picture No.2) But this may be because of the battery packs restrictively small cross cut out slots.

The battery pack (black plastic part) is not intended to be used, it's just for testing purposes.

R5-D4 - Bad Motivator system upgrade 1.1

More redesign work has been done on getting the bracket into the right place, to allow the Motivator to sit low enough in the dome and also for the sliding track to be able to fit and slide as well.

I've also flipped the bracket's location to the other side of the pie hole.
Waaaaaaay back when I first made and fitted my motivator, the installation was just bolted onto an aluminium plate, with two M8 bolts holding the plate to the inside of the dome, via T-nuts.
 This was a test fit, before cutting out the rest of the Pie hole.

 The view of the aluminium plate from the inside of the dome.

The Motivator pop-up system was installed on one side so that there was room for the actuator bracket movement to have enough reach.
The plan is to do away with all this aluminium and make things simpler.

So after a few design and re-design ideas, length changes etc. I think I've now got the bracket right.... still a work in progress, but getting there.
Next is to re-design the actuator bracket and then the motivator adapter to connect it to the rail.

February 22, 2018

R5-D4 - Bad Motivator system upgrade 1.0

R5's pop up 'Motivator' system, was deactivated last year for an 'event'. Although the linkage used to lift the motivator is sound, the riser bars were starting to seize up a bit, so making the up and down movement not so smooth. The electronics side also needs a tune up as well, so this will be worked on too.


So after doing some researching, I think I found some new components to upgrade the set-up.
  • I found a slide 'sample' unit in work from IGUS.
  • I also ordered a cheap bearing loaded kitchen draw rail.
I'll be drawing up some ideas in AutoCAD 3D Inventor (in work) for how best to work these into the dome. But out of the two options listed above, I'm going with the IGUS drylin T miniature guide carriage.

I also looked and was toying with a new DJ Design's 'updated' Motivator resin kit. As he states on his website, he has updated the motivator to look more screen accurate, which it does. He does state that it's still only an interpretation of what it looks like, but it does look close to screen grabs I've seen.

Here's some of the pics of the 3D work.
This was idea Mk1

This needed some refining and was a bit over kill, even with the 'weight savin' cut-outs lol, so this now looks a bit like this.
Idea Mk2

Am already working on a possible Mk3 version, but it's more a 'what if' idea than a change to this design.

February 13, 2018

Rogue One patch

My Rogue One patch arrived from the USA the other day, and I didn't waste any time sowing it onto my club fleece. I added to my left sleeve, underneath the club logo, as one unnamed patch 😉, is above this.

It was purched off Etsy,
price compared to Amazon saved me about £15!

Really glad I was able to get this patch.

February 09, 2018

The official UK R2D2 Builders Club Patch

Needed to get the official Club's path for the rear of my fleece. Arrived in no time and it was soon stitched on.


Just waiting of one more patch to arrive.

February 06, 2018

UK R2D2 Builders Club - Patches

Decided the other day that with the arrival of my new 2018 Club patch, I should dig out the others and sow them onto my Club Fleece.

I just had to figure out where best to display them. So I went with the Celebration 2016 one above the Clubs logo, and the others down the right arm. I'm just waiting on two more to arrive, but for now, here's the ones I've stitched on.
 Celebration Europe 2016
This event was won of the most enjoyable experiances, shared with great friends & My Son.

I do have an Orange 2018 Pinewood patch,
these kindly given out to Club member by Lee T. 😎

This one I stitched onto my Club Polo top.....

February 02, 2018

Jessika 'Testor' Pava - helmet - 2.5

Work done 19.6.2017

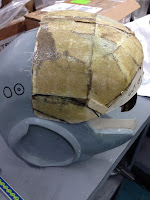
The inner 'ear' area, needed to be raised up to form a central pad area. so I glued in some cardboard to build this up and then applied filler to slope the edges.

To create the rear helmet details, I used Milliputty.
These are rough to start with.......

More updates on this project coming as need to redo some of the costume for my daughter.

Jessika 'Testor' Pava - helmet - 2.4

work done: 15.6.2017

Next up I started on re-doing the 'blast shield'. I'd already attempted this once, but wasn't happy with it, so decided to try again a different way. This is all new to me so I soon realised I had to think back words.... by this I mean that I make the shield, then make a cast of the shield, to then make it into a mold, just like the helmet.


Started off by making the shape using cardboard.

A few more layers of cardboard to make more rigid,
before applying fiber glass matt and resin.

Here is the first layer of fiber glass matt applied.
I added another layer on top of this to help strengthan.

Once this was dried I started to mix up and apply car body filler.
I ran out so this was all that was left in the tin.

pic....

Whilst waiting, I started looking at the details that I could add to the helmet to be included in the actual casting of it. Rather than have to stick extra pieces on.
I started on the cheek detail (circled in yellow below)

Other's have done these, so there was plenty of ref pics to work with.
And this was the mocked up version...in cardboard.

And here it is glued into place

I still need to fill in the gaps etc and then seal it before applying primer etc.
But it's looking good, and after all, this is for my daughter so scale is not 100%

Jessika 'Testor' Pava - Flight suit 2.2

Work done last year 13.6.2017.....Thought these following post's had been posted


Usual busy family weekend stuff, but i was able to re-make a start on the blast shield. Using a hot glue gun to get started, i cut out and positioned roughly where the sides would go. Next was over the top strips, cross strips, followed by larger flatter pieces.

The start of the cardboard strip framework.

Next then was to start applying fiber glass and resin to form the base of the shield.

Resin applied to framework.


The plan is to create the shield, then make a silicone mold to then create a slush cast from it.

February 01, 2018

R4-D4 Dome work progress 4.0 - LED's

Been looking into the random servo movement for the Holo, as I'd like my original idea to work, but still having problems.

Next up I ordered some RGB slow transition LED's to add to the other flashing & non flashing others.

I drilled a small hole and fed the cables for it through the rear section.

This was held in place with hot glue.

Next up was the 'electronic' side panels.
I filled in the previously open upper hole and slot, with hot glue, this helped to diffuse the LED's light.
I applied some black paint around the edges to help reduce reflection, mainly on the upper edge, as can be seen in the above two pics. These were taken as the LED faded colour change.
Above picture shows the slight, light bleed above the yellow bar.

I just need to sort out the inside wires next.


R4-D4 Dome work progress 3.9 - New Holo ring cover

I drew up & 3D printed a new Holo ring.


I then painted it black with silver details. This was to cover the screws retaining the Holo eye in place.
And here it is as a test. This is not a 'film cannon' item, but as there are a few different R4 with different holo projector 'boxes', this isn't a problem for me.

Next up......LED's