Next up I started on re-doing the 'blast shield'. I'd already attempted this once, but wasn't happy with it, so decided to try again a different way. This is all new to me so I soon realised I had to think back words.... by this I mean that I make the shield, then make a cast of the shield, to then make it into a mold, just like the helmet.
Started off by making the shape using cardboard.
A few more layers of cardboard to make more rigid,
before applying fiber glass matt and resin.
Here is the first layer of fiber glass matt applied.
I added another layer on top of this to help strengthan.
Once this was dried I started to mix up and apply car body filler.
I ran out so this was all that was left in the tin.
pic....
Whilst waiting, I started looking at the details that I could add to the helmet to be included in the actual casting of it. Rather than have to stick extra pieces on.
I started on the cheek detail (circled in yellow below)
Other's have done these, so there was plenty of ref pics to work with.
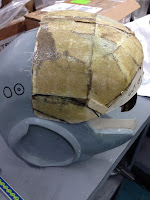
And this was the mocked up version...in cardboard.
And here it is glued into place
I still need to fill in the gaps etc and then seal it before applying primer etc.
But it's looking good, and after all, this is for my daughter so scale is not 100%


No comments:
Post a Comment