June 25, 2013

R5-D4's Head 3.2 - Neck

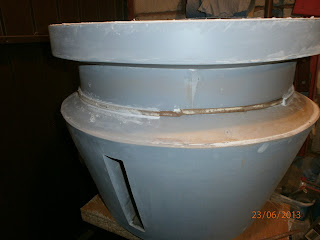
Ok, so last week I made a start on R5's neck details.

First I measured and then with a straight edge and stanley knife, cut lengths of strip to go around the neck. I Applyed watered down PVA glue to soak into the wood to help make it more flexible, and harder once dried. This also stop's it absorbing to much of the paint. Fitting the 1st strip to dome. Tricky, used a strap to hold it in place while the wood glue drys.
R5-D4
The bottom strap is holding the glued strip in place.
The upper strap is 'shaping' another 'wet' strip.

This made fitting the strips a LOT easier.
R5-D4
R5-D4
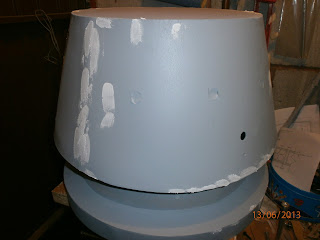
work in progress. starting to apply wood filler
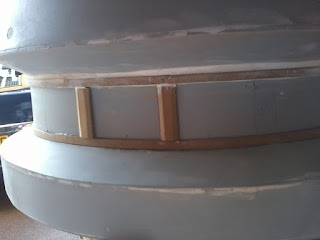
Neck verticals
The verticals have chamfered side edges. So to create this I cut lower strips at wider, using thin hardboard and then upper strips at 5mm wide. These were PVA glued, in the middle, then wood filler was applied to create chamfers. Once dried, they are lightly sanded smooth.
R5-D4

Here are two of the verticals glued in place. These were my first attempts, to layers and shaped the angles with a file.
R5-D4
Lower horizontal strip, still needs an additional piece to achive the depth
R5-D4 Dome


June 19, 2013

Body Skin 4.7 - Painting Silver Grooves

The other week I started to paint all the grooves on R5's body, silver. This is to give the effect of the skin being dual layered and the under layer is still aluminium. When I did this on the rear hatch, I used loads of masking tape to prevent paint from going on the white painted skin.

This time, I trimmed the small paint brush to a fine point, saving on masking tape and time.
Doing only this much, took over an hour to do. Time fly's when your having fun lol.
R5-D4
Not great images, but when viewed large, you can see the silver in the grooves.
R5-D4

Battery Box No2 - 1.0

I already had the ends cut out from when I built the first Box. But wanted to build the first one and if it worked out or didn't I could change Box no2 accordingly.

Stacked, drilled and screwed the end pieces together from the inside this time, ground the ends off, then applied some wood filler.
R5-D4 Battery Box

R5-D4 Battery Box

R5-D4 Battery Box

Then measured and cut out the side pieces. Pinned and bonded, on the inside, to the end panels.
R5-D4 Battery Box

R5-D4 Battery Box
Next, the curved surfaces......

R5-D4's Eyes - spacer's

Posted up last week about machining up spacers for the three main Eyes.
Here they are, made out of available Brass bar material.
R5-D4 Astromech Droid

June 14, 2013

R5-D4 Head & Body fitting with all components

As I had all the recessed boxes bonded into place, I wanted to test fit them all :)

I had found a Hex socket counter sunk screw for the single lower dome eye. I fitted the screw through an old 'thingy', that i've had in a tin for years lol. This is all then held with a nut inside the dome. i also fitted all the other components. inside the dome as well.
R5-D4 astromech Droid

I need to make up three spacer pads for the main Eyes. As theres not much holding them on the inside if someone accidently 'grabbed' or' leaned' on them, worse case synario. So that's my lunchtime job for today.

And I had to then test fit everything.......again :)
R5-D4 astromech Droid

R5-D4 astromech Droid


I also started on painting the grooves silver. A very steady hand! Lol.
R5-D4 astromech Droid

And then I test fitted everything together......
R5-D4 astromech Droid

R5-D4 Astromech Droid
Forgot to 'test fit' his Antenna tho lol.

Then It all came off and I finished off a can of primer on the Dome.
R5-D4 Astromech Droid
.......and then started touching up with wood filler.

R5-D4's Head 3.1 - Recessed Boxes

Used dremel with sanding drum to cut/sand out a section on the [internal] lower dome ring, to allow clearance for the recessed box to fit up against the inside of the dome. Then started on cutting out the other two box recess.


I also started applying P40 resin into the joins between the angled skin pieces to strengthen them. So that lifting the dome is able to be done withought worry of cracking of joins & paint etc.

Then got to apply resin to bond the rear recess box to the inside of the dome. Also applied some to cover up the wrong holes. Then finished off by filling in more to the joins etc.

R5-D4
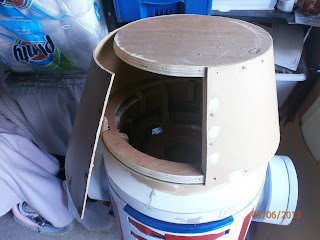
These are not pretty, but here's inside of the dome, side recessed box bonded in place
R5-D4
inside of the dome, rear recess box bonded in place
Dome Rod's issues.......???
How to fix the side rods in their recessed boxes = upgrade. Originally I had the lower section of the side Dome Rods, tapped with M5 threads. These would secure them in place, while the top section would slide up through a hole and then be lowered down to fit onto the lower section. But due to the internal frame now being in the way of locking the Rods in place, Something I hadn't originaly planned on, so it's onto 'Plan B'.

Plan B:
I drilled out the lower hole to be the same size as the lower section, so it will slid into it. I then cut a small piece of wood and glued it to the underside of the box. This acts as a stop for the lower section. This, along with the sides, was covered with resin to bond it all together.

Loads of sanding & top-up areas with more wood filler. Then sprayed all over with primer. This helps to find areas that still need work & also start to build up some undercoat layers.
Then applied MORE filler were it showed it was needed.

June 10, 2013

R5-D4's Eye Location issues = SORTED

Friday straight after work, I got down to comparing the Eye locations.


Marked the dome with a vertical line up from the width ends of the large data port up to the eyes & yes, the original position is too far over! Re-drill new holes & test eyes fitting.

I then drilled hole for antenna. This is roughly in the right position, but it can be repositioned when dome angle top is added, at a later date.

June 07, 2013

R5-D4's Eye Location issues.......?

Looking at R5's Eye location/spacing, I'm not 100% happy with how these look, comparing them to the film screen grab image. So I drew up the dimensions & angles in CAD and checked my work against the plans I had used. They both match. But, I'm still not 100% happy with the distance apart, then again it might just be me :D.

This image shows the outer two Eyes being almost inline with width of the L.D.P. & Utility Arms.
Compared to my R5's Eyes photo below, head is not properly inline with front of R5 in this pic, but you can see what I'm talking about.

So, do I stick with what I've done or move the eyes closer together [more screen accurate, which I would actually like lol].

Thought's and comments welcome please :)

June 04, 2013

R5-D4's Head 2.9 - UPDATE

Did some more work on the Dome panel joins etc last night. Filed and sanded the join between the two as it was still bulging slightly and could be felt when you moved your hand over the surface. Once done I applied some watered down PVA glue onto the 'cut/rough' surface to seal.

I then got to re-positioning the Eyes & recessed boxes. I just rotated them around by about 30mm. This was enough to clear the verticals behind the panels and also make sure the recessed boxes were clear too.

I then checked my accuracy via cross lines on the flat top, lol, not had, not had at all :D

It was getting very late now and I know this is when you SHOULDN'T continue, but I had to hahahaha. I pilot drilled the first Eye hole and then opened it out to be a tight fit with the spyhole's locking tube.

And here's a quick pic of R5 with one Eye.

R5-D4's Head 2.8 - Dome Panel's = SORTED ;)

Friday evening after work, I fitted the already assembled, upper disc & panel, onto the lower ring and started fitting panel no2 onto it. 
Upper & Lower disc/rings attached to dome panel no1
Drilled & countersunk holes, screwing screws in, filing edges & a bit of sanding. I cut some vertical pieces with angled ends, to 'flatten' the two joins bulges and screwed these together. Then applied some wood filler to some of the un-used holes.
This pic shows the vertical support, that I've had to use to stop
the dome panel from 'bulging' outwards.
This next pic show's that the wood eventually retains it's curve lol
Curve's at last lol
One more shot with my phone camera, vintage style :)
My work area [garage] look's like the inside of a Sandcrawler, hahahaha.

To do list:
1. use 'P40' resin to strengthen panel joins
2. clean the main panel edges to the lower section, and apply filler.
3. reposition the eyes and recessed box's to avoid the join areas.
4. location of antenna for drilling its securing hole.