Step 2: The Side - continued. As mentioned in my previous blog, the base wasn't cut to be over size. This required some modification. The outer dome padding would now sit flush with the base padding, instead of sat on it. This required so stitching, which had to be done by hand.
joined side protection.
Now, I also said that I hadn't accounted for the top part of the dome, just the vertical height. So I needed to 'add' more material. Thanksfully, there's more than enough left over of the sheet.
Step 3: The Top. So I fitted R5's dome into the bag, and then worked on the top section of material.
top of dome material
Step 4: The Draw String.
Before I stitched this piece onto the side section, I needed to first add the draw string cord.The top of the material had its edge folded over and stitched.
I then threaded the cord through the hole and fitted a toggle on the end. The two string ends were then folded over and stitched together.
Step 5: The Handle(s).
This is one single piece which loops around and under the dome bag. This is what takes the weight of the dome. The webbing is stitch fixed at the top of the side padding and bottom of it. It's then stitched at it's crossover point. The two ends are also stitched together.
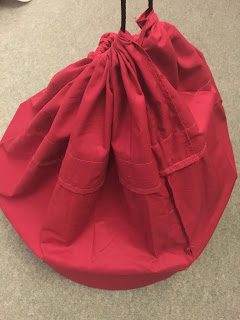
And the completed first dome bag, test fitted with both R5 & R4's dome.....
And the bag, closed, with handles raised.
Now I have upgraded my dimension and corrected my previous errors with dimensions.
I know where I need to make alterations for dome bag no2.
It will be a lot neater with the stitching lol as I now know where/how best to assemble all the panels. I only need to re-order the foam & buy another bed sheet as I have more than enough strap webbing, draw string and a spare toggle.
I'll also draw/dimension this up so I don't forget lol.


No comments:
Post a Comment