April 26, 2018

LegoLand - May 4th Weekend event 2018

It's almost that time of the year...... May the 4th!


And members of the UK R2D2 Builders Club
will be heading off to


Friday is the 4th, but the event only covers the 5th to 7th
(the Bank Holiday Monday).
We'll be joining
and other Star Wars cosplay groups.

LegoLand


Look out for Instagram posts over the weekend.

April 24, 2018

A 'sticker' for R5-D4

The free samples came last week and what a choice to choose from lol :D

Loads of different finishes to choose from, some I won't need, but a few that would be really cool to do. But for my first run, I went with 'Glossy coated'.
R5-D4 stickers
R5-D4 stickers
My design was drawn up in bit map, which for sending off for the patch, was ok, but when I loaded it up on the sticker site....I realised it wasn't going to right!

I don't have access to proper design programs and we're not able to download unauthorised programs, so I had to find a converter online. After searching and finding what I actually needed, I was able to get my bit maps converted to 'Vector' files.

I've uploaded my first design and they should be here in a week or so.

.................I'll post up links for these and the patches, once they arrive,
if anyone would like to purchase.

April 17, 2018

A 'sticker' for R5-D4 [patch]

A question was asked about possible 'stickers' of my patch design.

After some searching online, there's a lot of places that do reasonable batch's and die-cut to R5's dome shape and also offer sample's.

So this could also be a thing. Just waiting for free samples to come through to see which type would be best.

SCI-FI Scarborough 2018

One day I'll hopefully be able to make the trip up to sunny Scarborough,
but for now, it will be attended by other Club members.


Scarborough Sci-fi 2018

The R2-D2 Builders Club will be in the Ocean Room.
Scarborough Sci-fi 2018, uk r2d2 builders club

There will be as mentioned above, some 'special' droids in attendance!

April 16, 2018

A Patch for R5-D4 - Final Design

So here is my finished design (still pending manufacture approval lol).

Previous post on designs for a R5-D4 Patch.

As R5's dome is white, I decided to fill it with the iconic scene. It's a bit different to the other designs, but I felt this worked better.

I've posted this up on Astromech.net & Astromech.info (the UK forum, both you have to be signed up on) & also on my Facebook page James' R5-D4.

R5-D4

I have a few more designs for other R5 droids from the films,
which if this is successful I would consider doing as well.

April 13, 2018

3D files now on Thingiverse

Decided that I really needed an online 3D storage facility
.....lol,

Ok, it's really just a page on Thingiverse

I will also post up the lever linkages for the motivator, just in case anyone wants to use it.

..........though you'll have to wait 24hrs (as I'm a new users)

Smoke system tutorial - Part 2 Assembly

Here is my 'How-to' for assembling R5's e-Cig smoke system.

I've created this in picture format, so that it can be easily downloaded (if needed to be) & is therefore easy to save & print off. I've not included the bracket in this layout. The pump and additional electrics, I'll do separately as it is a lot of info to diagram up.


All the info is contained on the guide.

Including a text link to the 3D printable collar.


r5d4, bad motivator, smoke system, e-cig


Here's the link to my Thingiverse page, though you'll have to wait 24hrs (for new users)


This is the easy part, I'm still drawing up a wiring diagram for the relay timers,
voltage regulator & remote control side of the system.
Will post his up next week.

This info will also go up on my Blog on

April 11, 2018

Smoke system tutorial - Part 1 introduction

As with most of my Blog, the assumption is that you the reader don't want to read about 'how long I held this in position for' or 'how tight to tighten a bolt'. Most of it is common sense. And I hope I post enough photo's to 'fill in the blanks'.

I have been asked on my Facebook page tho about my latest upgrade of R5's smoke system. So I hope this will explain the work I have done. First tho, a bit of history about how I developed this idea to this stage.

E-Cig Mod: Smoke system info can be found all over the internet and e-Cig hacked/mod for 'fog machines' are plenty. I found videos on YouTube, for Ghostbuster's backpack venting systems, and this gave me the idea to build R5's original smoke system.
This was my first test & it worked great
Link to my You Tube channel showing my first smoke tests.

The problem is the soldering of the wires to the middle contact,

without blocking the hole to allow air through.
The blown wire has to be soldered onto the centre pin,
without blocking the hole with solder
Then you have to file the outside of the atomiser to get bare metal to be able to solder on the negative wire (blue in picture above). But as you can see, the inside still needs to have a tube to cover all of this to channel the air flow.

I managed this, but struggled as the solder joints would break contact, and the unit would of been sealed with hot glue to help the pumped air through the atomiser.

One problem also is that all this is then a fixed item! It you wanted to refill the unit, you had to disconnect wires from the supply etc.

After over a year of not having any smoke, due to the disappointment of it not working after attempts to fix it, I decided to read up a bit more and try a new way to connect everything up. This is not the difinitive way to do this as I'm a novice at e-Cig stuff, but this is how I got mine to work and it's also a LOT easier to assemble, and use/refill the atomiser.

Check out my next post on how I assembled everything, coming soon:
'Smoke system tutorial - Part 2 Assembly'

April 09, 2018

Optimus Comic Con 3 - Bristol (UK) - Event Report

Sunday April 8th, was us attending Optimus Bristol Comic Con.

This was my first time attending and joined Paul, who's a vet of these events now lol. Rob joined us for his first event, driving up from down South. We all arrived about 8:30am and were told to just find a free spot to set up.
Lined up ready for the day ahead
We were helped by Paul's lovely wife & his daughter and son-in-law, thanks 😊.

The Passenger Shed is quite a large venue, there was lots going on, 'Movie Cars', coplay competition etc. Stalls, arcade area, an inflatable Stay-puff man lol.

Was great to see a few familiar faces, thanks to Mel for this pic of us lol
Optimus, R2D2, R5D4

We drove the droids around the event and stopped by the signings.

Whilst waiting around and chatting, actor/director Robert Cavanah, came over to chat to us about the droids. This event was his first attending a signing. After a good 10-15 mins chatting about some of his work, he asked if he could have his picture taken with R2 & R5.
These were taken on his phone, so when he's able to send me them, I'll post them up.

R2D2
Paul checking out some tunes on his R2 portable walkman lol
The day was a very busy one, and things only started to quiet down around 4pm'ish. The event finished up at 5 and so we packed up and loaded up the cars.

Home in 20mins, now that's a first for an event for me lol.

April 06, 2018

A Patch for R5-D4

Back in February (7.2.18) I actually started on designs for a patch for R5-D4. I've been thinking about creating a patch for a few years, basically since researching info for building him. There's loads of patches for R2-D2, as well as him being included in other club logos.
But hardly anything at all for R5 😢.

I did some early designs, but wasn't happy with them, and of course the cost of getting them produced was also daunting. Spending money on a minimum quantity only for no one to actually want one 😄.... so I put the idea back on hold 😄.

Well, with the Clubs 2018 patch announced the end of last year, I got to re-thinking again about doing a patch. I've got two ideas, one for R5 and another special idea....


Here's a few of my design ideas
that didn't make the final design.
But these did lead onto the final design, which is a combination of these....

April update....
.....I've decided on a design, next up is finding a suitable company to bring my design to life. Then, once I get round to getting them made, will post up pictures.

Optic 6 Transmitter - modified with a hand strap

When holding the transmitter down by my side, was giving me cramp in my hand from trying to grip the transmitter & steering R5 with my thumb. I do this to hide it whilst walking around at event's, so as not to spoil the illusion of who's controlling him.

I do have a neck strap attached to the transmitter, that I loop and wrap around my wrist, but this is only a safety thing so I don't drop it if it get's knocked. It doesn't offer any support to actually holding the transmitter.

So I looked on eBay for a strap of some sort.
I found two types, one that would clip onto the centre neck point and loop round your wrist or a SLR camera hand strap. The first one would just the same as what I had already, so I bought the SLR hand strap.

I already had some strap fixing loops from a previous project, my droid callers. So I dug out my nuts and bolts box and found two washers for inside the casing.
 Just need to re-fit the two grey side covers.


Then it was just a case of drilling one hole, as there was already a switch hole not being used in just the right spot. Fitting the nut/washer/locking split nut through these holes and adjusting so the rear case will close.

It feels a lot better tho the proof will be this Sunday
at R5's next event Optimus Comic Con in my home City of Bristol.

April 05, 2018

R5-D4 - Bad Motivator system upgrade 1.6

It's been a while since my last update, but I have been busy.

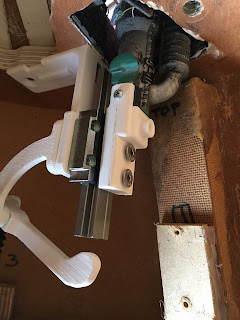
I've drilled and tapped the slide so that the 'motivator' can be bolted onto it. The 3D printed adaptor, just needs some silver or black paint to blend it in.
R5-D4 Bad Motivator, R5-D4, Bad Motivator
R5-D4's pop-up motivator

I did a test fire of the pop-up of the motivator and it actually got fired right out of the pie hole.....!! I caught it tho. May have to do a video for that lol.


Next up was sorting out the contacts for the e-cig smoke unit. I tried to disassemble it to connect up more thicker wire, but this proved a waste of time as the soldering just wouldn't take to the aluminium of the contact. So I ordered two new components that I hope I can work with and these will then sort this out. I'll just need to design and print off a bracket for this to locate inside the dome.

With all the 3D printed stuff for the motivator pop-up system, the electronics control board was looking a bit naff.... So I drew up a simple'ish board (picture below) that all the components could be fitted onto. I next drew up a bracket so that this could be fitted to the inside of R5's dome.
R5-D4 Bad Motivator, R5-D4, Bad Motivator
electronics control board
I designed raised pads for the screws used on the remote board & voltage regulator boards.
The digital readout's have a rear wall around the rectangular holes for a tight fit.
The two orange units are the time delay units, these are just tight fit's into place.

I later installed two status LED's along with a mini switch to help show power and 'power on'. The reason for these is that the board only 'lights-up' when in use and the switch helps if I need to actually turn the motivator system off. Am also waiting for a second digital volt meter, as I couldn't find a spare one in my electronics stash.

With the new board, I needed to also draw up a bracket to hold the smoke pump in place.
So I drew this up...

I made the internal diameters smaller so that they would grip the pump tightly.

Once I've installed the second digital readout, I can then arrange where this is all going to fit.