Showing posts with label actuator (solenoid) door opener. Show all posts

March 20, 2022

R5-D4's Bad Motivator system 2021 - Part 1.3

June 2021
Decided (last month May) that I was going to be the start of getting R5's
'Bad Motivator'
…….back installed again.

It all started waaaaay back in 2019 (part 1.0)........


....the door actuator needed replacing...... again!

The following past Blog links:
The design's were all from my early days of 3D designing components, so they needed some slight modifications and alterations for printing on my Tevo printer.

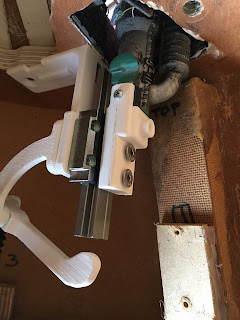
This new idea is to combine all the components onto the one assembly bracket, which is secured to the inside of the dome.

The solenoid holder needed a few changes, but the knowledge I have gained meant that the design itself was sound.

The bracket which supports the motivator and rail, had a notch in it from an earlier design. This I could use as a location point for the solenoid support bracket.

One thing I did have to change was the pivot position on the bracket arm. The solenoid activates in the pull position when powered on.
*****************************

The electricals needed re-doing as I will also be replacing the original 4 channel remote control with a two channel one.
This will operate the original Bad Motivator pop actuation, smoke/vape system....... and new for 2021.... (if all goes well)..... an amplifier/speaker/sound card to play the sound effects!

…..March 2022, thought I had posted this up last year 😂

May 13, 2019

Bad motivator actuation upgrade 1.2 (2019)

I did some design changes and re-printed off a new holder.

This one fitted much better all round. I had made slots in the inside top face , but I hadn't made them wide enough to allow the crimped edges to fit. Also the clearance hole in the top, didn't clear the shaft enough. It didn't need to be so close a fit.


Next I needed to add a new joining pivot piece similar to the previous one which came fitted on the door actuator itself.
Hopefully I’ll get time to test fit this. I’ve included a hole to fit a locking pin through.

April 28, 2019

Bad motivator actuation upgrade 1.1 (2019)

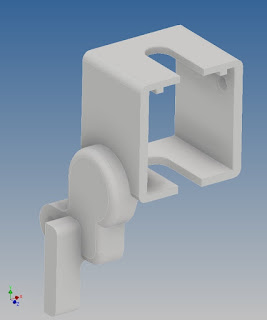
Drew up a holder in AutoCAD Inventor and printed off a sample.
This was slightly tighter than it should of been, on the inside faces,
so increased some of the dimensions to allow for a better fit.

Here's the CAD model images.
bad motivator, r5d4, 3D
 New magnetic actuator holder
bad motivator, r5d4, 3D

This new holder, is designed to fit onto the exsisting bracket.

If this works, then I may look at 3D printing this all as one piece.
But for testing and speed, it's just an add on for now.

April 25, 2019

Bad motivator actuation upgrade 1.0 (2019)

With the electronics being worked on, another thing that needed replacing due to issues, was the door actuator that makes the ‘Bad Motivator’ pop up.

I bought ages ago a magnetic activated piston, as something to try. In testing it works great, but I still need to actually connect it up to the motivator movement arm.
So am back in CAD drawing up things in 3D, to then be printed.
Am looking at the idea of an attachement to this original arm.

April 05, 2018

R5-D4 - Bad Motivator system upgrade 1.6

It's been a while since my last update, but I have been busy.

I've drilled and tapped the slide so that the 'motivator' can be bolted onto it. The 3D printed adaptor, just needs some silver or black paint to blend it in.
R5-D4 Bad Motivator, R5-D4, Bad Motivator
R5-D4's pop-up motivator

I did a test fire of the pop-up of the motivator and it actually got fired right out of the pie hole.....!! I caught it tho. May have to do a video for that lol.


Next up was sorting out the contacts for the e-cig smoke unit. I tried to disassemble it to connect up more thicker wire, but this proved a waste of time as the soldering just wouldn't take to the aluminium of the contact. So I ordered two new components that I hope I can work with and these will then sort this out. I'll just need to design and print off a bracket for this to locate inside the dome.

With all the 3D printed stuff for the motivator pop-up system, the electronics control board was looking a bit naff.... So I drew up a simple'ish board (picture below) that all the components could be fitted onto. I next drew up a bracket so that this could be fitted to the inside of R5's dome.
R5-D4 Bad Motivator, R5-D4, Bad Motivator
electronics control board
I designed raised pads for the screws used on the remote board & voltage regulator boards.
The digital readout's have a rear wall around the rectangular holes for a tight fit.
The two orange units are the time delay units, these are just tight fit's into place.

I later installed two status LED's along with a mini switch to help show power and 'power on'. The reason for these is that the board only 'lights-up' when in use and the switch helps if I need to actually turn the motivator system off. Am also waiting for a second digital volt meter, as I couldn't find a spare one in my electronics stash.

With the new board, I needed to also draw up a bracket to hold the smoke pump in place.
So I drew this up...

I made the internal diameters smaller so that they would grip the pump tightly.

Once I've installed the second digital readout, I can then arrange where this is all going to fit.

March 16, 2018

R5-D4 - Bad Motivator system upgrade 1.5

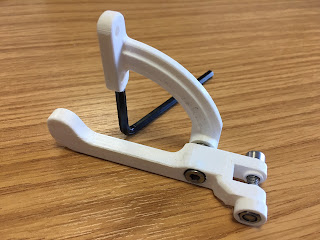
So it was back to re-designing the pivot arm and linkage points.

I first used a piece of cardboard to gauge the distance after I took photos of the gaps that the pivot arm would need to be extended by.

I then redrew these up in work on Inventor. I countersunk the nut so that it looked good lol, no other reason other than the length of the bolt. Both parts seen in picture one were then reprinted in 3D PLA filament.


Recessing the nut, just makes fitting easier. It's a push fit into the recess, so is help tight.

Next up is the electronics, electrical & the smoke system to be re-installed. This will be next week as this weekend I'll be at the NEC Birmingham.

March 09, 2018

R5-D4 - Bad Motivator system upgrade 1.4

After printing out the actuator bracket re-design, I found out that I actually had less space than I thought and that the rear of the actuator was interfering with the inside of the dome, so not allowing it to sit in it's needed position.

Next problem was that in order to achieve clearance, I needed extra height (see pic above). Unfortunately tho, the longer version was TOO long (or high) for my mini desktop 3D printer.

So I had a thought and swapped the actuator bracket's location to the other side of the motivator opening. This meant a re-design, again, of the 'bell crank' component.

Am getting the hang of the clearances needed to make things a nice fit. I countersunk the hex hole for the lock nut into the component.

Well, the new position for the actuator fits, but is now at an angle that won't work.....

So looks like it's back to the drawing board (CAD) to look at another way to activate the motivator.

~~~

Next idea was to just mount the actuator directly below the IGUS slide to push/pull the motivator unit. But where to fix it tho. Idea was to mount the bracket to on of the internal wood frame supports.
So I drew up this bracket.
The next thing once this is fitted is to design up the linkage from the actuator to the IGUS slide.

March 05, 2018

R5-D4 - Bad Motivator system upgrade 1.3

Ive had to do a few more re-designs on the motivator's activator bracket & pivot pieces. This is all new to me and although I sort of know the basics, a linear piston movement connected to a pivoting 'bell crank', didn't go the way I thought it would lol.

I decided to change the bracket for the pivoting bell crank, by making it a separate item. This means the actuator bracket can now be placed independently, maybe until I know where it should actual go lol

Downloaded the IGUS slide an assembled it onto the bracket. Along with nut, bolt and washer. Re-designed bell crank as well.


I found a supplier for the IGUS t-track and the price wasn't bad. I just now need to sort out the location bracket for the actuator.

February 26, 2018

R5-D4 - Bad Motivator system upgrade 1.1

More redesign work has been done on getting the bracket into the right place, to allow the Motivator to sit low enough in the dome and also for the sliding track to be able to fit and slide as well.

I've also flipped the bracket's location to the other side of the pie hole.
Waaaaaaay back when I first made and fitted my motivator, the installation was just bolted onto an aluminium plate, with two M8 bolts holding the plate to the inside of the dome, via T-nuts.
 This was a test fit, before cutting out the rest of the Pie hole.

 The view of the aluminium plate from the inside of the dome.

The Motivator pop-up system was installed on one side so that there was room for the actuator bracket movement to have enough reach.
The plan is to do away with all this aluminium and make things simpler.

So after a few design and re-design ideas, length changes etc. I think I've now got the bracket right.... still a work in progress, but getting there.
Next is to re-design the actuator bracket and then the motivator adapter to connect it to the rail.

May 09, 2016

Bad Motivator - electronics/electrical work UPDATE 2

So Saturday I set up the electrics so I could easily work on them outside of R5's body.
excuse the hanging regulator, [mid left] this was just a wired up to test
I tested the new regulator and the bad motivator board worked.

Then I connected up the slip ring into the circuit, all good still.

Next, I connected up the door actuator ......and it didn't work properly!

Then realised I was using the old one.....so swapped it for the new one and, YES, it works. No fluttering! So I now know the old actuator is broke, cause tho??? We'll see how long this new one lasts.

~~~

Sunday I fitted R5's dome onto his body and re-tested everything.

Test one, motivator and smoke system work perfectly.
Test two, again, all works.
Test three......smoke yes, actuator not so great!?!?!

It activated and moved a little, but then stopped, not completing it's full travel.
And it also felt warm, need to look into this further.....

April 20, 2016

Bad Motivator - electronics/electrical work UPDATE

Fitted the XT60 fly lead and plug into R5's dome, then looked at the Motivator electrical system.

When testing the Bad Motivator system, connected to the main body power supply, the actuator's actions were 'pulsing/twitching' as if struggling to get enough power. So I disconnected the actuator and locked the Motivator in the 'blown' popped up position for events. I was baffled and a bit disappointed.....

This is the simple layout of the system:

After some thought, I deduced that the only thing different in the system when connected to R5's main electrical system was the Voltage regulator.

This is a 'switching' type, so no heat build up. This type is obviously fine with LED's, amps etc, but the 'switching' circuit [I believe] is the cause of the actuator's 'pulsing/twitching' problems.

So I've bought a 'normal' voltage regulator [like every one else does] to test out my theory.
Just waiting for it to arrive.....

October 09, 2015

R5 really does have a 'Bad Motivator'....?

For the life of me I can't remember if I've actually tested R5's 'Bad Motivator' whilst his head has been connected to his body??? I've bench tested it wired direct to a 12 volt 12ah battery and everything works fine.

But the other night, whilst connecting everything up and testing, I noticed & heard that the actuator was making a hell of a racket and wasn't able to pop, like it did on test??

The smoke system is fine, but no 'pop'. Bench tested and all's ok!?!?!

The wiring hasn't changed and all's ok there.......so I'll need to look at this again. But don't have time at mo, with having to redo the 12 channel board and prep R5 ready for Saturday [loading Friday night].

For now, I've locked the Motivator in the up position & disconnected it's power. He will still have smoke and sound, so all good there :)

July 17, 2015

'Bad Motivator' - upgrade to power lift 'Blown' status 2.0 [You-Tube]

So I was happy that the pop-up motivator system working, but not really with them ended both at the same time. As, well, in the film, after the smoke stops pouring out of R5,
his motivator is still in the UP position.


So I ordered another timer relay (that was delivered super quick) and wired this up to the motivator's actuator. With the intention of having different switch off times.


So the smoke and sound ends (once sound is wired up) and then after a while the motivator operation ends and drops back down. Sound sample was added to video for effect.

July 14, 2015

'Bad Motivator' - upgrade to power lift 'Blown' status 1.9 [You-Tube]

.......sorted out the Motivator to lower back down after being activated......here's a VERY short video.

I fitted a simple rubber band to the actuator, so retract the motivator after the power switches off.
R5D4, Bad Motivator

The noise from the pump vibrating on the inside of the wood dome, was a bit to loud for my liking, regardless of the fact that at an event you probably wouldn't hear it! So I uncliped the cable tie and cut up some foam, wrapped it round the pump and tied it back into place. This is now a lot quieter!
R5D4, smoke, bad motivator
It may not look pretty, but it does the job lol.

I have another small addition for the electrics to make things look and act how I'd really like.......

July 13, 2015

'Bad Motivator' - upgrade to power lift 'Blown' status 1.8 [You-Tube]

Installation Time!

Got home last night and started on fixing the electronics board into position. But soon realised that this position was not a good idea! Do to the material being screwed to was flexing and moving the outer skin. So back to the drawing board.

Whilst looking inside the dome, it came to me to just make a bracket and secure the board to the inside roof, like everything else lol

So in work this morning, I got to cut up an angle strip of Aluminium and drilled location and fixing holes into it. This can now be fitted and all wired up!

So on Saturday, I fitted the bracket to the inside roof of dome. Then attached bad motivator board to the bracket. Had to do some power re-wiring inside R5 to sort 12 volt power to board, then using multimeter, adjusted the voltage regulator to 6 volts. Topped up the e-Cig unit with some more fog juice and here's the first test video in action.

There was a bit of wind when I video'd hence the gaps in the fog showing.

I'll adjust the timer once the sound is sorted. Next is to wire up the actuator to pop up the motivator.

July 09, 2015

'Bad Motivator' - upgrade to power lift 'Blown' status 1.7

Last night I trimmed board down the board so it can fit in this position. Will have to reposition the timer relay.
Bad Motivator, R5D4Bad Motivator, R5D4


Dome wires previously set up for individual power of lights, motivator and smoke....not now required, so I could use these for other things (???) Only the 12 volt feed is needed to then be distributed to motivator and smoke via dome board.

'Bad Motivator' - upgrade to power lift 'Blown' status 1.6 [You-Tube]

Not had much time to work on this recently, but got back onto Monday.

I'd found a suitable piece of MDF that I could mount the components onto. I then did a bit of re-cutting of wires (see prev post pic) to shorten them to better fit the board and layout of them all.

Once layed out, I marked and drilled securing holes and fixed down with mini cable ties.
Not very pretty, but necessary.
R5D4, Bad Motivator

And here's the test video showing the timer relay in action. I connected an LED to the 12 volt output to show power, the voltage regulator has it's own LED power indicator already.


I just need to add some labels to identify what power and where wires go where lol.

Next is to test connect up to the Dome and the Bad Motivator & Smoke system to test for real!!

July 02, 2015

'Bad Motivator' - upgrade to power lift 'Blown' status 1.5

Components arrived at the weekend, sooner than I'd expected lol. But wasn't able to try them out till Tuesday.

As always the instructions for at least one components wiring diagram are......well, inaccurate......would be putting it mildly! lol. A black& white picture, no colour identities, component picture doesn't actually match the component! But it didn't take long to sort.

So this is the plan for connecting it all up.
R5D4, Motivator, Bad Motivator

And here's it all wired up for testing, using an LED as the motivator/smoke side of things.
The cigarette plug, connects to the 12v power adaptor.

And here it is again, this time with the voltage regulator fitted. Again, this is just a test fitting.
R5D4, Bad Motivator
The voltage regulator will be connected up to the smoke system (pump & E-Cig) as this runs at 6 volts. There will be another connection to link up to the 12 volt to the door actuator to activate the Motivator.

The remote triggers the circuit, which activates the timer relay, sending power to the motivator and smoke system. After the set time, the timer switches off and system deactivates. There is a bonus fail safe in that another button has to be pressed to reset the first button......well it's a bonus for now....lol

June 26, 2015

'Bad Motivator' - upgrade to power lift 'Blown' status 1.4

OK, so I got round to planning how to operate R5's pop-up motivator and also to trigger the smoke system.
  • activate motivator to pop-up
  • activate sound of blown motivator via the Adafruit Audio FX board
  • activate smoke system.
I want the three things to work at once from one button. Originally my idea was to use the 12 channel remote unit I had for R5's sounds, but the one I have/had was faulty and so I gave it a .......'vote of no confidence'......lol.

As I'm still working on a budget, I searched eBay for suitable (& cheap) components. If they work, great, if they don't then the price goes up.

Found a four button remote control unit, and a timer switch relay unit.
R5D4, Bad Motivator

R5D4, Bad Motivator
The remote & the switch timer relay only cost £8 each.

October 03, 2014

'Bad Motivator' - upgrade to power lift 'Blown' status 1.2

Tuesday 30th Sept.
Almost finished making the frame/support bracket to hold the door look actuator (solenoid) with. The unit will be secured with two screws to the inside of the dome.

Some thought went into this build (the very basic idea of what I wanted) and some bits weren't lol. As this build was mostly guessed on the fly, I kid you not lol. As I need to figure out if I'll be able to screw in one of the mounting screws, as its partially obscured by the actuator (solenoid) lol. I had to move the actuator over as the top angles securing bolt was in the way.

I wanted to make the bracket(s) as light as posible, so I weighed one before I took it into work and machined off excess material.
R5D4 bad motivator
I didn't get the chance to weigh the brackets after machining, but we'll assume they are now lighter lol.

Friday 3rd Oct.
Well here's some pics of what the whole thing looks like installed. Oh yeah, re: how I was going to fix the actuator's bracket in place....I marked and screwed it down first, then screwed the two securing screws for the actuator into place. These were not so difficult to reach, phew... :)
R5D4 Bad Motivator

R5D4 Bad Motivator

R5D4 Bad Motivator

I've jet to wire up to power, but test moving by hand, I think it will work OK.....