June 26, 2015

'Bad Motivator' - upgrade to power lift 'Blown' status 1.4

OK, so I got round to planning how to operate R5's pop-up motivator and also to trigger the smoke system.
  • activate motivator to pop-up
  • activate sound of blown motivator via the Adafruit Audio FX board
  • activate smoke system.
I want the three things to work at once from one button. Originally my idea was to use the 12 channel remote unit I had for R5's sounds, but the one I have/had was faulty and so I gave it a .......'vote of no confidence'......lol.

As I'm still working on a budget, I searched eBay for suitable (& cheap) components. If they work, great, if they don't then the price goes up.

Found a four button remote control unit, and a timer switch relay unit.
R5D4, Bad Motivator

R5D4, Bad Motivator
The remote & the switch timer relay only cost £8 each.

June 19, 2015

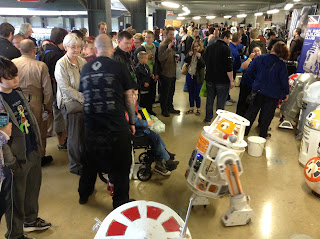
Collectormania 23 Milton Keynes - Event Report

Had a great time on Saturday!

R5 had been loaded up into the rear of the car the night before, so the early morning start was all i had to deal with. Due to changes beyond our builders Group's control, we (the displayee's) only found out that we also had to pay entrance to the event for attending before 11am! After this time entrance is free!

So 5am I was up, and out the door by 5:30am. It wasn't long tho that roadworks and bad weather slowed my journey, so arriving almost an hour later than I'd planned. Then due to parking and the rain, two long walk trips were required to get R5 inside un-wet lol.

Once inside I saw lots of familiar group faces from MK Garrison, Mark and his collection of droids and members of The Joker Squad, before arriving at our club stand. There I found new faces and droids that I've only met on the group forum. Brad, Colin, Mat to name a few. James from X-Robots was there with his BB8 droid & his 3D printed Astromech Droid, check out his VBlog here.


Collectormania 23, UK R2 Builders, R5D4

More members of the club arrived to see the droid's and say hi throughout the morning.

Here are the pics...
Collectormania 23, UK R2 Builders, R5D4, James X Robots

Collectormania 23, UK R2 Builders, R5D4 Collectormania 23, UK R2 Builders, R5D4

Collectormania 23, UK R2 Builders

Collectormania 23, UK R2 Builders

Collectormania 23, UK R2 Builders

Collectormania 23, UK R2 Builders

Due to unforeseen circumstances, R5 was asked if he could 'stand-in' for the other droid that was now not available, for the opening part of a Cosplay best costume competition!
Collectormania 23, UK R2 Builders, R5D4
Here R5 was interviewed about if he was having fun etc lol,
where he replied with beeps & whistles lol. Lasted about 5mins :)

Brad with his R2 unit was interviewed also about the Club.
Collectormania 23 - UK R2 Builders

The crowds were kept entertained by the Droids, kids and grown-up's alike, pictures, videos, selfies lol. Lot's of questions were asked about build materials, costs, time and energy. Hopefully a lot of people were encouraged to join up and start a journey to build their own droid.
The crowds started to thin about about 3/4pm, but this just meant more people could then ask questions and some of the droids could 'play' lol.

We called it a day just before 6pm and we all headed back to our cars to load up droids.
This pic was taken by Colin lol.....
R5D4, Collectormania 23
Then it was a not so long drive home.

Another great day spent doing what we enjoy doing,
bringing a small part of Star Wars to life.

Check out R5's Facebook page & twitter feed

June 18, 2015

R5's to visit my old Primary School's Summer Fair

Earlier this year, I was chatting with an ex-pupil from our Primary School,
about when this years Summer Fair was.
As I'd missed it last year and it turned out to be a bit of a mini reunion of sorts.
I've always wanted to be able to help the school out somehow &had a light bulb moment lol. So as I wasn't able to attend my own kids Summer Fair with him,
I'll be taking R5 along to entertain the kids at this one :)

June 17, 2015

'Bad Motivator' - upgrade to power lift 'Blown' status 1.3 [You Tube]

last update was September last year:
'Bad Motivator' - upgrade to power lift 'Blown' status 1.2

Last night I thought I'd re-look at how to activate the unit. I had already applied lithium grease to the sliding rods as previously they would bind up and not move smoothly. They do now though.

So connected up some cable to the door actuator and then turned R5 head upright. Then to test I just touched the 12v battery contacts and pop, up goes the motivator! At present, it falls back down inside his head under its own weight, once power is removed from the actuator.

Due to the tight pie hole opening, sometimes the motivator doesn't drop back down fully, so am thinking either a spring on the arm end to help retract or an electrical relay to reverse polarity and force the motivator to retract down inside his pie hole again.

June 12, 2015

Collectormania 23 Milton Keynes - 1 day to go!!


Only 1 more day to go to Collectormania 23.

Really looking forward to go as will get to meet up with fellow UK R2 Builders again. There are also a few other reasons, which I'll update with after the event.
It's going to be an very early start tomorrow morning, so R5 will be loaded up tonight.

I hope to be tweeting updates about the day on R5's Twitter account.

R5's Facebookpage will also get updates as well.

June 11, 2015

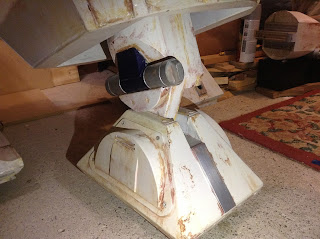
New Centre Leg - 1.7 - Installation

So last night I started to re-assemble all the components for R5's new centre leg.

  • First off was fitting the internal wheel platform into the foot shell.
  • Then the locking bolt through the angle & Leg & into the M5 thread in the other angle.
  • And next the M10 ankle bolt/locking washer/nut.
  • On went the two side panel, half moon details.
  • And finally, fitting the assemble up and into the bottom slot, where it was clamped with the two pieces of aluminium angle.


I did have to remove the cylinder holder to fit the wheel platform as the shell needs to move slightly to be able to fit the M10 bolt head into the shell. This is not a problem as the holder just pops snugly back in.


R5D4 Cannon centre leg fitted

R5D4 Cannon centre leg fitted

I've posted up on R5's Facebook page, the UK R2 Builders & the R2 Builders and have had good positive feed back, which coming from more experienced builders is great :)

One such comment was 'your the first to do this' !
Praise in deed, thanks.

June 10, 2015

New Centre Leg - 1.6 - White paint & Dirt

So here's the new centre leg all sprayed up in white with clear coat too.
Ankle cylinder unit and holder fitted in place too.
R5D4, Star Wars, r5d4, r5-d4, R5-D4
I did have a problem with fitting the cylinder holder, so had to trim some wood of it's inside curve edge. But it's not noticeable.

Next comes the weathering. This is the start so far.
R5D4
Paint it on, burnt umber, then allow to dry, before wiping off excess.

June 09, 2015

New Centre Leg - 1.5 - Primer & Bush

After some more sanding of filler. I next cut up a piece of 8mm dia dowell. This was instead of the planned two screws to hold on the cylinder holder. This way it can all be removed without damage to the cylinder. I actually only used one piece, not two, to allow it to pivot in fitting and removal, along with the cylinder. The previously drilled holes were filled with wood filler.
R5D4 Cannon centre leg

Later on, after some more sanding, I applied some grey primer. This helps to show up spots missed that need more wood filler lol. Not going for perfection mind as this goes towards the 'used' look of R5.

R5D4
-----
Also machined up a brass bush to push fit into the ankle hole. I included a washer style end to aid the extra piece of material I added for the thickness. To reduce any stress on it and prevent splitting.
R5D4R5D4

Next is white paint.......

June 08, 2015

Collectormania 23 - FIVE days to go!

Only a week to go before the UK R2 Builders will be attending Collectormania 23.


This year R5 will be attending on Saturday, joining lots of other astromechs! R2 Units of all types will be attending on both Saturday & Sunday, so don't forget to come and say hi and find out about the club first hand.


Check out the UK R2 Builders Club here. And follow on @UKR2builders@JamesR5D4

New Centre Leg - 1.4 - Cylinder work

So Friday night's I managed 2 hrs work, re-drilled cylinder location fixing holes. Happier with position now. Played with position of new leg in centre foot to get the right angle, clearance over the foot sheel. Trimmed down the curve edge of cylinder holder to better fit the width of the leg. Touched up with some more wood filler on the ankle curved area. Cut a spacer as centre leg ankle was actually a bit to thin for my foot channel. Marked location hole position for locking the leg inside body base.
R5D4R5D4

R5D4

Monday mornings work was to drill through the centre foot's ankle angle brackets for the locking bolt. I used a M5 hex socket bolt I had left over from the outher foot metal builds. This might seem easy but with limited free hands and no clamps available lol..... But I got it done. 

Next was the new set of two holes needed to clamp the L brackets onto the tongue that fit's up inside R5's body. I couldn't use the original holes drilled because they were 'special*' lol.
R5D4

Last was to cut off the excess material not now needed for securing the centre leg. I then drilled, glued and applied wood filler to the extra piece of wood to make up the correct width.

* and by 'special' I mean there was no way I would of been able to align these original holes lol

June 05, 2015

New Centre Leg - 1.3 - Ankle Cylinder

As only one or the other centre leg will ever be used at one time, I'm going to swap over one of the ankle cylinders to the new Centre Leg when in use. The wedge is already fitted to the cylinder, so I don't need to make a new one of these.
But I will need to make a new ankle cylinder holder. I have to make a new cylinder holder as the centre legs don't have these and the outer legs need the ones already fitted to them.


So I found a scrap piece of 18mm thick wood and shaped it to fit. Unlike the other holders [which are fixed to the cylinders] this one will be screwed onto the centre leg.


I marked hole positions onto the leg for the cylinder fixing dowels to push into.

R5D4 Cannon centre legR5D4 Cannon centre leg
 pictures of holes

R5D4 Cannon centre leg
picture of cylinder fitted position

I've done things this way so that the curved angle is right and matches up with the angle on the cylinder wedge.

Next is a brass bush for the bolt hole......

June 04, 2015

New Centre Leg - 1.2 - curved area

Started to shape the wood filler I had applied yesterday and trimmed off excess material.

Then after work, I applied more filler to the curved section and also all over to cover the visible wood grain and joins.
I needed to fill in some gaps with 8mm thick wood off cuts. These were wood glued into place and after wood filler was applied.
R5D4 centre legR5D4 centre leg

R5D4 centre legR5D4 centre leg
The angle still needs to be cut on this new piece, once the glue has fully dried.
Wood filler was then applied all over this to cover the wood grain, even though it won't be seen lol.

June 03, 2015

New Centre Leg - 1.1

So yesterday lunchtime I got on with cutting out wood. Though I didn't have any 8mm material available, so that had to wait till the evening.

Once home I got on with finishing off cutting the back pieces at the shorter length, and finding some spare 8mm thick material, made up the rest of the leg to correct'ish thickness.
R5D4, film accurate centre legR5D4, film accurate centre leg

Here you can see the pieces countersunk screwed together. The square edge on the left will be measured and cut to add extra stability to the centre foot location locking.

Next I unscrewed and started work on the curved ankle section, see next blog update soon.

New Centre Leg - Film Version 1.0

After a conversation in a post on astromech.net about R5-D4 and its 'authentic' look. This got me thinking about R5's centre leg. In 'the' scene he is seen rolling away from the Sand crawler when called by Luke, the sharp eyed people noticed that his centre leg, is in fact an outside lower leg section, with only one ankle cylinder!!

R5 is only seen a few times in the film, but due to technical issues there were different units used to film him. Two leg mode, a possible 3 leg static mode and the infamous mobile 3 leg 'bad motivator' mode.
Star Wars - ANH, R5D4R2D2, R5D4 & Luke

This picture below, you can just make out the centre leg is different.
R5D4

The following picture was created by club member Paul, based on the above screen image.
Check out more great work of Paul's here on his Twitter account.

So to make R5 as screen accurate as possible, which would be cool, I'll be making a new centre leg, with improved foot location and locking.

Slip-ring system 1.1

Slip-ring work, I paired up the wires and soldered them onto a 9 pin plug. Not used all the pins though. I figured by doubling up the wires it could/would help with current flow [what do I know though lol]. Thankfully my soldering skills held out and all went well. Finished off with heat shrink sleeving. Only took a few hours, of twisting and soldering up lol.
R5-D4 Dome power

R5D4 dome power

Next was soldering some wire to the Dome socket. Electrical cable was used, as I've used on the rest of R5's electrical system. The plugs were chosen as can only be plugged in one way, so can be done 'blind' if needed from inside the Dome. Obviously I'll be adding labels to everything, to help with remembering what wire does what.

The fixing bracket was made from some scrap computer 
insides bracket, this was screwed to the inside frame.

And here's the slip ring installed in R5.
R5D4