
Back in August 2020
After lots of design layout ideas, and 3D printing a special holder for the sound components. I decided to just go back to basics and use Perspex.....as I had found some spare. I still utilised the digital voltage meter holders & also the Dual Relay Switch holder, as these don't have there own fixing points.
I dug out all the old nuts and bolts previously used and thought.....naaaa, I don't like the look of them. So I drilled a hole and test fitted a threaded Brass insert. It worked! So positioned the components, marked and drilled holes......all except the sound board (as this requires M2 size thread fittings) and then using my soldering iron tip, melted into place the Brass inserts.

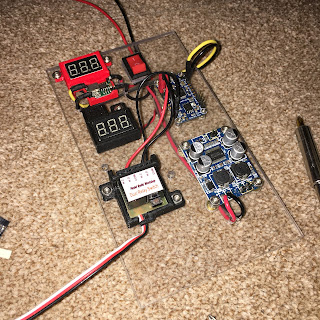
Next up was test fitting all the components on the perspex board.

Just waiting on the M2 thread fittings.....
I started routing and soldering the wiring next. I drilled holes to route the power wires behind the panel and to help identify the voltage, used yellow as positive for the Audio FX sound board as it uses a lower voltage than the amplifier.
The M2 inserts and bolts/screws arrived in a few days via eBay and where inserted into the rear of the board.
October 2020.....update
Got on with refitting the sound system. The extra perspex material has now been removed and a suitable location to mount it has been prioritised. A wood spacer block is needed to raise off the vertical frame support to allow the wires to fit behind. This new location is closer also to the 12v terminal distribution block.
I also fitted some of the new cable clamps I designed and 3D printed.
![new [yellow] cable clamps installed](https://blogger.googleusercontent.com/img/b/R29vZ2xl/AVvXsEj4777JvyLwKXlj10euqQOyYYAteDlCEUfa_eC3GqHQjOZ9lFbRSdNpzq58iypRHeroiVffnv0zJT_j9SeXiYBR0uGezIE4QdvEQiusi4cvja0Sd-rZG-RwrJrx01tupxFm2eJX524Dx1w/w200-h200/IMG_6272.JPG)
![new [yellow] cable clamps installed](https://blogger.googleusercontent.com/img/b/R29vZ2xl/AVvXsEj72TgDacBKBJEjssGu67_YT0BPilt9T12Qqg4lAOLbjIHPqyCMtSy_j39S2kX6LNxSv4ueXUGRCn_8R2E1ovoNctyu-OoSonrSbWaORH3EV3Htc38BkACsHHHdUyfMH_VQPzqI6HIE8bA/w200-h200/IMG_6273.JPG)
No comments:
Post a Comment