Just waiting of one more patch to arrive.
Droid Builder
Extra Projects & Event Page's
- Home
- Trading Card Dispenser (version 2) - TCD [2020/2022]
- Trading Cards
- R5-D4's ....Bad Motivator development
- R5-D4 - silver neck details
- R4-D4 - Dome [wood build]
- R0-D4 Dome [wood build]
- 3D Printing - Star Wars stuff
- *** Star Wars Shoes ***
- Event: Droids @Mshed Bristol 2026
- Event: Droids @Mshed Bristol 2025
- Event: Droids @Mshed Bristol 2024
- Event's 2018
- Event's 2017
- Event 2016 - "Celebration Europe"
- Event's 2015
- Event 2014 - Chippenham Sci-Fi
- R5-D4 - events page - The beginning (2013)
- ** R5-D4 patch **
- R5-D4 Photos
- Costume for my Son - Han Solo -
- Costume for my Son - Boba Fett
- Droid Caller - Han Solo style
- Scanning Crew Container - Transmitter Storage Box
- Stormtrooper - me
- Rogue One - trading card storage box
- Rogue One
- Jabba’s gate prop for Celebration 2023
- GOUD-4 Messenger Droid - Solo ASWS
- Treadwell Droid - WED-15-77
February 09, 2018
The official UK R2D2 Builders Club Patch
Needed to get the official Club's path for the rear of my fleece. Arrived in no time and it was soon stitched on.
February 06, 2018
UK R2D2 Builders Club - Patches
Decided the other day that with the arrival of my new 2018 Club patch, I should dig out the others and sow them onto my Club Fleece.
I just had to figure out where best to display them. So I went with the Celebration 2016 one above the Clubs logo, and the others down the right arm. I'm just waiting on two more to arrive, but for now, here's the ones I've stitched on.
Celebration Europe 2016
This event was won of the most enjoyable experiances, shared with great friends & My Son.
I do have an Orange 2018 Pinewood patch,
February 02, 2018
Jessika 'Testor' Pava - helmet - 2.5
Work done 19.6.2017
The inner 'ear' area, needed to be raised up to form a central pad area. so I glued in some cardboard to build this up and then applied filler to slope the edges.
To create the rear helmet details, I used Milliputty.
These are rough to start with.......
More updates on this project coming as need to redo some of the costume for my daughter.
Jessika 'Testor' Pava - helmet - 2.4
work done: 15.6.2017
Next up I started on re-doing the 'blast shield'. I'd already attempted this once, but wasn't happy with it, so decided to try again a different way. This is all new to me so I soon realised I had to think back words.... by this I mean that I make the shield, then make a cast of the shield, to then make it into a mold, just like the helmet.
Started off by making the shape using cardboard.
A few more layers of cardboard to make more rigid,
before applying fiber glass matt and resin.
Here is the first layer of fiber glass matt applied.
I added another layer on top of this to help strengthan.
Once this was dried I started to mix up and apply car body filler.
I ran out so this was all that was left in the tin.
pic....
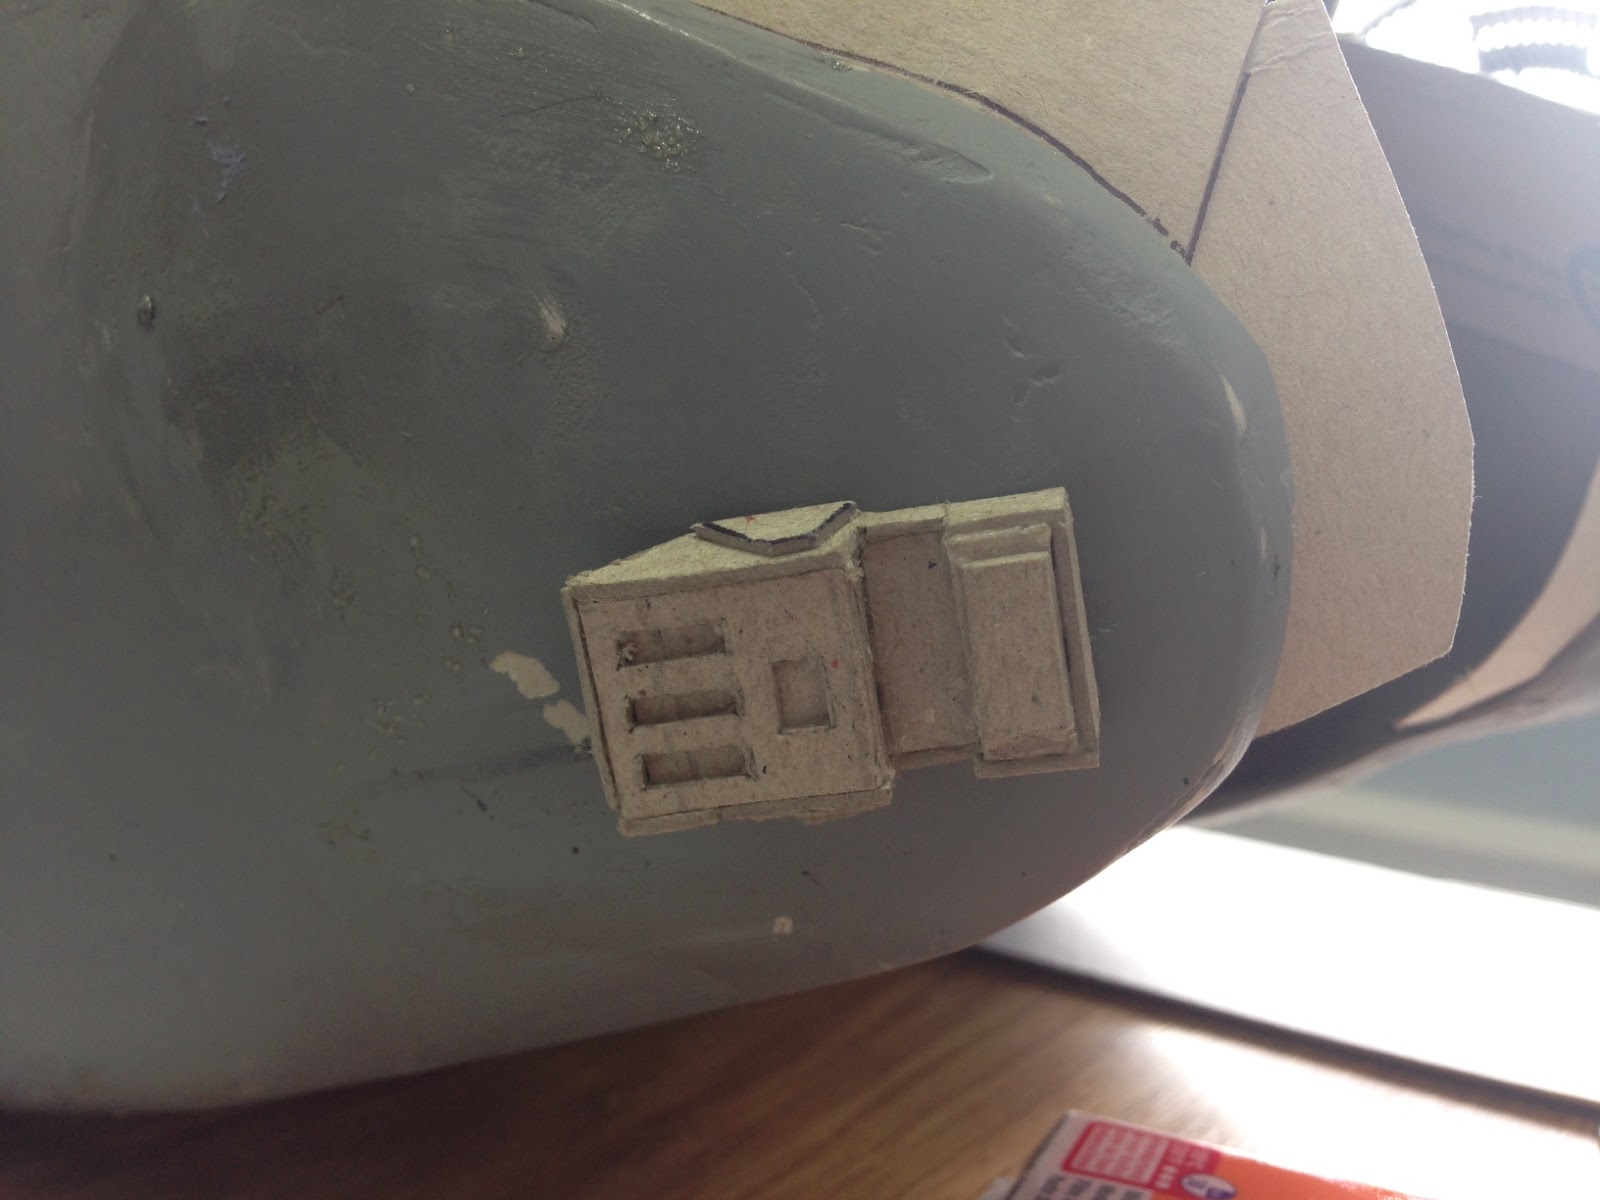
Whilst waiting, I started looking at the details that I could add to the helmet to be included in the actual casting of it. Rather than have to stick extra pieces on.
I started on the cheek detail (circled in yellow below)
Other's have done these, so there was plenty of ref pics to work with.
And this was the mocked up version...in cardboard.
And here it is glued into place
I still need to fill in the gaps etc and then seal it before applying primer etc.
But it's looking good, and after all, this is for my daughter so scale is not 100%
Jessika 'Testor' Pava - Flight suit 2.2
Work done last year 13.6.2017.....Thought these following post's had been posted
Usual busy family weekend stuff, but i was able to re-make a start on the blast shield. Using a hot glue gun to get started, i cut out and positioned roughly where the sides would go. Next was over the top strips, cross strips, followed by larger flatter pieces.
The start of the cardboard strip framework.
Next then was to start applying fiber glass and resin to form the base of the shield.
Resin applied to framework.
The plan is to create the shield, then make a silicone mold to then create a slush cast from it.
Subscribe to:
Posts (Atom)
