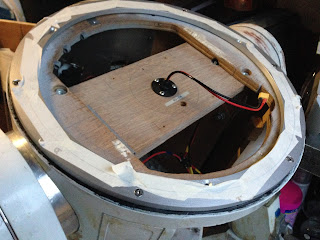
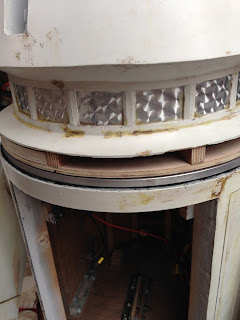
With the new dome lazy susan bearing soon to be permanently fitted in place, the sledge will also need an upgrade.
In order for the lower part of the sledge to be able to lift up R5, the top struts (seen in the above picture) need to be trimmed to accommodate the extra 10mm or so of the new bearing. So I marked up and then jigsawed off the extra material. These have insulation foam on as can be seen in the lower right part of the picture, to protect him in transport.
Due to the position of the dome location bolts, the length of the struts needed to be shortened as well.
Bottom strut has a pencil line for where to cut to length. The upper strut in the above pic had already been cut to new shorter length. The foam was then re-attached to the struts as well as the cross beam strengthening piece.
Droid Builder

Extra Projects & Event Page's
- Home
- Trading Card Dispenser (NEW version 3) - TCD [2020/2022]
- Trading Cards
- R5-D4's ....Bad Motivator development
- R5-D4 - silver neck details
- R4-D4 - Dome [wood build]
- R0-D4 Dome [wood build]
- 3D Printing
- *** Star Wars Shoes ***
- GOUD-4 Messenger Droid - Solo ASWS
- Event: Mshed Bristol 2025
- Event: Mshed Bristol 2024
- Event's 2018
- Event's 2017
- Event 2016 - "Celebration Europe"
- Event's 2015
- Event 2014 - Chippenham Sci-Fi
- R5-D4 - events page - The beginning (2013)
- ** R5-D4 patch **
- R5-D4 Photos
- Costume for my Son - Han Solo -
- Costume for my Son - Boba Fett
- Droid Caller - Han Solo style
- Scanning Crew Container - Transmitter Storage Box
- Stormtrooper - me
- Rogue One - trading card storage box
- Rogue One
- Jabba’s gate prop for Celebration 2023
- Treadwell Droid - WED-15-77
Showing posts with label lazy susan. Show all posts
Showing posts with label lazy susan. Show all posts
April 04, 2017
R5's dome rotation upgrade 1.5
Had no free time the other weekend, so I had to wait till Monday back at work.
Due to more limited time, I was only able to work on clearance hole clearance & using my dremel, to grind down the washers that were overhanging the bearing inner diameter.
This is just to make sure that the dome motor wheel has a flat surface.
This upgrade work involves a lot of multi-mini-projects lol. The electric upgrade, dome work, rotation/position of the lazy susan & next, the actual dome motor location and fixing.
I had thought about moving the motor to the front area of the body, so the wheel was at the top. But as I had already cut out an area, years ago in the build, for this position, I decided that here was just as good as anywhere else.
Next was how to mount it.....
I have a rear door stop on one of the vertical body struts, and it's in just the right position to mount the new motor spacer block. It will replace the original door stop at the same time. So I had to make up a new bracket for the motor/door stop, much more sturdier than the last bracket.
There was some thought in how to attach the bracket to the body frame, once the motor was attached to it, which prevented fixing it on afterwards.....lol, I don't make things easy for myself do I :D. The aluminium bracket fits to one side of the vertical internal frame, with a countersunk bolt and then a wing nut. This was the only way to secure, which was actually genius, as the wings stopped the nut from turning when the bolt was screwed into place!
Powered up the motor and the lazy susan ring spins great.
Update on the new lower dome metal ring to follow......
Due to more limited time, I was only able to work on clearance hole clearance & using my dremel, to grind down the washers that were overhanging the bearing inner diameter.
This is just to make sure that the dome motor wheel has a flat surface.
-----
This upgrade work involves a lot of multi-mini-projects lol. The electric upgrade, dome work, rotation/position of the lazy susan & next, the actual dome motor location and fixing.
I had thought about moving the motor to the front area of the body, so the wheel was at the top. But as I had already cut out an area, years ago in the build, for this position, I decided that here was just as good as anywhere else.
Next was how to mount it.....
I have a rear door stop on one of the vertical body struts, and it's in just the right position to mount the new motor spacer block. It will replace the original door stop at the same time. So I had to make up a new bracket for the motor/door stop, much more sturdier than the last bracket.
There was some thought in how to attach the bracket to the body frame, once the motor was attached to it, which prevented fixing it on afterwards.....lol, I don't make things easy for myself do I :D. The aluminium bracket fits to one side of the vertical internal frame, with a countersunk bolt and then a wing nut. This was the only way to secure, which was actually genius, as the wings stopped the nut from turning when the bolt was screwed into place!
Motor & bracket bolted into place.
Powered up the motor and the lazy susan ring spins great.
Update on the new lower dome metal ring to follow......
March 22, 2017
R5's dome rotation upgrade 1.4
More holes in the lazy susan [rockler style] bearing.
Took the bearing into work so I could use the piller drill.
I'd already marked where the holes should go, so after a pop with a centre point, I drilled out the holes needed to 4.5mm Dia. This is so the M5 threads bite a little when screwing them through the aluminium. The holes were countersunk, of course, to allow the bolts to sit flush.
Next was to line the bearing up again on the dome to mark the new hole positions. So removed the three new bolts, positioned the bearing back onto the dome ring and mark, and drill holes. Then two more strengthening blocks are screwed into place for the location bolts to sit in.
I've also found some mild steel sheet, strip to hopefully make the new dome lower skin.
More on this next time.....though time is ticking till the next upcoming event.....
March 20, 2017
R5's dome rotation upgrade 1.3 + (Banebot wheels)
Managed to do some more work on the new dome ring at the weekend.
Lots of thinking, marking, drilling......then re-thinking, bit more marking and yep....more drilling lol. Customising something to fit something else can be a pain the the a$$ lol.
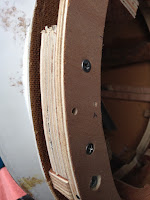
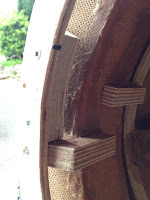
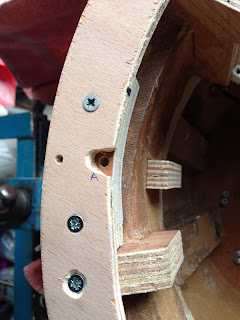
Marked up the bearing on the dome, for it's screw positions. Then made up two blocks that are screwed behind the new ring to add strength to the location points.
The 'A' is the location point to be drilled.
And here's the hole and the opening to accept the nylock nut which holds the screw onto the bearing race.
I had to make two of these as the third hole goes into one of the frame uprights.
This fit's great on the dome and the body.
But because the dome location holes were made 0.5mm bigger, there's slight movement. This may be rectified once the metal skin is added. But may need to add additional location bolt uprights. So far so good tho :)
Another plus was that my new dome motor wheels arrived.
Banebot 'blue' & 'orange' wheels, different hardness's. I wanted two blue ones as they have become as rare as Unicorn poo! But I literally had the last one in stock, so had to get the orange one. This wasn't a problem as the softer rubber may be better at gripping the lazy susan bearings inner ring.
Lots of thinking, marking, drilling......then re-thinking, bit more marking and yep....more drilling lol. Customising something to fit something else can be a pain the the a$$ lol.
Marked up the bearing on the dome, for it's screw positions. Then made up two blocks that are screwed behind the new ring to add strength to the location points.
The 'A' is the location point to be drilled.
And here's the hole and the opening to accept the nylock nut which holds the screw onto the bearing race.
I had to make two of these as the third hole goes into one of the frame uprights.
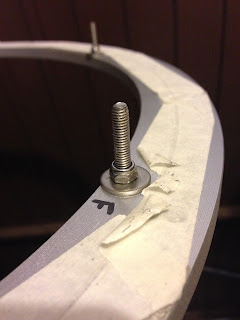
ring positioned and testing length of new securing bolts
This fit's great on the dome and the body.
But because the dome location holes were made 0.5mm bigger, there's slight movement. This may be rectified once the metal skin is added. But may need to add additional location bolt uprights. So far so good tho :)
Another plus was that my new dome motor wheels arrived.
Banebot 'blue' & 'orange' wheels, different hardness's. I wanted two blue ones as they have become as rare as Unicorn poo! But I literally had the last one in stock, so had to get the orange one. This wasn't a problem as the softer rubber may be better at gripping the lazy susan bearings inner ring.
Instagram picture of the wheels.
March 14, 2017
R5's dome rotation upgrade 1.2
Went to my local Wicke's store, material suppliers for Trade and people in the know lol. Cheaper prices than B&Q for example (UK).
Picked up a sheet of 9mm thick hardboard and got it home for measuring, marking and cutting.
The original base ring from the dome. Measured it up for marking new wood ring.
Diameters marked up and started cutting with jigsaw. Once cut came the 'test fitting' with it sat on the dome internal uprights. With the bearing sat on top.
I then marked up an inner circle that would allow the dome wheel to not make contact with the wood circle. This next pic also shows crews taped in place so I could line up the dome to sit centrally on R5's body.
And here's the test positioning picture, pre any holes being drilled.
After this was spent digging out washers for spacers, counter sunk bolts for the bearing etc. Which I found but weren't long enough, so these were ordered.
And here's the work so far. Picture taken for my Instagram 'james_r5d4'.
March 13, 2017
R5's dome rotation upgrade 1.0
I started to unscrew the lower base plate, and then remembered that the skin was pinned & so as much as I didn't want to do more work than I needed to, it meant that it had to be taken off.
Started by cutting the silver tape round the edge, then started to pry off the outer skin.
And here it is removed.
Saturday I picked up from the Post Office, my new 'lazy susan/rockler style' bearing. Wasn't expecting it to have steel bearing in tho.....
 |
 |
Here you can see the panel pin, that held the skin on.
And here it is removed.
Saturday I picked up from the Post Office, my new 'lazy susan/rockler style' bearing. Wasn't expecting it to have steel bearing in tho.....
March 10, 2017
R5's planned dome rotation upgrade 2017
The plan is to fit a lazy susan bearing, replacing the small central one. R5's dome wobbling days may soon be over. This will be a budget bearing race due to cost, but have read that these can be upgraded with some work to improve them, we'll see.
This is a BIG undertaking, as this was never considered as a do-able thing, due to the cost of the 'standard' Rockler bearings, used by R2 Builders (and the additional import costs).
But I've come to the conclusion that it is needed :(. This may mean a new way to power its movement by wheel as the Bane Bot wheel was no longer available from the UK supplier I'd previously bought it from (update: I've now found another supplier). It will mean a new position of the motor/wheel assembly to power the lazy susan.
Next up is a 'SyRen 10'. Found one on eBay for £40, bargin!
So am waiting for the lazy susan, and SyRen speed controller, before I can carry on with dome rotation system upgrade work, both should be here by the end of this week.
Subscribe to:
Posts (Atom)


