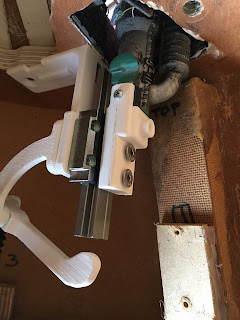
I've drilled and tapped the slide so that the 'motivator' can be bolted onto it. The 3D printed adaptor, just needs some silver or black paint to blend it in.
 |
| R5-D4's pop-up motivator |
I did a test fire of the pop-up of the motivator and it actually got fired right out of the pie hole.....!! I caught it tho. May have to do a video for that lol.
Next up was sorting out the contacts for the e-cig smoke unit. I tried to disassemble it to connect up more thicker wire, but this proved a waste of time as the soldering just wouldn't take to the aluminium of the contact. So I ordered two new components that I hope I can work with and these will then sort this out. I'll just need to design and print off a bracket for this to locate inside the dome.
With all the 3D printed stuff for the motivator pop-up system, the electronics control board was looking a bit naff.... So I drew up a simple'ish board (picture below) that all the components could be fitted onto. I next drew up a bracket so that this could be fitted to the inside of R5's dome.
 |
| electronics control board |
The digital readout's have a rear wall around the rectangular holes for a tight fit.
The two orange units are the time delay units, these are just tight fit's into place.
I later installed two status LED's along with a mini switch to help show power and 'power on'. The reason for these is that the board only 'lights-up' when in use and the switch helps if I need to actually turn the motivator system off. Am also waiting for a second digital volt meter, as I couldn't find a spare one in my electronics stash.
With the new board, I needed to also draw up a bracket to hold the smoke pump in place.
So I drew this up...
I made the internal diameters smaller so that they would grip the pump tightly.
Once I've installed the second digital readout, I can then arrange where this is all going to fit.

No comments:
Post a Comment