January 30, 2020

‘Trading Card Dispenser’ - Another mini project 2.0 - new support bracket design

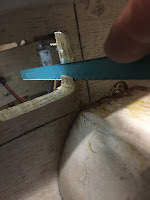
After test fitting the location to install the support bracket, I found that I needed to locate the box closer to the outside diameter of the body. This was because the distance the card is ejected, is almost the same distance that the bracket and dispenser is located inside the body.
trading card dispenser
 So I needed the dispenser to be this much further forward.

trading card dispenser


Without having to cut a slot in the body somewhere, I found a position behind the Utility arm. This required a redesign of the bracket locating points and also move the position it holds the card dispenser, further forward.
trading card dispenser
This is the new bracket (upside down view) as the supports were created using the conical enabled selection.

This bracket also needs a front, so that was the next item to draw up, more in next post.

January 25, 2020

Another mini project 1.9 - Trading Card Dispenser

Yesterday I uploaded the stl files and the assembly instructions to the UK builders club forum.
The components take a while to arrive so it will be a few weeks before I get any feedback. But as I’ve printed the same version, there shouldn’t be any problems lol.

The other fun part was creating instructions for 3D printing (orientation & support placement), assembly of the bought components and then fully assembling of the unit itself.
Created a PDF to be downloadable with simple instructions.

I finished printing my frame holder to fit into R5 so hoping to get this all installed and tested soon. There’s still work to be done with alignment etc, so more posts on this to come.

January 23, 2020

Another mini project 1.8 - 'Trading Card Dispenser'

So after a bit more fine tuning,
the TCD is now complete.


The TCD..... The 'Trading Card Dispenser'

I was still waiting for an electronic component to arrive in order to wire everything up to test it. It arrived and it wasn't what I was hoping for, so I'll have to revert back to my original electronics setup, not a big deal as this doesn't effect the actual dispenser being assembled or operated.

I've designed this as a self contained unit with it's own remote controller & timer delay off circuit, but it would also be able to be controlled via any momentary switch, Arduino etc. I'm not an Arduino guy, but from what I know this is possible.
The motor runs on 6v and would only need to run for a few seconds.

The unit comes in 4 parts, base (in red), plate (in blue), lid (in green) & a wheel adapter which fits onto the motor. (colour's are for identification only, not actual)

There are then 4 components required to be bought in order to fit and glue together to fully assemble. I'll post up this list and an assembly instruction PDF when files are released.

More updates soon.......

YB Illustration - R5 artwork & others


Over Christmas I found these fantastic artwork on Instagram
created by YB Illustration

R5-D4

As I visited the website, I found loads more Star Wars work.......
.........and more R5's lol

These are just some of my fav's....
R5-2JE
(From The Rise of Skywalker)

---


R5-232
(From Solo - a Star Wars Story)


For more and to follow, check out Instagram for @ybillustration

January 14, 2020

Another mini project 1.7 -‘Trading Card Dispenser’ - fine tuning

The axle worked, so have upgraded the component to include a support for it. Really pleased with this! I also slightly adjusted the wheel holder for a tighter fit of the rubber wheel. Next up was to the plate, the spring location holes needed a more snug fit and I also increased the height of the location walls to better secure and guide the springs from buckling when compressed.

Already started on a second design which kind of cancels out a lot of previous design work 😐 aaah well, these things happen when designing without having a clue how or what is the best way lol.

More updates and the release of this projects name, will be coming soon.

January 10, 2020

Electrical system update for 2020

R5’s original electrical system was set up as most are, with the purpose of general use etc. This is fine  but in R5’s case, I have to remove the rear hatch to power him on or off. This has grown to annoy me over the years lol.

So I’ve decided to make life easier by streamlining the electrical layout & re-positioning the switches to a more accessible location.

Below was the electrical board original position.
R5D4 astromech droid

I have already taken out the electrical board that was fitted to the crossbeam and uninstalled the components, Sabertooth speed controller, voltage reducer, distribution power block and switches.

Next up was to test fit the components to the side wall.
R5D4 astromech droid

The two switches are going to be relocated into the skirt recess. As the wood base is 18mm thick, I need to cut out a piece large enough for the main body of the switch to fit inside. And these will then be secured to a new blanking plate. In this case, a piece of Perspex.

I marked a position suitable and chain drilled holes for the opening.
R5D4 astromechR5D4 astromech droidR5D4 astromech droid

The last corner I had to grab a saw blade to trim it square.
R5D4 astromech droid

I made a start on cleaning up the edges. And as I had to finish up, made a template out of cardboard to get an idea of the size required.

Switch mounting plate:
I didn't want a piece of metal so I grabbed an off cut of perspex and using the cardboard template, marked and cut it to size. I then marked hole positions and drilled these too.

Here I test fitted one of the switches with the 'kill switch' cover.
R5D4 astromech droid

Happy to say that the skirt is deep enough not to be able to see the cover when it's in it's open position.

January 09, 2020

R5 gets a mention on Instagram

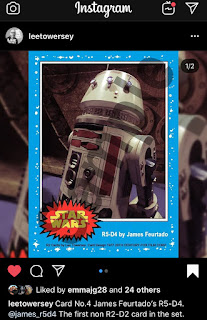
If your on Instagram & are into Star Wars, apart from following me lol, well R5 & all my other projects, you should also follow Lee Towersey (as well as a few other club members).

Lee has recently been posting up the Builders Clubs trading cards that he produced for cleared club droids.

Today is the turn of R5-D4.
Honoured and proud member of the UK R2 Builders Club 

January 08, 2020

Another mini project 1.6 - ‘Trading Card Dispenser’ springs & axle

HAPPY NEW YEAR 2020

First post of 2020:
With time off over Christmas I was able to do some work on this project and also R5 upgrades.

3D printing
So in my last post, I had set the printer to print over night and was expecting a completed print on my return to work in the morning.......NOOOOOO it had paused as had run out of filament! Quickly replaced with leftover real and continued printing. Only problem, it was Christmas Eve and we finished early.....so had to work over to collect the print before I could leave for the Christmas break.

Just after Christmas, the new (same size) springs and some different wire diameter springs arrived.

New Springs
The new springs are 0.4mm x 30 long. These are a lot firmer and more ridged than the original ones, which are only 0.3mm wire dia. These won’t be any good for this project as they are too firm. So it will have to be the 0.3mm wire springs.

The next item is the wheel axle is wobbly, so needs a guide axle on the other side. This goes back to one of my original ideas, but this time I’m fitting a metal rod rather than trying to locate with 3D printing.

More 3D Updates
Need to print out a few test pieces before I can test the final parts. A few other slight changes and then it's just some final small additions and this project should be complete....