December 31, 2020

** Happy New Year 2021 **


Happy New Year 2021

Here’s to a New Year...... a fresh start on the road to the World returning to some normality. So here’s to 2021.

Best Wishes to all!

....and keep droid building and also, being creative.

#droidbuildersuk #ukr2d2buildersclub #r5d4 #happynewyear #2021 #jamesr5d4 

Blog hits counter for 2021 starts @ 156587

R4-D4 dome lid modification - part 1

 I know, I know, I’ve not finished the last two mini projects lol, but it helps me be busy whilst awaiting components.

 Been thinking about fitting the Life-form scanner into R4’s dome, as he doesn’t have any special features.

This tho requires that the lid needs an opening hatch/panel. Firstly I was thinking about making a new lid, either out of wood again or 3D printing one, but apart from being time consuming, I just wanted to get it done. Lol :D

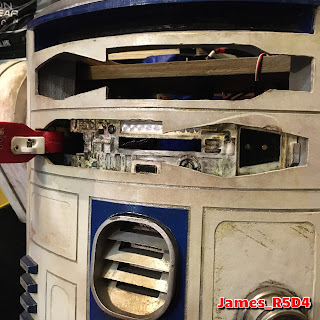
So I’ve roughly marked the underside of the lid to check clearance and it looks like it would fit.

R4-D4 dome lid

Next up is to cut out the red panel.

Not having a dremel anymore, I decided to utilise the drill with the old dremel attachment. This worked out ok lol. It cut through at an angle which actually might help with stopping the new lid from dropping down to far.
R4-D4 lid, opening

Pleased with how it came out. May need to reinforce the underside, but that’s just for my piece of mind. I applied some watered down PVA glue to soak into the cut edges. But they didn’t need much as the top already had a wash before it was painted years ago. So, on to the next stage, hinges.

December 28, 2020

And another mini project begins for 2021

 Not actually droid related, ie in building something. But something I’ve had the idea about for some time.

Going to events & having to transport your equipment can be a handful, so this will hopefully help.

There’s going to be two versions of this which I have started working on today.

As always, more updates coming......

December 26, 2020

Life-form scanner - YouTube video

 Hi all hope you’ve had a good Christmas.

Finished off the short video of the life-form scanner lift setup. It’s still a work in progress but you’ll get the idea and you will be the first to see it. It’s only viewable via this link at the moment lol

Hope you like:

James R5D4 YouTube channel 


December 24, 2020

A Life-form scanner for R5-D4 - Part 8

Final 3D printed parts fitted and everything works as it should. Really pleased with how it runs.

Life-form scanner
Now it’s onto the electrical side of the project. The micro switches need diodes soldered across the contacts. This is so they return the flow of power but switch off the motor. The idea is that the power lift servo is a one button activation:

  • Press button, activates system.
  • Motor lifts LFS, micro switch stops lift at top.
  • Pololu control board activates scanner, set amount.
  • Motor lowers LFS, micro switch stops lift at bottom.

This is the idea......have to see how it works out.

As promised, I’m putting a quick video together of this in action. I’ll post up the link to YouTube once complete.

December 23, 2020

A Life-form scanner for R5-D4 - Part 7

 Fine tuning the design of the lower servo holder & the servo/tube connector.

The new normal sized servo's holes were NOT the same as my previous one, so needed to be slightly moved. I added the slot in the support for the support tube and also added splines for point contact only. Both of these will be getting re-printed again.

The pulley wheel got a new version printed, happy with how it turned out and that it works.....of course it works lol :D

Then this morning Royal Mail pulled their finger out and I received the micro switches, second aluminium tube AND.......

........the Pololu servo control board, from Hobbytronics!

Pololu 6ch servo control board

So after the re-prints, it's onto the electronics, tho I will be looking/designing a holder for the board and the electronics. Thingiverse came up trumps again, case will be printed later. I'll also post up pictures of the full assembly.

December 22, 2020

Wishing you all a Happy Christmas 2020

 Had a surprise Christmas card/gift the other day from fellow Bristol builder Mike B.

Merry Christmas from Mike Berry 2020

Always wanted one of these (below image) and over the years, I have attempted to create one.....but the results where something I wasn’t anywhere near happy with lol. Mike and his design, printing skills, came up with this tho.

Card back of R5, created by Mike Berry

Whatever your beliefs for the Christmas season, I’d like to wish all who are reading this, a very Happy Christmas from myself & of course R5.


Mental Health message:

2020 has not been a good year for all of us, in many different ways and then there’s COVID to top it all off. I like to think of myself as a ‘glass half full’ person and try to always look on the positive side of life. Perspective is always a good thing to keep in mind when things don’t look good, they can and do, get better! Find a little something that makes you smile and feel good, keep these little happy moments and add to them. I find (apart from family/my children) that being creative, designing, making stuff really helps me.

2021 is on its way so a new year, new start and hopefully we can all get back to what we used to call, normal!

If you need to seek more help, see your Dr, there’s NO shame in asking for help!

If you don’t feel you can’t in person, then try contacting CALM, the Charity Against Living Miserably.

*** CALM ***
Click on this link to go to the CALM website.


December 21, 2020

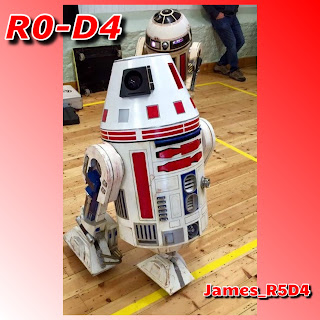
R0-D4 Dome update 2020 (Part 2)

Sprayed up the neck ring with plastic-kote  white paint & left it to dry for a day or so. No pics of this but onto the next colour, Red.

Thankfully I still have the original wood neck ring, so that I could match up the painted stripes.

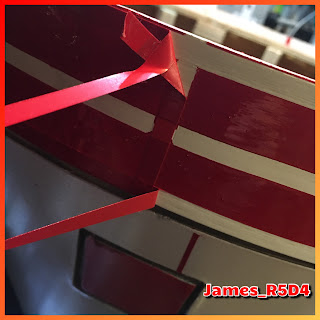
There are four quarters which have thicker vertical bands. These had a stripe of masking tape and the pin strips to prevent paint bleed.

R0-D4’s next ring being masked up

Next came the top and bottom bands, again using the pin stripe tape width, with an additional single thickness vertical line at each centre of the quarters. As can be seen in above picture.

Then the fun bit, spraying with the red metallic’ish paint.

Red paint

Looking good. I left this for about 20mins before starting the messy bit, removing the pin stripe tape.

Tape removal

Removing the tape

I had made sure to corner crease the edges of the over lapping tape, but this isn’t the best way, cutting the tape is. But I didn’t want to damage the paint and it’s not critical. Weathering will cover up and also chipped paint too.

Once all the tape was off, one final picture before being left to fully dry.

R0-D4 red neck paint, waiting to dry


December 20, 2020

R0-D4 Dome update 2020 (part 1)

 This dome has been sat patiently on a shelf waiting for me to finish its dome ring I upgraded a few years ago. Original the ring was wood, but when having to upgrade the dome to the new rockler style bearing, I had to deconstruct the neck ring to be able to get the old bearing surface out.

R0-D4 dome on R5’s body, first of the dome alternatives
Check the link for the beginning of this building process here:

Building R0-D4’s wood dome.

On with the update 2020:

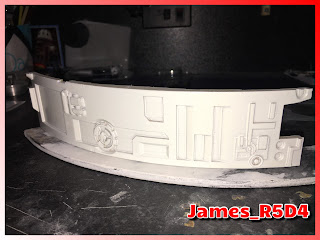
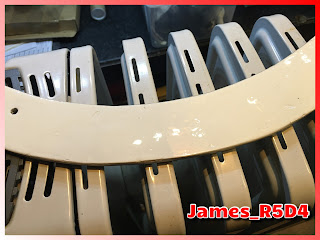
I had glued the 3D printed panels together, but then ‘welded’ them using a soldering iron and extra PLA filament. Melted plastic is a much stronger bond than super glue. Forward to 2020:

I smoothed over the not so perfect joins, before hitting it with filler primer.

R0-D4’s neck ring in orange filler primer

The neck ring is detachable so spraying is easy. A few coats of primer before spraying up red & white.

More updates soon.

Droid Builders UK - Christmas Special show


Droid Builders UK Christmas special show

Sam and Lee hosted the marathon show today, with special guests

  • Sammy Stormtrooper
  • Brian Herring 
  • Jake Lunt
  • video interviews with builders
  • tutorial
  • ......and also the raffle to raise funds for the charity CALM. Plus loads of other stuff.

To re-watch the show, click the following link:

Droid Builders UK YouTube channel.

The aim was to raise £10,000 by the end of the year 2020. It’s not been a good year and for sum it has been so much harder to have to deal with. That’s where CALM comes in.

Droid Builders

We are fundraising for the Campaign Against Living Miserably (CALM)

The Campaign Against Living Miserably (CALM) is leading a movement against suicide, the single biggest killer of men under the age of 45 in the UK.Anyone can hit crisis point. CALM run a free and confidential helpline and webchat 7 hours a day, 7 days a week for anyone who needs to talk about lifes problems.

For full details and also if you would like to donate to the charity, please click on the link, you can leave an anonymous donation if you like and every amount big or small is a step in saving a life.....

JustGiving for CALM

A Life-form scanner for R5-D4 - Part 6

 Design, 3D print, test fit.....& repeat lol.

All the bits fit so far, but I need to fit a second guide rail. I ordered another aluminium tube section to run parallel with the main one. This means more redesigning and printing of 3D parts, which I’ve already done.

The pulley cord arrived and a test of it showed it worked, but I needed to change the way it fixed to the winch wheel drum. I also needed to redesign the main holder and the bottom servo holder bracket. These are on the printer being printed.

For the scanner screen, I drilled some small holes in it and added white covered wire.

Life form scanner - screen with wires

These will be glued in place later. Need to look at LED’s next.

A test of the pulley setup worked well, but the aluminium tube wall may cause problems as it is easily bent. This caused the guides to not run smoothly and the servo connection to the tube, broke. But this is all part of the design process.

December 19, 2020

A Life-form scanner for R5-D4 - Part 5

 Plans and more plans as this build takes shape.

Life-form scanner R5-D4’s version

Had the idea of toothed belts for the lift system, but that wasn’t a simple option, it would require more components. Then I thought about a pulley system. Found a servo that was broken, swapped out its plastic gears for metal ones & removed the signal wire. So it’s just a power motor.

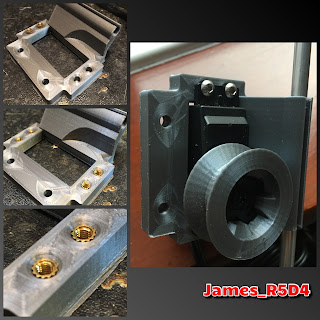
Next up was to design a holder for the servo/winch, that also combined the tube sleeve holder. I kept the slot in the sleeve so that there is some allowance for printing tolerance.

Servo holder

This was a test print, but isn’t far off the finished part. The curved part is for clearance of the winch wheel, this I downloaded off Thingiverse from Tetrix 'large Servo winch' (link). I’ve placed it so that it’s inline with where the bottom location point at the tube end will go.

I’ve left space for mounting this at a future date to the inside of the dome.

......yep, design has been updated, less material where not needed, additional added along with holes for fixing of the servo and for the unit to be attached to the dome insides. Had a thought about how best to connect the servo screws, so went with.....

LFC bracket for servo ‘winch’

........Brass threaded inserts.

I’ve also drawn up and printed a bottom servo holder for rotating the LFC. And I found some wire that could be used for the mast.

Still waiting on the micro switches to arrive, then update no3 will possibly include a location for them to be mounted on with.

Have also ordered some other goodies.

December 18, 2020

Jeremy & Dave - December 2020 RIP

 December 17th 2020, we lost another original member of the Star Wars films. Jeremy Bulloch.

I met both Jeremy & Dave Prowess over the years attending events with R5. Dave Prowess was the first or the two I met at a shop signing/opening ’MOSS’ , back in 2008. Being a fellow Bristolian, it was a must to go and see him. I then saw him whilst attending events at Corsham Sci-Fi.

Jeremy I also first met at a Corsham event in 2010. My young Son was very excited to be able to meet him although i think he may of been expecting to see him in his Mandalorian armour. He wasn’t disappointed tho as someone was there on the day wearing some. Jeremy was very warm and generous with his time when chatting. I met him again a few years later at Collectormania 22, after completing R5 & he was gracious enough to have his picture taken with him.

Jeremy Bulloch in 2014

I feel privileged to have been able to of met them both & that I have signed photos to add to the memories.

December 16, 2020

Utility arm UPPER socket screen (Part 3)

 Test fitting of the panel identified that a few things needed tweaking.

Utility arm socket screen installation

  • The utility arm wouldn’t close properly.
  • The screen was still a bit tight.
So firstly, the utility arm was not closing properly. This I found was down to the pivot pin not having enough clearance below it. It was being restricted by the lower frame panel. Before fitting the socket screens, there was a bit more space. As the pivot pin had left a rub mark on the new paint, I could see where to make a recess with a 10mm diameter drill bit.

Utility arm socket screen installation


Next was the socket screen itself. I had to clean off over spray paint from the top and bottom faces & trim a bit more off the pivot arm end. This was stopping the screen from going back far enough, which was restricting the utility arm from closing fully.

Really pleased with how this is looking. Just need to weather the screen and finally fit it in place.

December 15, 2020

Utility arm UPPER socket screen (Part 2)

Top utility arm socket screen test fitting

Before spaying up the screen white & then getting to work on weathering it.....see below.

The piece of wood that sits between the two utility arms, needed to be thinned down for the screen to fit. My original measurement was for a snug fit, but the print was just a bit higher than expected, so rather than take a blade to the 3D screen print (loosing details) I decided to trim the wood piece. This then needed some wood filler before repainting. It was black and I did respray it matt black again, but am thinking white so it all blends together.....

Utility arm socket screen.

Filler primer added

Top white coat drying off.

Once all dryer I’ll start weathering this piece and the screen before re-installing.

A Life-form scanner for R5-D4 - Part 4

After the test fitting of the servo, I was able to better define what was/wasn’t needed and what changed I needed to make. Some of these were just for aesthetics, others to better suit the servo and positioning of it.

These included:

  • Adding a small slot to one of the front grooves to allow the servo location tab to slot into. Just to add a bit to secure it.
  • Moving the position of the servo further forward towards the centre of the scanner.
  • Simplifying and standardising the design a bit more.
Next up was to design up a coupler for the servo to connect with the aluminium tube that arrived today.
This will use the servo screw to secure it and then the coupler will be a push fit onto the tube.

After printing and test fitting, I had to concede that this servo was actually TO small :D never mind....... onto plan B.

As I know that the servo attachment fitted onto the aluminium tube, I redesigned the outer surfaces and combined them into one file.
R5D4 life-form scanner

I've already got a lift system idea, and have some electrical/electronics to get together. So planning and building work continues.

And the printing has begun...
3D printing the life-form scanner
Hour and a half into the print gets you this far lol, 0.1 layer height.

December 14, 2020

A Life-form scanner for R5-D4 - Part 3

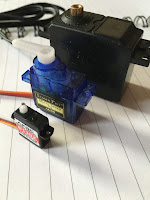
Mini update for this ..... well it’s not a mini servo, it’s a nano servo!

Nano servo

I obviously new it’s dimensions, that’s why I bought it, but was still amazed at its actual size when I opened up the package.

Life-form scanner for R5-D4

I had already printed off a new life-form scanner screen, which will need modifying and I can then make alterations for the final 3D print.

Here’s a comparison picture:

Servo sizes

December 13, 2020

James’ R5-D4 YouTube channel 2020

 Had this congratulations email today from YouTube for all my videos uploaded in 2020 lol......all 12 minutes of them :D . Not exactly ground breaking mind you, and a few million off any YouTube awards lol, but I appreciate everyone who has watched etc and I hope they have been entertaining or educational.

See screenshots below.... then head on over to my channel to contribute to the ‘ups’  & likes and shares, thanks everyone.


My YouTube channel link below:

https://youtube.com/channel/UCVWPGuMi4c6ngsx5xwH0kGg

December 11, 2020

Utility arm UPPER socket screen


As mentioned in previous post, I needed an upper utility arm socket screen. I CAD reversed the 3D files and had to do some height changes, as due to my wood build, the dividing shelf between the two utility arms & the Large Data Port, mean less height than the lower section.

I made a design change to remove the opening for the Trading Card Dispenser, and some other alterations so it differed from the lower screen.

Started the print Sunday afternoon around 3pm (UK time), layer height of 0.4, and it eventually finished Monday morning 9am (UK) lol. 17hrs 39mins.

Forgot supports

I had supports on but only touching build plate.... I think?? So apart from one ‘not seen area’ the print came out great!

First few layers

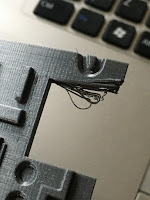
Not sure if bed or extrusion needs adjusting as I get this on the first few layers of the print. Nothing a knife can’t sort but still lol. It was extrusion, wasn’t hot enough for the initial layers.

After cleaning up work, it was time for primer/filler painting. Once dried, a bit more cleaning up before top coat.

A Life-form scanner for R5-D4 - Part 2

 I’ve been looking at ways to lift the life-form scanner. Loads of YouTube videos and info on the forum. Looking to make it as simple as possible tho without arduino‘a etc.

Did find a video made by Mike Senna, where he had a micro servo fitted to the top to give side to side movement of the scanner itself.

With the already restrictive pie hole that R5 has, I knew I needed the smallest servo I could find to fit.

Found and ordered one, just waiting now for it to be delivered. D1302.

D1302 micro servo

So I’ve modified the scanner to be able to fit the servo into it.


The sample aluminium tube came and was a snug fit in the previous servo scanner version. And was a great fit in the two test print guides. Just waiting on additional parts to be able to fully test everything and ideas.


Tevo Tarantula pro upgrade

 So the printer is quite’ish lol, nothing unbearable, but still, if you can make something better, quieter, just makes life better. And if you can’t then hear it upstairs then that’s a defo plus!

Work mate Will & fellow ‘printer’ suggested these as a definite upgrade that works.


They are motor dampers, didn’t need the heat sink to be fitted, but it’s there if I need it. The kit comes with screws & only took about 15mins to add these on.

The noise reduction is definitely noticeable & as an upgrade for your printer, it’s a thumbs up.

December 05, 2020

‘Trading Card Dispenser’ utility arm inside panel 1.4

The rear utility socket screen is 99% complete. Finished off painting it today and fitted (glued) the rear piece in place (not in the picture below).

TCD utility arm socket screen

Next up was re-fitting this into R5’s utility socket......see below picture.

Utility arm socket installed in R5

Need to do a panel now for the top socket.

December 03, 2020

A Life-form scanner for R5-D4 - Part 1

I wanted a periscope or life-form scanner for R5!
[December 2011]

Life-form scanner

December 2020 ......(nine years later)

A life-form scanner, see picture. This was next on my to do list. But I focused on getting his bad motivator working first.

Now that I’m able to 3D print my own things, I decided to return to this project with the intention of making a modular setup in R5’s dome to allow these interchangeable units.

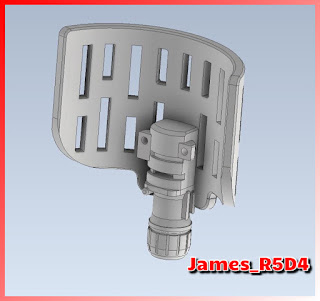
So using the size dimensions of my pie-hole opening, I drew this up.

Lol nothing ground breaking, except it’s size. The plan is a holo tube for electrics, LED’s & a pop up/rotate set up. I went with a slightly different design to that of R2’s to make it distinguishable.
More to follow....

Dome Bag - 2.6 side stitched up. *CONCLUSION*

June 2019
Can’t believe it! Can't understand it either....

I did NOT included the extra thickness of the foam which would increase the circumference and length of the side materia??? Is this what's happened??

Seriously not happy!!! What I can’t figure out is that everything was ok when I originally marked everything out.

So Bag No2. will also not now be 'correct'. Measured the extra needed, marked out on material and cut it out. Next is to hem the edges etc.

Then try to figure out how to attach it to the main piece.

**UPDATE**
JUST TO BRING THIS PROJECT TO A CONCLUSION.

Well, I didn't need to finish this project as thanks to Mike & his contacts, he has been able to procure a much more substantial bag. These come in sizes to best suit your domes, including a bag for your 39.1% droids & are available over on Lee Towersey’s shopping page.

Bag links:
  • suitable for the larger dome R0/R5/R4 & R6: https://artoo-detoo.co.uk/product/padded-bag-for-r0-r5-r6-domes/
  • suitable for the R2, R3, R7, R8 & R9 type dome: https://artoo-detoo.co.uk/product/padded-bag-for-r2-r3-r7-r8-r9-dome/
  • And for the 39.1% droids: https://artoo-detoo.co.uk/product/padded-bag-for-39-1-droid/

I enjoyed attempting to make my own bag and it will still be used for storage of the R4 dome.

November 30, 2020

The Mandalorian - R5D4 Holoprojector - 1.6

 Finished painting up the two half sections.


Liked how the spray came out on this, couldn't of achieved this finish if I'd tried lol. The can was probably cold, it was cold in the garage. Once dry, I scrapped off the indent panel, masked it off and applied blue paint as on the first test piece. I did some light scrapping off of the silver to reveal the matt black underneath, weathering look.

~~~

The changes I had made to the front lens holder, worked a little to well, so that the lens would only partially click into place. Back to the design and changed back a few dimensions and am awaiting a test of a small section to see if these are correct. Then I can hopefully print the final lens holder.

‘Trading Card Dispenser’ utility arm inside panel 1.3

 This was the next item that needed spraying up.

Utility arm socket screen

I bagged the led leads, and applied a small piece of masking tape over the front of the LED. And applied the filler primer. Once dried I sprayed it up white.

Next up is to add detail and weathering.